
This article is part 2 of our GraphQL application protection series. In this article, we will build a GraphQL API server and protect its resources with externalized policies administered in the Cloudentity Authorization SaaS platform. We will also protect the GraphQL API endpoint data with a local policy enforcement/decision point for the app deployed within a local Kubernetes cluster. This approach will also showcase a modern application protection hybrid model with local enforcement and Cloud based authorization and policy administration.
- Part 1: Externalized authorization for GraphQL using the Cloudentity authorization platform
- Part 2: Build a GraphQL server with Node.js and protect with the Cloudentity authorization platform
- Part 3: Build a GraphQL client react application to consume GraphQL server resources protected with the Cloudentity authorization platform
Overview
We will build the GraphQL API server with express-graphql and lokijs as a built-in database. Our application would be a tweet service that serves and consumes data exposed through APIs as per GraphQL specification. Once we build the application, we will deploy it to a local kubernetes cluster using kind and enforce centralized and decoupled policy based authorization without modifying any business logic or code.
You can checkout this entire demo application and related integration source here
Build the GraphQL server application
Pre-requisites
Following tools are required to build this application. nodejs was picked for its simplicity to build apps.
SKIP/JUMP LEVEL
In case you are not interested in building the application from scratch, you can skip some of the steps below and instead checkout/clone the github repo to get the application source code
git clone git@github.com:cloudentity/ce-samples-graphql-demo.gitand follow instructions to continue with the Build and Deploy Section
Initialize a Node.js project.
mkdir tweet-service-graphql-nodejs <span className="pl-k">&&</span> <span className="pl-c1">cd</span> tweet-service-graphql-nodejs
npm init
Click enter with no input for all prompts during npm init and finally type yes for the OK prompt. This will create a package.json for the project that will eventually hold dependencies and other execution script commands.
Add a start command to scripts section in package.json to start the app quickly, e.g.:
{
<span className="pl-ii">..</span>
<span className="pl-ent">"scripts"</span>: {
<span className="pl-ent">"test"</span>: <span className="pl-s"><span className="pl-pds">"</span>echo <span className="pl-cce">"</span>Error: no test specified<span className="pl-cce">"</span> && exit 1<span className="pl-pds">"</span></span>,
<span className="pl-ent">"start"</span>: <span className="pl-s"><span className="pl-pds">"</span>node index.js<span className="pl-pds">"</span></span>
},
<span className="pl-ii">..</span>
}
We will use express npm module for http handling, so let's install the dependency as well.
npm install --save express
Add http routers and listeners
Create a file named index.js and add basic router and listeners.
var express = require('express'); var app = express(); app.get('/', function(req, res) { res.send("We are building a tweet service!") }); app.get('/health', function(req, res) { res.send('Service is alive and healthy') }); app.listen(5001); console.log("Server listening at http://localhost:5001/");
Run the app
npm start
This will start and serve the Node.js app listener, and the endpoints below should be serving traffic:
Now that we have the basic structure in place, let's continue to add some GraphQL specific features to the Node.js application.
Add GraphQL capabilities
To add GraphQL API compliant endpoint within the Node.js server application, we will use the express-graphql npm package. Let's install the dependencies and attach a listener endpoint for graphQL.
npm install --save graphql@15.3.0 express-graphql@0.12.0
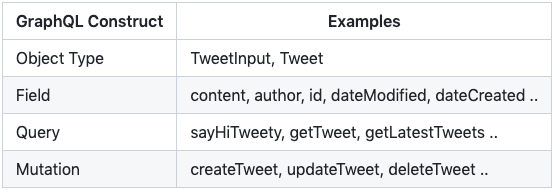
GraphQL SDL allows defintion of the GraphQL schema using various constructs as defined in the GraphQL specification. Let's build a schema that has a mixed flavor of basic object types, fields, query and mutations.
\In the schema, we will add a mix of GraphQL constructs and later in the article we will explore how to attach externalized authorization policies to each of these GraphQL constructs.
Add below schema specification to index.js
// graphql package import var { graphqlHTTP } = require('express-graphql'); var { buildSchema } = require('graphql'); // graphql schema definition var schema = buildSchema( ` input TweetInput { content: String author: String } type Tweet { id: String content: String dateCreated: String dateModified: String author: String } type Query { sayHiTweety: String getTweet(id: String!) : Tweet getLatestTweets : [Tweet] } type Mutation { createTweet(tweet: TweetInput): Tweet updateTweet(id: String!, tweet: TweetInput): Tweet deleteTweet(id: String!): String }` );
- Add implementation & listener for a GraphQL query
Let's add a simple resolver implementation for the first query sayHiTweety. We will expand to other query and mutation implementations later in the article. In contrast to REST, GrpahQL is designed to be a single endpoint API system. So all the queries and mutations will be served over this single enpoint at /graphql. The url name can be anything, graphql is just used for convenience.
<span className="pl-k">var</span> <span className="pl-s1">resolverRoot</span> <span className="pl-c1">=</span> <span className="pl-kos">{</span>
<span className="pl-en">sayHiTweety</span>: <span className="pl-kos">(</span><span className="pl-kos">)</span> <span className="pl-c1">=></span> <span className="pl-kos">{</span>
<span className="pl-k">return</span> <span className="pl-s">'Hello Tweety'</span><span className="pl-kos">;</span>
<span className="pl-kos">}</span>
<span className="pl-kos">}</span><span className="pl-kos">;</span>
<span className="pl-s1">app</span><span className="pl-kos">.</span><span className="pl-en">use</span><span className="pl-kos">(</span><span className="pl-s">'/graphql'</span><span className="pl-kos">,</span> <span className="pl-en">graphqlHTTP</span><span className="pl-kos">(</span>
<span className="pl-kos">{</span>
<span className="pl-c1">schema</span>: <span className="pl-s1">schema</span><span className="pl-kos">,</span>
<span className="pl-c1">rootValue</span>: <span className="pl-s1">resolverRoot</span><span className="pl-kos">,</span>
<span className="pl-c1">graphiql</span>: <span className="pl-c1">true</span>
<span className="pl-kos">}</span>
<span className="pl-kos">)</span><span className="pl-kos">)</span><span className="pl-kos">;
</span>
- Verify GraphQL API operations
Start the application using npm start and launch the graphQL endpoint at http://localhost:5001/graphql. Since the graphiql flag is set to true, we will see an interactive query screen and schema explorer as response.
NOTE
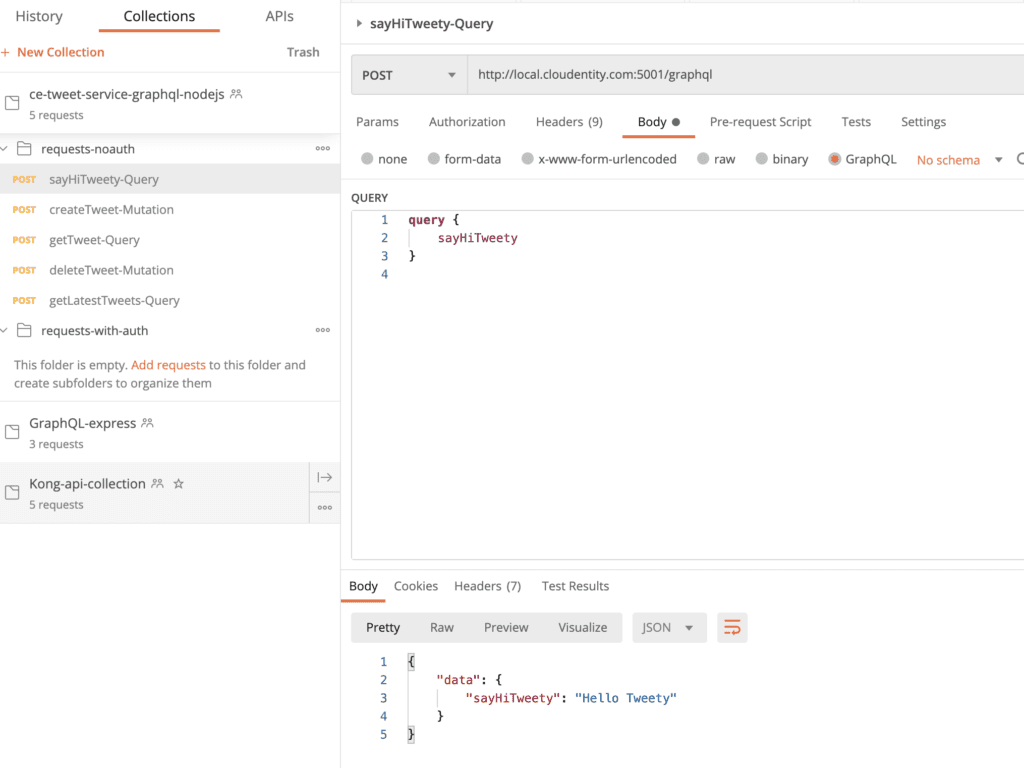
We will not be using above interface but usage of Postman app for further verification of GraphQL APIs is recommended.
Download Postman app, in case you don't have it already, and then import the Cloudentity GraphQL tweet service demo postman collection onto Postman.
- Execute GraphQL
sayHiTweetyquery
Navigate to the imported postman collection under request-noauth folder and run the sayHiTweety-Query GraphQL API request. It should respond with the response attached below.
Let's add a simple in-memory datastore to store the tweets and then add some mutations and queries to act on those objects. We will not dive into the specifics or add any complex business logic. Our main goal is to showcase externalized authorization policy administration and enforcement for the various GraphQL objects, fields, queries and mutations etc at runtime.
- Install dependencies
npm install --save uuid lokijs
- Add implementation for GraphQL query and mutation
<span className="pl-c">//imports</span>
<span className="pl-k">var</span> <span className="pl-s1">loki</span> <span className="pl-c1">=</span> <span className="pl-en">require</span><span className="pl-kos">(</span><span className="pl-s">'lokijs'</span><span className="pl-kos">)</span><span className="pl-kos">;</span>
<span className="pl-k">const</span> <span className="pl-kos">{</span><span className="pl-c1">v4</span>: <span className="pl-s1">uuidv4</span><span className="pl-kos">}</span> <span className="pl-c1">=</span> <span className="pl-en">require</span><span className="pl-kos">(</span><span className="pl-s">'uuid'</span><span className="pl-kos">)</span><span className="pl-kos">;</span>
<span className="pl-c">//logic</span>
<span className="pl-k">var</span> <span className="pl-s1">db</span> <span className="pl-c1">=</span> <span className="pl-k">new</span> <span className="pl-s1">loki</span><span className="pl-kos">(</span><span className="pl-s">'tweets.db'</span><span className="pl-kos">)</span><span className="pl-kos">;</span>
<span className="pl-k">var</span> <span className="pl-s1">tweets</span> <span className="pl-c1">=</span> <span className="pl-s1">db</span><span className="pl-kos">.</span><span className="pl-en">addCollection</span><span className="pl-kos">(</span><span className="pl-s">'tweets'</span><span className="pl-kos">)</span><span className="pl-kos">;</span>
<span className="pl-k">const</span> <span className="pl-en">getTweet</span> <span className="pl-c1">=</span> <span className="pl-kos">(</span><span className="pl-s1">tid</span><span className="pl-kos">)</span> <span className="pl-c1">=></span> <span className="pl-kos">{</span>
<span className="pl-smi">console</span><span className="pl-kos">.</span><span className="pl-en">log</span><span className="pl-kos">(</span><span className="pl-s">"Fetching record.."</span><span className="pl-kos">)</span><span className="pl-kos">;</span>
<span className="pl-k">var</span> <span className="pl-s1">results</span> <span className="pl-c1">=</span> <span className="pl-s1">tweets</span><span className="pl-kos">.</span><span className="pl-en">find</span><span className="pl-kos">(</span><span className="pl-kos">{</span><span className="pl-c1">id</span>: <span className="pl-s1">tid</span><span className="pl-kos">.</span><span className="pl-c1">id</span><span className="pl-kos">}</span><span className="pl-kos">)</span><span className="pl-kos">;</span>
<span className="pl-k">var</span> <span className="pl-s1">res</span> <span className="pl-c1">=</span> <span className="pl-s1">results</span><span className="pl-kos">.</span><span className="pl-c1">length</span> <span className="pl-c1">></span> <span className="pl-c1">0</span> ? <span className="pl-s1">results</span><span className="pl-kos">[</span><span className="pl-c1">0</span><span className="pl-kos">]</span> : <span className="pl-c1">null</span>
<span className="pl-k">return</span> <span className="pl-s1">res</span><span className="pl-kos">;</span>
<span className="pl-kos">}</span>
<span className="pl-k">const</span> <span className="pl-en">storeTweet</span> <span className="pl-c1">=</span> <span className="pl-kos">(</span><span className="pl-s1">t</span><span className="pl-kos">)</span> <span className="pl-c1">=></span> <span className="pl-kos">{</span>
<span className="pl-s1">tweets</span><span className="pl-kos">.</span><span className="pl-en">insert</span><span className="pl-kos">(</span>
<span className="pl-kos">{</span>
<span className="pl-c1">id</span>: <span className="pl-s1">t</span><span className="pl-kos">.</span><span className="pl-c1">id</span><span className="pl-kos">,</span>
<span className="pl-c1">content</span>: <span className="pl-s1">t</span><span className="pl-kos">.</span><span className="pl-c1">content</span><span className="pl-kos">,</span>
<span className="pl-c1">author</span>: <span className="pl-s1">t</span><span className="pl-kos">.</span><span className="pl-c1">author</span><span className="pl-kos">,</span>
<span className="pl-c1">dateCreated</span>: <span className="pl-s1">t</span><span className="pl-kos">.</span><span className="pl-c1">dateCreated</span>
<span className="pl-kos">}</span>
<span className="pl-kos">)</span><span className="pl-kos">;</span>
<span className="pl-smi">console</span><span className="pl-kos">.</span><span className="pl-en">log</span><span className="pl-kos">(</span><span className="pl-s1">tweets</span><span className="pl-kos">)</span><span className="pl-kos">;</span>
<span className="pl-k">return</span> <span className="pl-s1">t</span><span className="pl-kos">;</span>
<span className="pl-kos">}</span>
<span className="pl-k">function</span> <span className="pl-v">Tweet</span><span className="pl-kos">(</span><span className="pl-s1">input</span><span className="pl-kos">)</span> <span className="pl-kos">{</span>
<span className="pl-smi">this</span><span className="pl-kos">.</span><span className="pl-c1">id</span> <span className="pl-c1">=</span> <span className="pl-s1">uuidv4</span><span className="pl-kos">(</span><span className="pl-kos">)</span><span className="pl-kos">;</span>
<span className="pl-smi">this</span><span className="pl-kos">.</span><span className="pl-c1">content</span> <span className="pl-c1">=</span> <span className="pl-s1">input</span><span className="pl-kos">.</span><span className="pl-c1">tweet</span><span className="pl-kos">.</span><span className="pl-c1">content</span><span className="pl-kos">;</span>
<span className="pl-smi">this</span><span className="pl-kos">.</span><span className="pl-c1">author</span> <span className="pl-c1">=</span> <span className="pl-s1">input</span><span className="pl-kos">.</span><span className="pl-c1">tweet</span><span className="pl-kos">.</span><span className="pl-c1">author</span><span className="pl-kos">;</span>
<span className="pl-smi">this</span><span className="pl-kos">.</span><span className="pl-c1">dateCreated</span> <span className="pl-c1">=</span> <span className="pl-k">new</span> <span className="pl-v">Date</span><span className="pl-kos">(</span><span className="pl-kos">)</span><span className="pl-kos">.</span><span className="pl-en">toLocaleString</span><span className="pl-kos">(</span><span className="pl-kos">)</span><span className="pl-kos">;</span>
<span className="pl-smi">this</span><span className="pl-kos">.</span><span className="pl-c1">dateModified</span> <span className="pl-c1">=</span> <span className="pl-k">new</span> <span className="pl-v">Date</span><span className="pl-kos">(</span><span className="pl-kos">)</span><span className="pl-kos">.</span><span className="pl-en">toLocaleString</span><span className="pl-kos">(</span><span className="pl-kos">)</span><span className="pl-kos">;</span>
<span className="pl-kos">}</span>
<span className="pl-k">var</span> <span className="pl-s1">resolverRoot</span> <span className="pl-c1">=</span> <span className="pl-kos">{</span>
<span className="pl-en">sayHiTweety</span>: <span className="pl-kos">(</span><span className="pl-kos">)</span> <span className="pl-c1">=></span> <span className="pl-kos">{</span>
<span className="pl-k">return</span> <span className="pl-s">'Hello Tweety'</span><span className="pl-kos">;</span>
<span className="pl-kos">}</span><span className="pl-kos">,</span>
<span className="pl-en">getTweet</span>: <span className="pl-kos">(</span><span className="pl-s1">tid</span><span className="pl-kos">)</span> <span className="pl-c1">=></span> <span className="pl-kos">{</span>
<span className="pl-smi">console</span><span className="pl-kos">.</span><span className="pl-en">log</span><span className="pl-kos">(</span><span className="pl-s">"Fetching tweet using id: "</span> <span className="pl-c1">+</span> <span className="pl-v">Object</span><span className="pl-kos">.</span><span className="pl-en">values</span><span className="pl-kos">(</span><span className="pl-s1">tid</span><span className="pl-kos">)</span><span className="pl-kos">)</span><span className="pl-kos">;</span>
<span className="pl-k">return</span> <span className="pl-en">getTweet</span><span className="pl-kos">(</span><span className="pl-s1">tid</span><span className="pl-kos">)</span><span className="pl-kos">;</span>
<span className="pl-kos">}</span><span className="pl-kos">,</span>
<span className="pl-en">createTweet</span>: <span className="pl-kos">(</span><span className="pl-s1">input</span><span className="pl-kos">)</span> <span className="pl-c1">=></span> <span className="pl-kos">{</span>
<span className="pl-smi">console</span><span className="pl-kos">.</span><span className="pl-en">log</span><span className="pl-kos">(</span><span className="pl-s">"Creating a new tweet..."</span><span className="pl-kos">)</span><span className="pl-kos">;</span>
<span className="pl-k">const</span> <span className="pl-s1">newTweet</span> <span className="pl-c1">=</span> <span className="pl-k">new</span> <span className="pl-v">Tweet</span><span className="pl-kos">(</span><span className="pl-s1">input</span><span className="pl-kos">)</span><span className="pl-kos">;</span>
<span className="pl-en">storeTweet</span><span className="pl-kos">(</span><span className="pl-s1">newTweet</span><span className="pl-kos">)</span><span className="pl-kos">;</span>
<span className="pl-k">return</span> <span className="pl-s1">newTweet</span><span className="pl-kos">;</span>
<span className="pl-kos">}</span><span className="pl-kos">,</span>
<span className="pl-en">getLatestTweets</span>: <span className="pl-kos">(</span><span className="pl-kos">)</span> <span className="pl-c1">=></span> <span className="pl-kos">{</span>
<span className="pl-smi">console</span><span className="pl-kos">.</span><span className="pl-en">log</span><span className="pl-kos">(</span><span className="pl-s">"Fetching records.."</span><span className="pl-kos">)</span><span className="pl-kos">;</span>
<span className="pl-k">var</span> <span className="pl-s1">tweets</span> <span className="pl-c1">=</span> <span className="pl-s1">db</span><span className="pl-kos">.</span><span className="pl-en">getCollection</span><span className="pl-kos">(</span><span className="pl-s">'tweets'</span><span className="pl-kos">)</span><span className="pl-kos">;</span>
<span className="pl-k">var</span> <span className="pl-s1">all</span> <span className="pl-c1">=</span> <span className="pl-s1">tweets</span><span className="pl-kos">.</span><span className="pl-en">find</span><span className="pl-kos">(</span><span className="pl-kos">{</span> <span className="pl-s">'id'</span>: <span className="pl-kos">{</span> <span className="pl-s">'$ne'</span>: <span className="pl-c1">null</span> <span className="pl-kos">}</span> <span className="pl-kos">}</span><span className="pl-kos">)</span><span className="pl-kos">;</span>
<span className="pl-k">return</span> <span className="pl-s1">all</span><span className="pl-kos">;</span>
<span className="pl-kos">}</span><span className="pl-kos">,</span>
<span className="pl-en">deleteTweet</span>: <span className="pl-kos">(</span><span className="pl-s1">tid</span><span className="pl-kos">)</span> <span className="pl-c1">=></span> <span className="pl-kos">{</span>
<span className="pl-smi">console</span><span className="pl-kos">.</span><span className="pl-en">log</span><span className="pl-kos">(</span><span className="pl-s">"Deleting tweet.."</span><span className="pl-kos">)</span><span className="pl-kos">;</span>
<span className="pl-k">var</span> <span className="pl-s1">tweets</span> <span className="pl-c1">=</span> <span className="pl-s1">db</span><span className="pl-kos">.</span><span className="pl-en">getCollection</span><span className="pl-kos">(</span><span className="pl-s">'tweets'</span><span className="pl-kos">)</span><span className="pl-kos">;</span>
<span className="pl-s1">tweets</span><span className="pl-kos">.</span><span className="pl-en">findAndRemove</span><span className="pl-kos">(</span><span className="pl-kos">{</span><span className="pl-c1">id</span>: <span className="pl-s1">tid</span><span className="pl-kos">.</span><span className="pl-c1">id</span><span className="pl-kos">}</span><span className="pl-kos">)</span><span className="pl-kos">;</span>
<span className="pl-k">return</span> <span className="pl-s1">tid</span><span className="pl-kos">.</span><span className="pl-c1">id</span><span className="pl-kos">;</span>
<span className="pl-kos">}</span><span className="pl-kos">,</span>
<span className="pl-kos">}</span><span className="pl-kos">;</span>
- Verify all GraphQL API operations
Navigate to the imported collection in Postman and run rest of the GraphQL endpoints. These should now return responses similar to below attached samples. At this point the GraphQL API application is completely unprotected and data can be requested or posted without authorization.

Deploy and Run GraphQL API workload in Kubernetes cluster
Let's deploy the GraphQL API onto a local Kubernetes cluster to enforce externalized authorization policies with the Cloudentity authorization platform without any modification to the application code.
NOTE
We will be referencing make commands in below sections. There is a Makefile in the project folder and the contents can be inspected for the actual commands that are orchestrated by the make target
Pre-requisitesLocal Kubernetes cluster can be deployed using any tool of your choice, but we will use kind in this article.
SKIP/JUMP LEVEL
In case you want to skip some of the deployment detailed steps and want to move to next logical step with a shortcut, use
make all
This will deploy all resources and you can jump to the Protect using Cloudentity authorization platform
Build the docker image
First get a copy of the Makefile and Dockerfile
wget https://raw.githubusercontent.com/cloudentity/ce-samples-graphql-demo/blob/master/tweet-service-graphql-nodejs/Makefile
wget https://raw.githubusercontent.com/ce-samples-graphql-demo/blob/master/tweet-service-graphql-nodejs/Dockerfile
Now let's build the docker image for GraphQL API using
make build-image
Launch the Kubernetes cluster
We will go ahead and create a Kubernetes cluster using kind. The below cluster config will be used to create the cluster and within the config, a NodePort is configured to enable accessibility at port 5001 from outside of the cluster since we do not have an actual load balancer.
<span className="pl-ent">kind</span>: <span className="pl-s">Cluster</span>
<span className="pl-ent">apiVersion</span>: <span className="pl-s">kind.x-k8s.io/v1alpha4</span>
<span className="pl-ent">nodes</span>:
- <span className="pl-ent">role</span>: <span className="pl-s">control-plane</span>
  <span className="pl-ent">extraPortMappings</span>:
  - <span className="pl-ent">containerPort</span>: <span className="pl-c1">31234</span>
    <span className="pl-ent">hostPort</span>: <span className="pl-c1">5001</span>
    <span className="pl-ent">protocol</span>: <span className="pl-s">TCP</span>
Get a copy of k8s-cluster-config.yaml
wget https://raw.githubusercontent.com/cloudentity/ce-samples-graphql-demo/master/tweet-service-graphql-nodejs/k8s-cluster-config.yaml
Create the kind cluster using:
make deploy-cluster
Deploy GraphQL app on the Kubernetes cluster
We will use helm to define and deploy all the Kubernetes resources required for the application. We will not be going into the helm details, so copy the existing helm templates into our working directory from https://github.com/cloudentity/ce-samples-graphql-demo/tree/master/tweet-service-graphql-nodejs/helm-chart
Using the below make command, we will upload the image to kind cluster, create a Kubernetes namespace and deploy the GraphQL app.
make deploy-app-graph-ns
The above make target will launch all the pods and services to run the GraphQL app. The status of the pods and services can be fetched using:
kubectl get pods -n svc-apps-graph-ns

kubectl get services -n svc-apps-graph-ns
Service readiness
Let's exec into the pod container to see if the service is reachable (note the ID appended to the name of the pod after running kubectl get pods -n svc-apps-graph-ns and replace it in the command below)
kubectl <span className="pl-c1">exec</span> -it <span className="pl-k"><</span>pod-name<span className="pl-k">></span> -n svc-apps-graph-ns -- /bin/sh
and run
curl --location --request POST <span className="pl-s"><span className="pl-pds">'</span>http://local.cloudentity.com:5001/graphql<span className="pl-pds">'</span></span> --header <span className="pl-s"><span className="pl-pds">'</span>Content-Type: application/json<span className="pl-pds">'</span></span> --data-raw <span className="pl-s"><span className="pl-pds">'</span>{"query":"query {
    sayHiTweety
}
","variables":{}}<span className="pl-pds">'</span></span>
{
    <span className="pl-ent">"data"</span>: {
        <span className="pl-ent">"sayHiTweety"</span>: <span className="pl-s"><span className="pl-pds">"</span>Hello Tweety<span className="pl-pds">"</span></span>
    }
}
NETWORK ACCESS
The components deployed on the Kubernetes cluster are not exposed outside the Kubernetes cluster. External access to individual services can be provided by creating an external load balancer or node port on each service. An Ingress Gateway resource can be created to allow external requests through the Istio Ingress Gateway to the backing services.
Deploy Istio
To allow external service access, let's install Istio onto this cluster. We will use the helm based install mechanism for installing istio We have condensed all required steps under the make target, which updates the helm repo and installs istiod under istio-system namespace.
make deploy-istio
Check the status of the pods:
kubectl get pods -n istio-system
and once the pod is healthy, let's add an Istio Ingress Gateway to expose the traffic outside the cluster.
Expose the Service externally with Istio Ingress GatewayLet's install the Istio Ingress Gateway and configure a Virtual Service for routing to the GraphQL service in the svc-apps-graph-ns namespace. Let's first copy some configs that will be used for the below steps from the gitub repo:
mkdir istio-configs
wget -P istio-configs https://raw.githubusercontent.com/cloudentity/ce-samples-graphql-demo/master/tweet-service-graphql-nodejs/istio-configs/istio-helm-config-override.yaml
wget -P istio-configs https://raw.githubusercontent.com/cloudentity/ce-samples-graphql-demo/master/tweet-service-graphql-nodejs/istio-configs/istio-ingress-gateway-graphql.yaml
wget -P istio-configs https://raw.githubusercontent.com/cloudentity/ce-samples-graphql-demo/master/tweet-service-graphql-nodejs/istio-configs/istio-ingress-virtual-service.yaml
wget -P istio-configs https://raw.githubusercontent.com/cloudentity/ce-samples-graphql-demo/master/tweet-service-graphql-nodejs/istio-configs/istio-mp-authorizer-policy.yaml
using:
make deploy-istio-gateway
You can confirm if the gateway and virtual service is created and running using
kubectl get gateways -A
kubectl get virtualservices -A
Now, let's check to see if we can access the service from outside the cluster
curl --location --request POST <span className="pl-s"><span className="pl-pds">'</span>http://localhost:5001/graphql<span className="pl-pds">'</span></span> --header <span className="pl-s"><span className="pl-pds">'</span>Host: local.cloudentity.com<span className="pl-pds">'</span></span> --header <span className="pl-s"><span className="pl-pds">'</span>Content-Type: application/json<span className="pl-pds">'</span></span> --data-raw <span className="pl-s"><span className="pl-pds">'</span>{"query":"query {
    sayHiTweety
}
","variables":{}}<span className="pl-pds">'</span></span>
OR
curl --location --request POST <span className="pl-s"><span className="pl-pds">'</span>http://local.cloudentity.com:5001/graphql<span className="pl-pds">'</span></span> --header <span className="pl-s"><span className="pl-pds">'</span>Content-Type: application/json<span className="pl-pds">'</span></span> --data-raw <span className="pl-s"><span className="pl-pds">'</span>{"query":"query {
    sayHiTweety
}
","variables":{}}<span className="pl-pds">'</span></span>
Notice that the either the Host header needs to be passed in or the domain needs to have a matching name of local.cloudentity.com as it's defined in the iStio Virtual Service routing rule.Expected output.
{
    <span className="pl-ent">"data"</span>: {
        <span className="pl-ent">"sayHiTweety"</span>: <span className="pl-s"><span className="pl-pds">"</span>Hello Tweety<span className="pl-pds">"</span></span>
    }
}
Voila! Now the services should be accessible from outside the cluster. Now that we have a production-like Kubernetes deployment serving GraphQL operations from the platform, let's dive into protecting the application using externalized authorization policies using the Cloudentity platform without altering the application code at all.
Authorization Policy administration in Cloudentity authorization platform
- Sign up for a free Cloudentity Authorization SaaS account
- Activate the tenant and take the self guided tour to familiarize with the platform
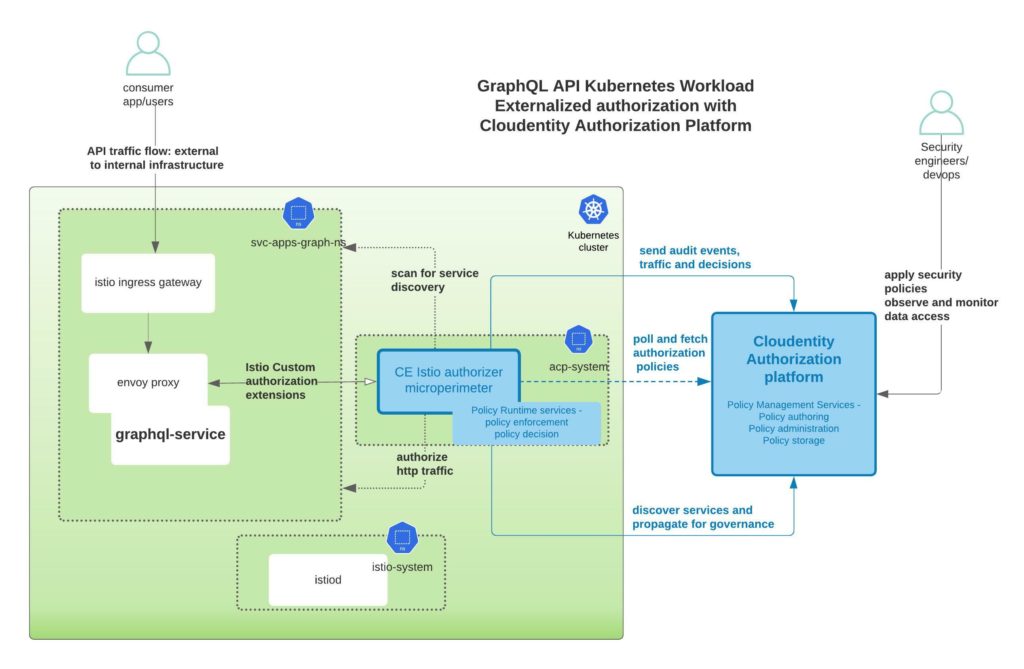
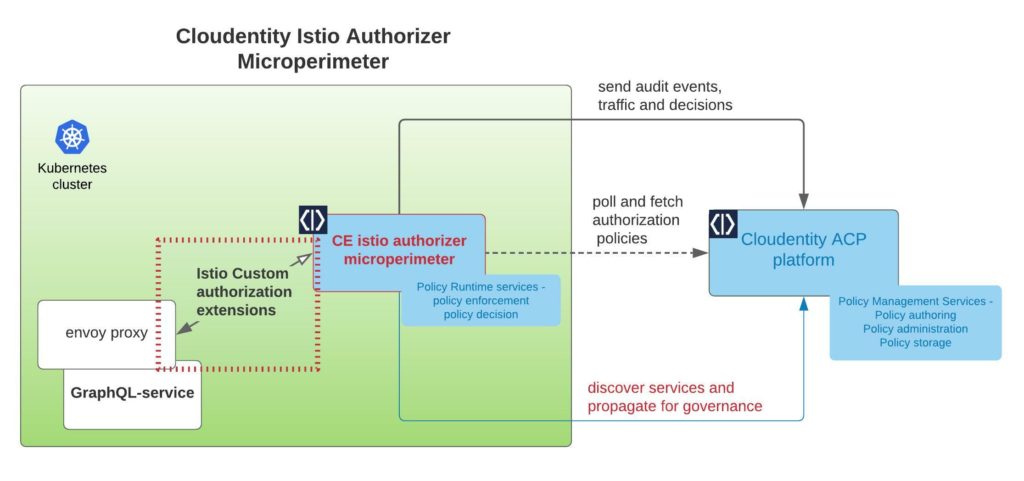
Now that you have the Cloudentity platform available, let's connect all the pieces together as shown below
Annotate services for service auto discovery
Cloudentity micropermeter authorizers can self discover API endpoints if annotated properly in a Kubernetes cluster. More details on discovery is detailed in auto discovery of services on Istio.
For example, in the helm chart, we have annotated the services so that final deployment resource file has the annotations. services.k8s.cloudentity.com/spec-url annotation enables this GraphQL schema to be read by Cloudentity Istio authorizers deployed onto a cluster and then propagated to the Cloudentity Authorization Plaform can then govern and attach declarative policies on the GraphQL schema itself.
NOTE
The GraphQL schema URL can be served by the GraphQL API resource server itself or hosted in separate accessible location. We are using an external URL only for demonstration purpose.
<span className="pl-ent">apiVersion</span>: <span className="pl-s">apps/v1</span>
<span className="pl-ent">kind</span>: <span className="pl-s">Deployment</span>
<span className="pl-ent">metadata</span>:
  <span className="pl-ent">name</span>: <span className="pl-s">{{ include "tweet-service-graphql-nodejs.fullname" . }}</span>
  <span className="pl-ent">labels</span>:
    <span className="pl-s">{{- include "tweet-service-graphql-nodejs.labels" . | nindent 4 }}</span>
  <span className="pl-ent">annotations</span>:
    <span className="pl-ent">services.k8s.cloudentity.com/spec-url</span>: <span className="pl-s"><span className="pl-pds">"</span>https://raw.githubusercontent.com/cloudentity/random-bin/master/graphql/tweet-svc-schema<span className="pl-pds">"</span></span>
    <span className="pl-ent">services.k8s.cloudentity.com/graphql-path</span>: <span className="pl-s"><span className="pl-pds">"</span>/graphql<span className="pl-pds">"</span></span>
In case you want to change the annotation, you can update the url in the helm template and do the following
helm uninstall svc-apps-graphql -n svc-apps-graph-ns
helm install svc-apps-graphql helm-chart/tweet-service-graphql-nodejs -n svc-apps-graph-ns
Deploy Cloudentity Istio authorizer to the Kubernetes cluster
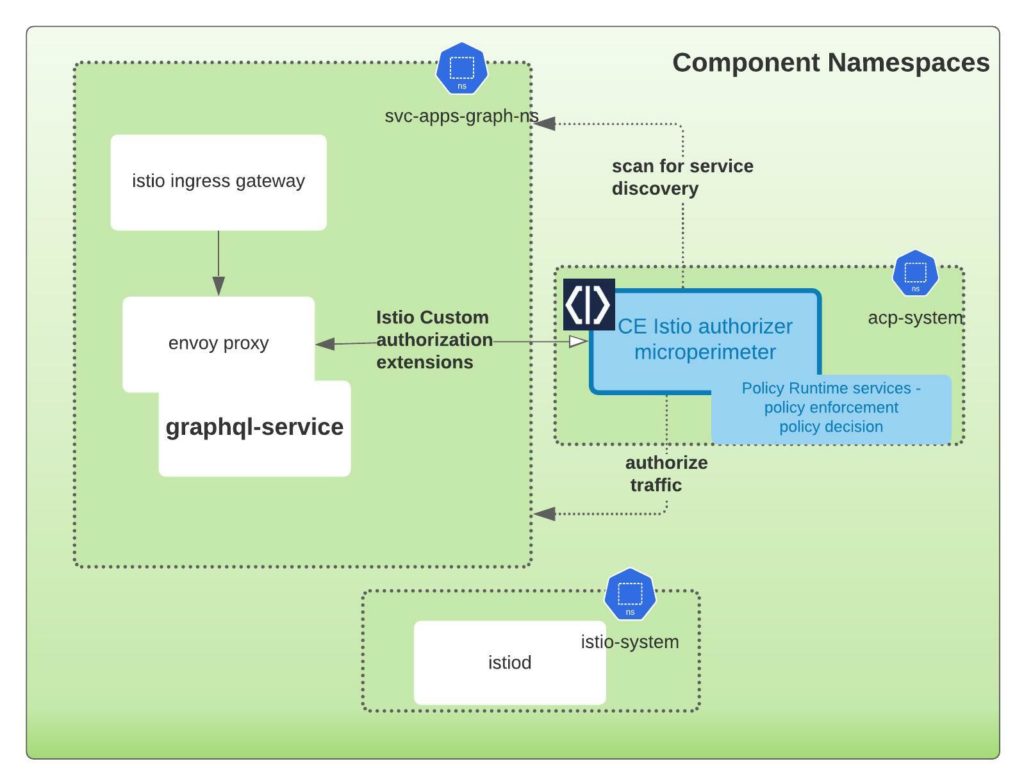
In this step, we will install and configure the Cloudentity Istio authorizer to act as the Policy Decision Point(PDP). The scope of responsibility of this component is to act as the local policy decision point within the Kubernetes cluster. This component is also responsible to pull down all the applicable authorization policies authored and managed within the Cloudentity authorization platform. In the below image, the highlighted section in the box is the component that we will download and install onto a local Kubernetes cluster.
Detailed Istio setup concepts and instruction are available here, in a nutshell the steps are:
- Navigate to the Cloudentity authorization platform admin console
- Go to
Enforcement >> Authorizers, click on "Create Gateway," and create a new Istio authorizer. Select "Create and bind services automatically". Technically, this means we will register this discovered service as anOAuth resource serverwithin the Cloudentity platform. - Install the
istio-authorizerin target Kubernetes using thehelmcommands provided in the "Quickstart" installation instructions Step 1 (make sure to select the visibility icon to make the secrets visible before copying the commands). You will also need to edit thehelm upgradecommand to add the namespacesvc-apps-graph-nsto the list of discovery namespaces, as shown below:
<code>helm upgrade --install istio-authorizer acp/istio-authorizer ...
  --set "discovery.namespaces={default,svc-apps-graph-ns}"...
</code>
NOTE
Cloudentity Istio authorizer will be deployed to its own name space (in this case acp-istio-authorizer). The authorizers can be deployed to any namespace based on the deployment architecture. The namespaces chosen in this article are for demonstration purpose only.
What happens with the given helm command?
- The above command will create a new
acp-istio-authorizernamespace - deploy the
istio-authorizerunder that namespace - Configures the target namespaces the authorizer should scan for service discovery and traffic enforcement
- Creates a request body parser Envoy filter resource for the service pod in the target namespaces (if configured)
- Creates the Cloudentity authorization policy resource as an Istio external authorization policy. External authorization policies are "CUSTOM" actions and will be evaluated first in the Istio authorization policy authorizer.
You can modify the command to include an override in the values file
<code>parseBody:
  enabled: true
</code>
<code>helm upgrade --install istio-authorizer acp/istio-authorizer   -f overide-values.yaml
  ..
  ..
</code>
NOTE If you don't apply the above request parser sidecar, you will get this error
{
<code>"errors": [
    {
        "message": "failed to parse json: unexpected end of JSON input"
    }
]
</code>
}
Step 2: attach external authorization to Istio
Cloudentity Istio authorizer is designed to be a native Istio extension that uses Istio External authorizer model. Following the Step 2 instructions under the "Quickstart" tab, add extensionProviders under mesh section to indicate that acp-authorizer will be an external authz provider.
kubectl get pods -n acp-istio-authorizer

<Img src="news/healthy-istio-authorizer.png" />
IMPORTANTWe have seen issues with this step if there is network traffic restrictions between the local workstations and the external Cloudentity platform due to internal firewalls, etc. Make sure the traffic path is allowed in case you see the pod status as not healthy.
Restart the service pods
Since we are using automatic Istio injection, we need to recreate the pod so that envoy-proxy is injected into the service namespaces
<code>kubectl rollout restart deployment/svc-apps-graphql-tweet-service-graphql-nodejs -n svc-apps-graph-ns
</code>
After this step we should see the APIs auto discovered by the Cloudentity authorizer and propagated back up to the the Cloudentity Authorization SaaS platform. Let's check it out in the Cloudentity authorization platform.
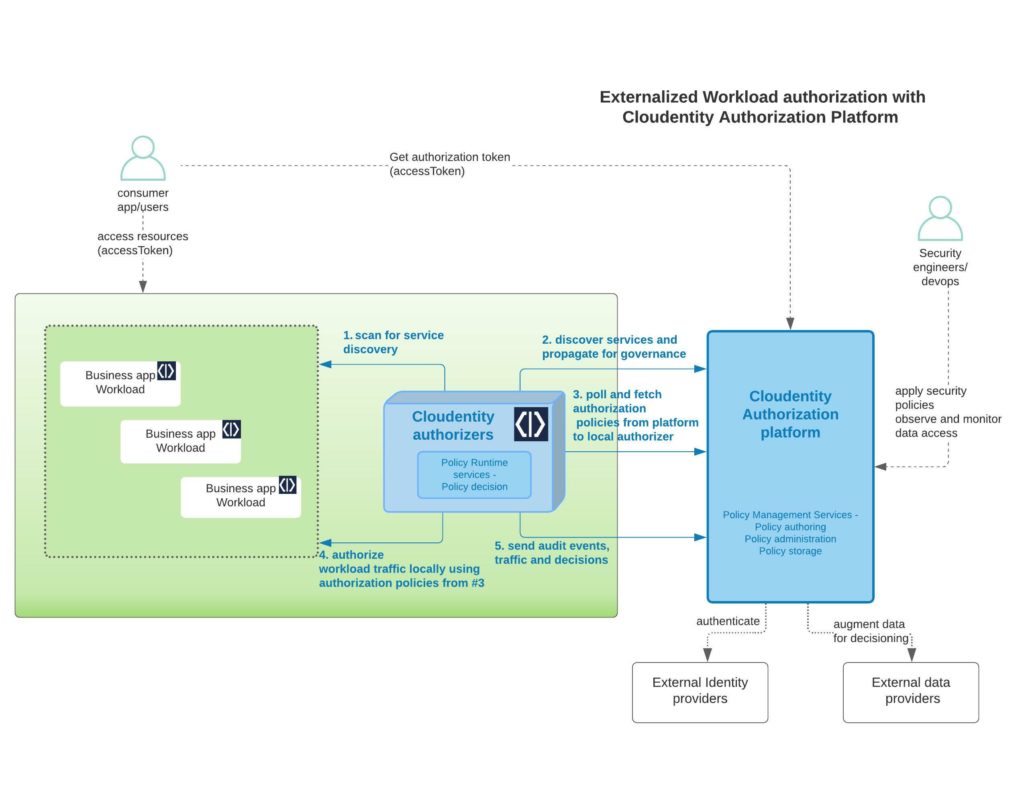
Cloudentity authorizer and Cloudentity platform communication
It is very important that the communication path between the local Istio authorizer and Cloudentity Authorization SaaS platform is established. The local Istio authorizer is responsible for pushing any discovered services to platform for further governance. Once pushed, the centralized policies administered and managed in the platform are polled back by the authorizer for policy decisions and enforcement locally.
<Img src="news/mp-authorizer-highlight-1-1024x481.jpeg" />
Service Communication
Login into the Cloudentity authorization admin portal and navigate to the Enforcement >> Authorizers. As shown in the below diagram, the Last Active column is an indication of communication status of the local authorizer with the remote platform.
<Img src="news/succesful-istio-connection-1024x335.png" />
Regarding the communication security, the local Istio authorizer uses OAuth authorization mechanisms to authenticate itself to the Cloudentity authorization SaaS platform before handshaking information.
Discovered service from cluster
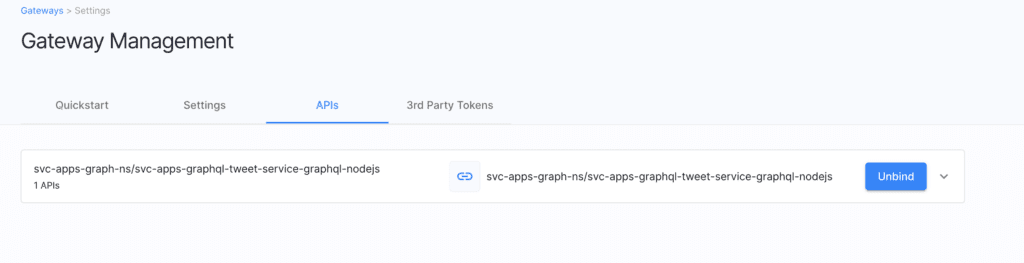
If the business service(workload) is discovered from the remote Kubernets cluster, it should automatically be bound in the ACP platform. Technically, this means Cloudentity authorization platform will register this discovered service as an OAuth resource server and can be governed from within the platform).
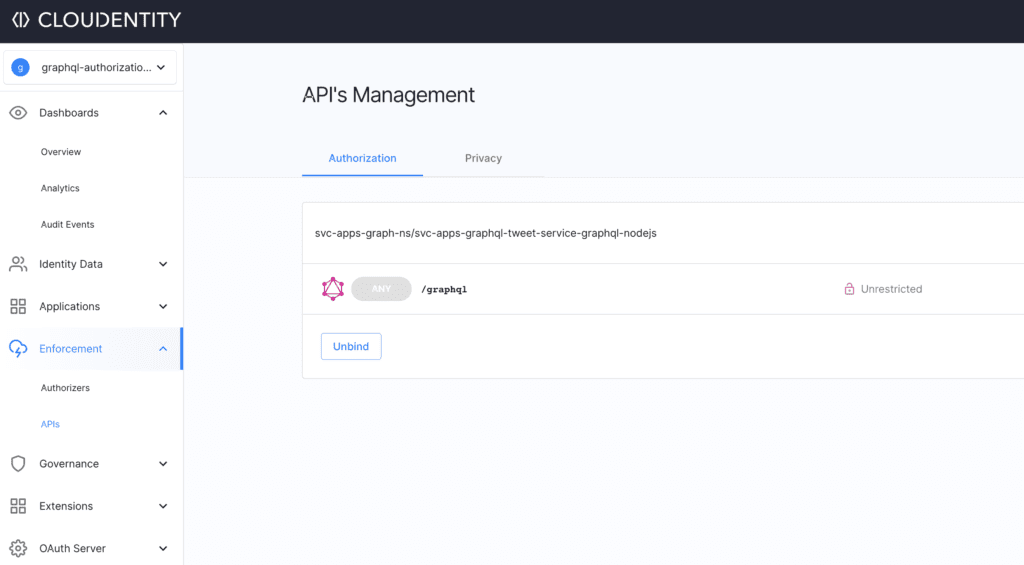
Govern GraphQL API and Schema**
At this point, the remote workload should be available to govern within the Cloudentity authorization platform. In case of GraphQL workload, the schema annotated along with the workload is also transferred by the local Cloudentity authorizer to the Cloudentity authorization platform. This enables us to explore the GraphQL schema for the workload and we can apply authorization policies and manage the policies applied to the various constructs within the GraphQL schema.
Now we have seen the service is available in the Cloudentity authorization platform for governance and central management of authorization policies, which will automatically be downloaded by respective local satelite Cloudentity authorizers bound to the services. This way the Cloudentity authorization platform acts as a very powerful and robust policy management services engine and the Cloudentity authorizers acts as policy runtime services that makes decisions using the policies governed and administered within the central policy management engine.
Enforce externalized dynamic authorization
Before we start enforcing policies, run the postman collection(https://www.getpostman.com/collections/b84dcc2e6d7034c02d48) to check if all the GraphQL API operations are still accessible. Once the pre check is complete, let's try to add more authorization scenarios to enforce access and authorization policies authored and managed via the Cloudentity authorization platform.
For policy governance, we expect the admin (policy administrator) to
- Login into the Cloudentity Authorization portal
- Navigate to the workspace and select
Enforcement >> APIsnav item to see the GraphQL APIs - Apply policies at various GraphQL construct level in the GraphQL API explorer
Scenario#1: Block GraphQL endpoint alltogether
Let's say we want to temporarily block access to all users for this endpoint. For this
- Select the GraphQL API endpoint and attach a
Block APIpolicy.
This in effect blocks any call made to any GraphQL operation. Run any of the test in the imported Postman Test collection and we should see an "authorization denied" response.
Authorization policy
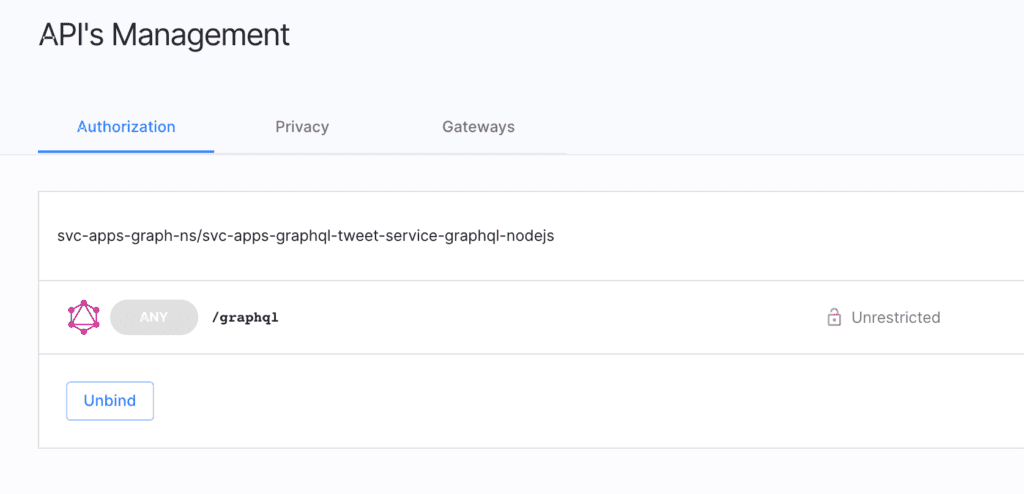
Output

Scenario#2: Disallow GraphQL queries for specific fields
Let's say we do not want GraphQL clients to ask for a specific field that is available in the schema. These could be internal identifiers or only could be requested by some special priviliged internal applications. For this
- Select the GraphQL API endpoint and enter into the
GraphQL API explorer - Navigate to
Objectsand go to theTweetfield - Assign the
Block APIpolicy todateModifiedcompletely
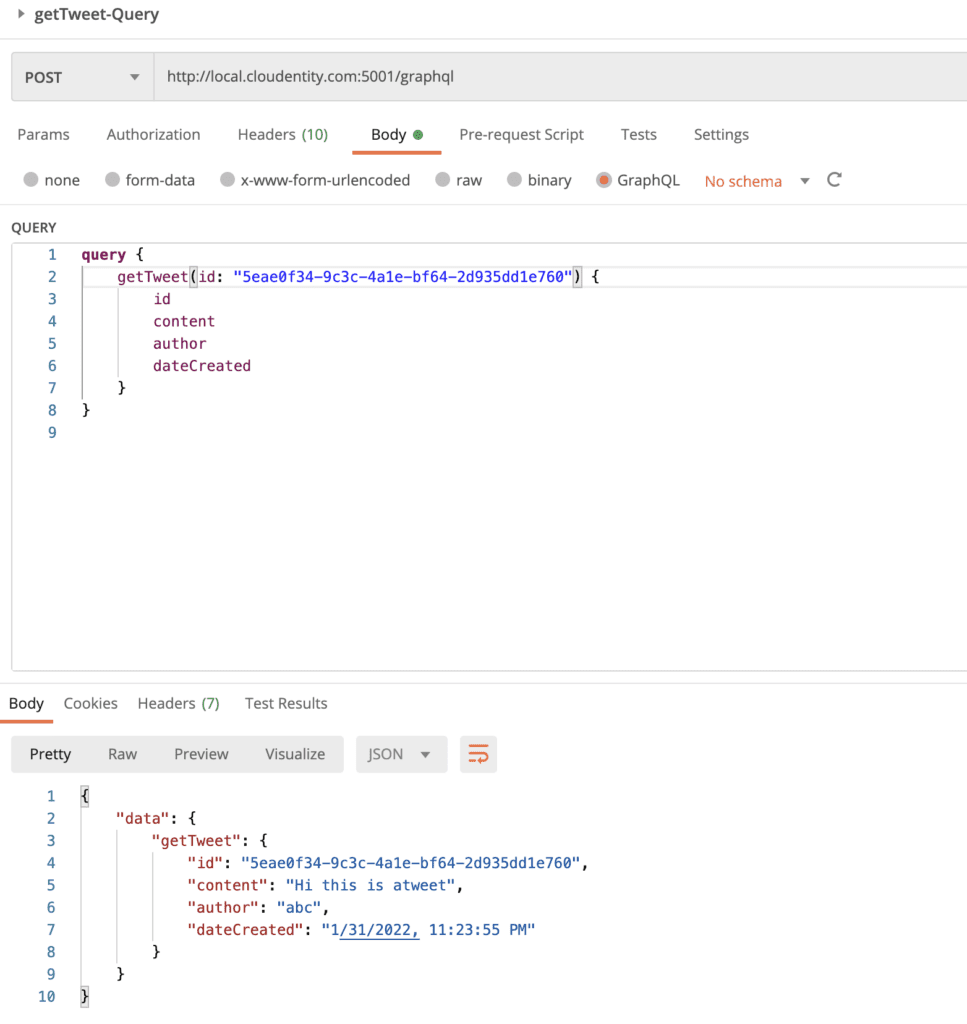
This in effect blocks any GraphQL query that requests for the dateModified field. Let's run the getLatestTweets query from the imported Postman Test collection.
Modify the request payload to include/exclude dateModified in the query and observe the response difference. Whenever dateModified is requested, the request is automatically rejected.
Authorization policy
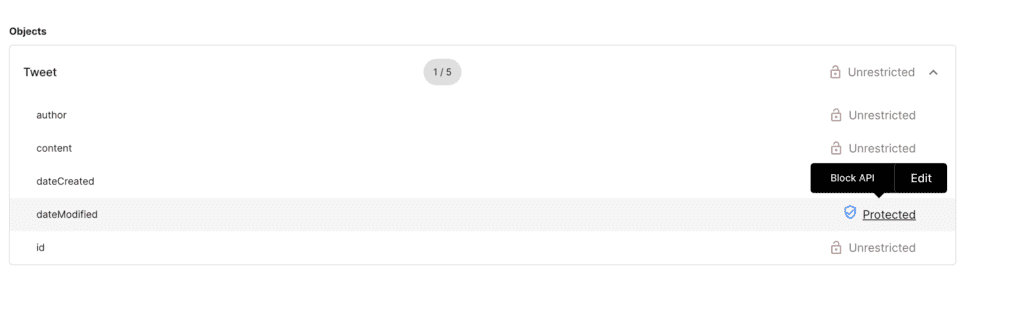
Output
Scenario#3: Disallow GraphQL queries for specific objects with constraints
Let's say we do not want GraphQL clients to ask for a specific object unless some specific constraints are met for that client application. For example, we want to return the Tweet object only when some constraint is met. In this we can apply a policy at the object level for IP address check that is available in the given range. For this we will use the inbuilt Rego engine to author the policy.
For this:
- Select the GraphQL API endpoint and enter into the
GraphQL API explorer - Navigate to
Objects - Select the
Tweetobject and apply the constrainedIP checkpolicy at object level.
Sample Rego policy
<span className="pl-s">package acp.authz</span>
default allow = false
allowedCidrRange := ["3.0.0.0/9","3.128.0.0/10","4.0.0.0/8","5.8.63.0/32","5.10.64.160/29","217.161.27.0/25"]
extracted_ip := input.request.headers["X-Custom-User-IP"][_]
is_within_allowed_cidr = true }some inet.cidr_contains(allowedCidrRange[i], extracted_ip)} else = false
allow {is_within_allowed_cidr}
Authorization policy
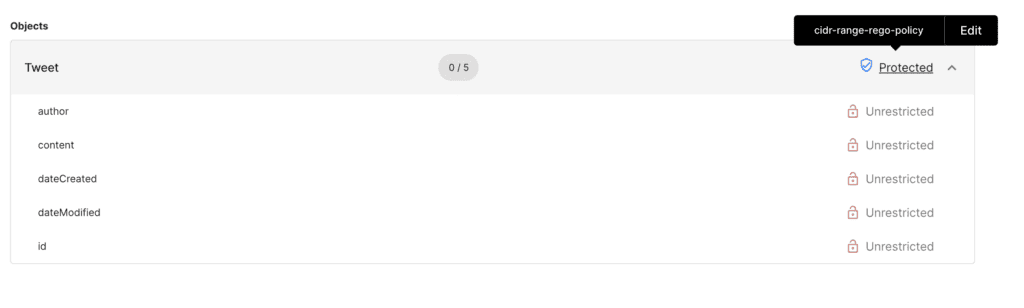
Output
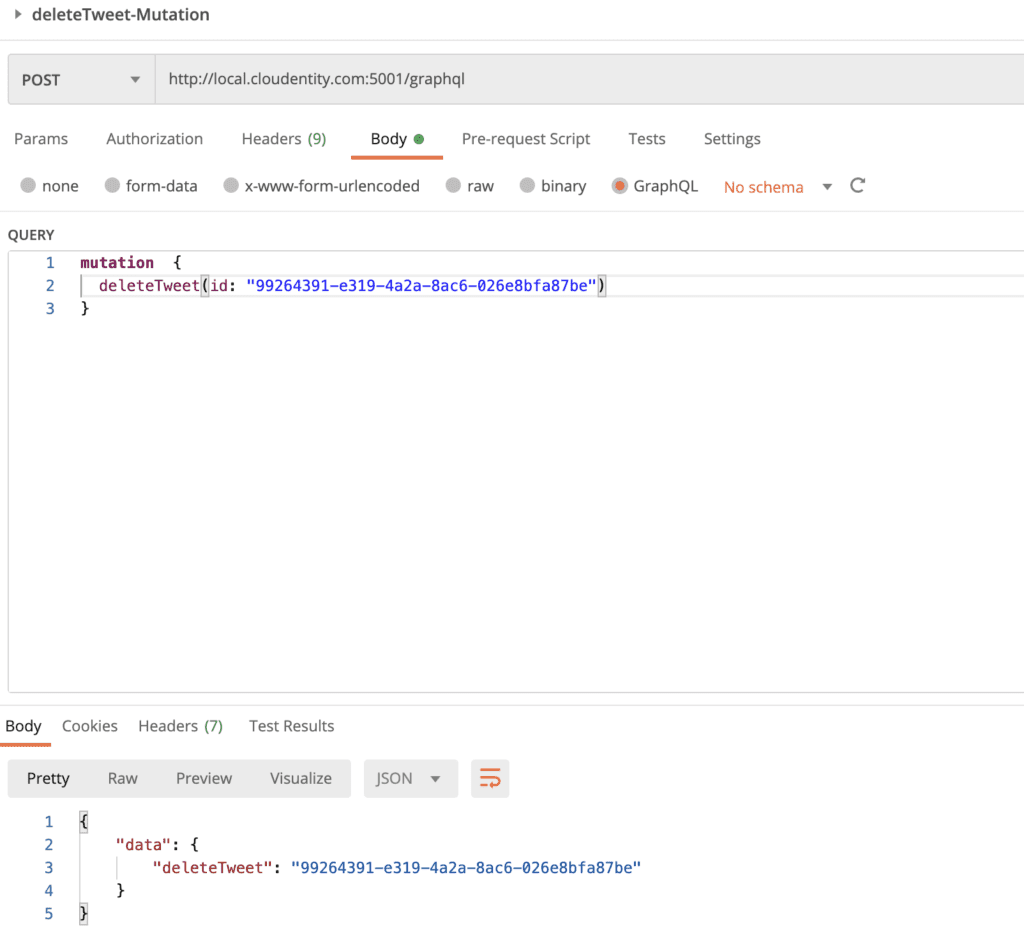
Scenario#4: Block GraphQL delete mutation unless it comes from a client with specific metadata
Let's say we do not want all GraphQL clients to operate on deleteTweet mutation. For example, we want to allow only access tokens issued to specific clients to be authorized to use the deleteTweet mutation. This way this operation can be used by specific clients and not all client apps even though it is available in schema.
For this:
- Select the GraphQL API endpoint and enter into the
GraphQL API explorer - Navigate to
Mutation - Select the
deleteTweetMutation operation and apply the constrainedallow-only-for-specific-clientspolicy at mutation level.
Authorization policy

Output
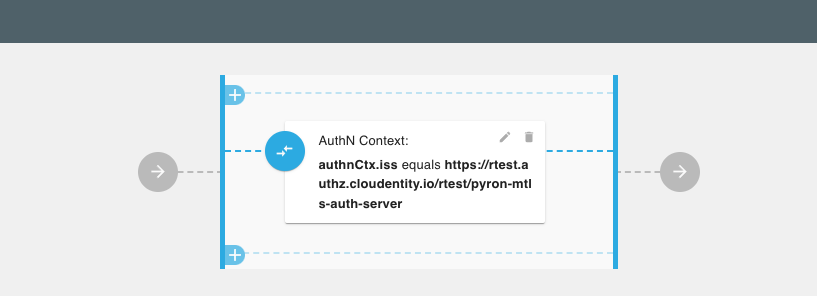
Scenario#5: Allow GraphQL query only if token is issued by a specific Authorization server
Let's say we do not want all GraphQL clients to operate on getTweets query.
For example, we want to allow only access tokens issued by specific authorization servers to be authorized to use the
getTweets query.
Next steps
Now that we have protected a GraphQL API resource server with dynamic and flexible authorization policies, we will build a simple GraphQL client application to demonstrate an entire application in real life. In this client application, we will look at how to get an access token from the Cloudentity authorization server and then utilize it to make further calls to the GraphQL API resource server.
Check it out for yourself using our FREE tenant. You'll find helpful product documentation here or contact us and we'd be happy to answer any questions and give you a demo.