Overview
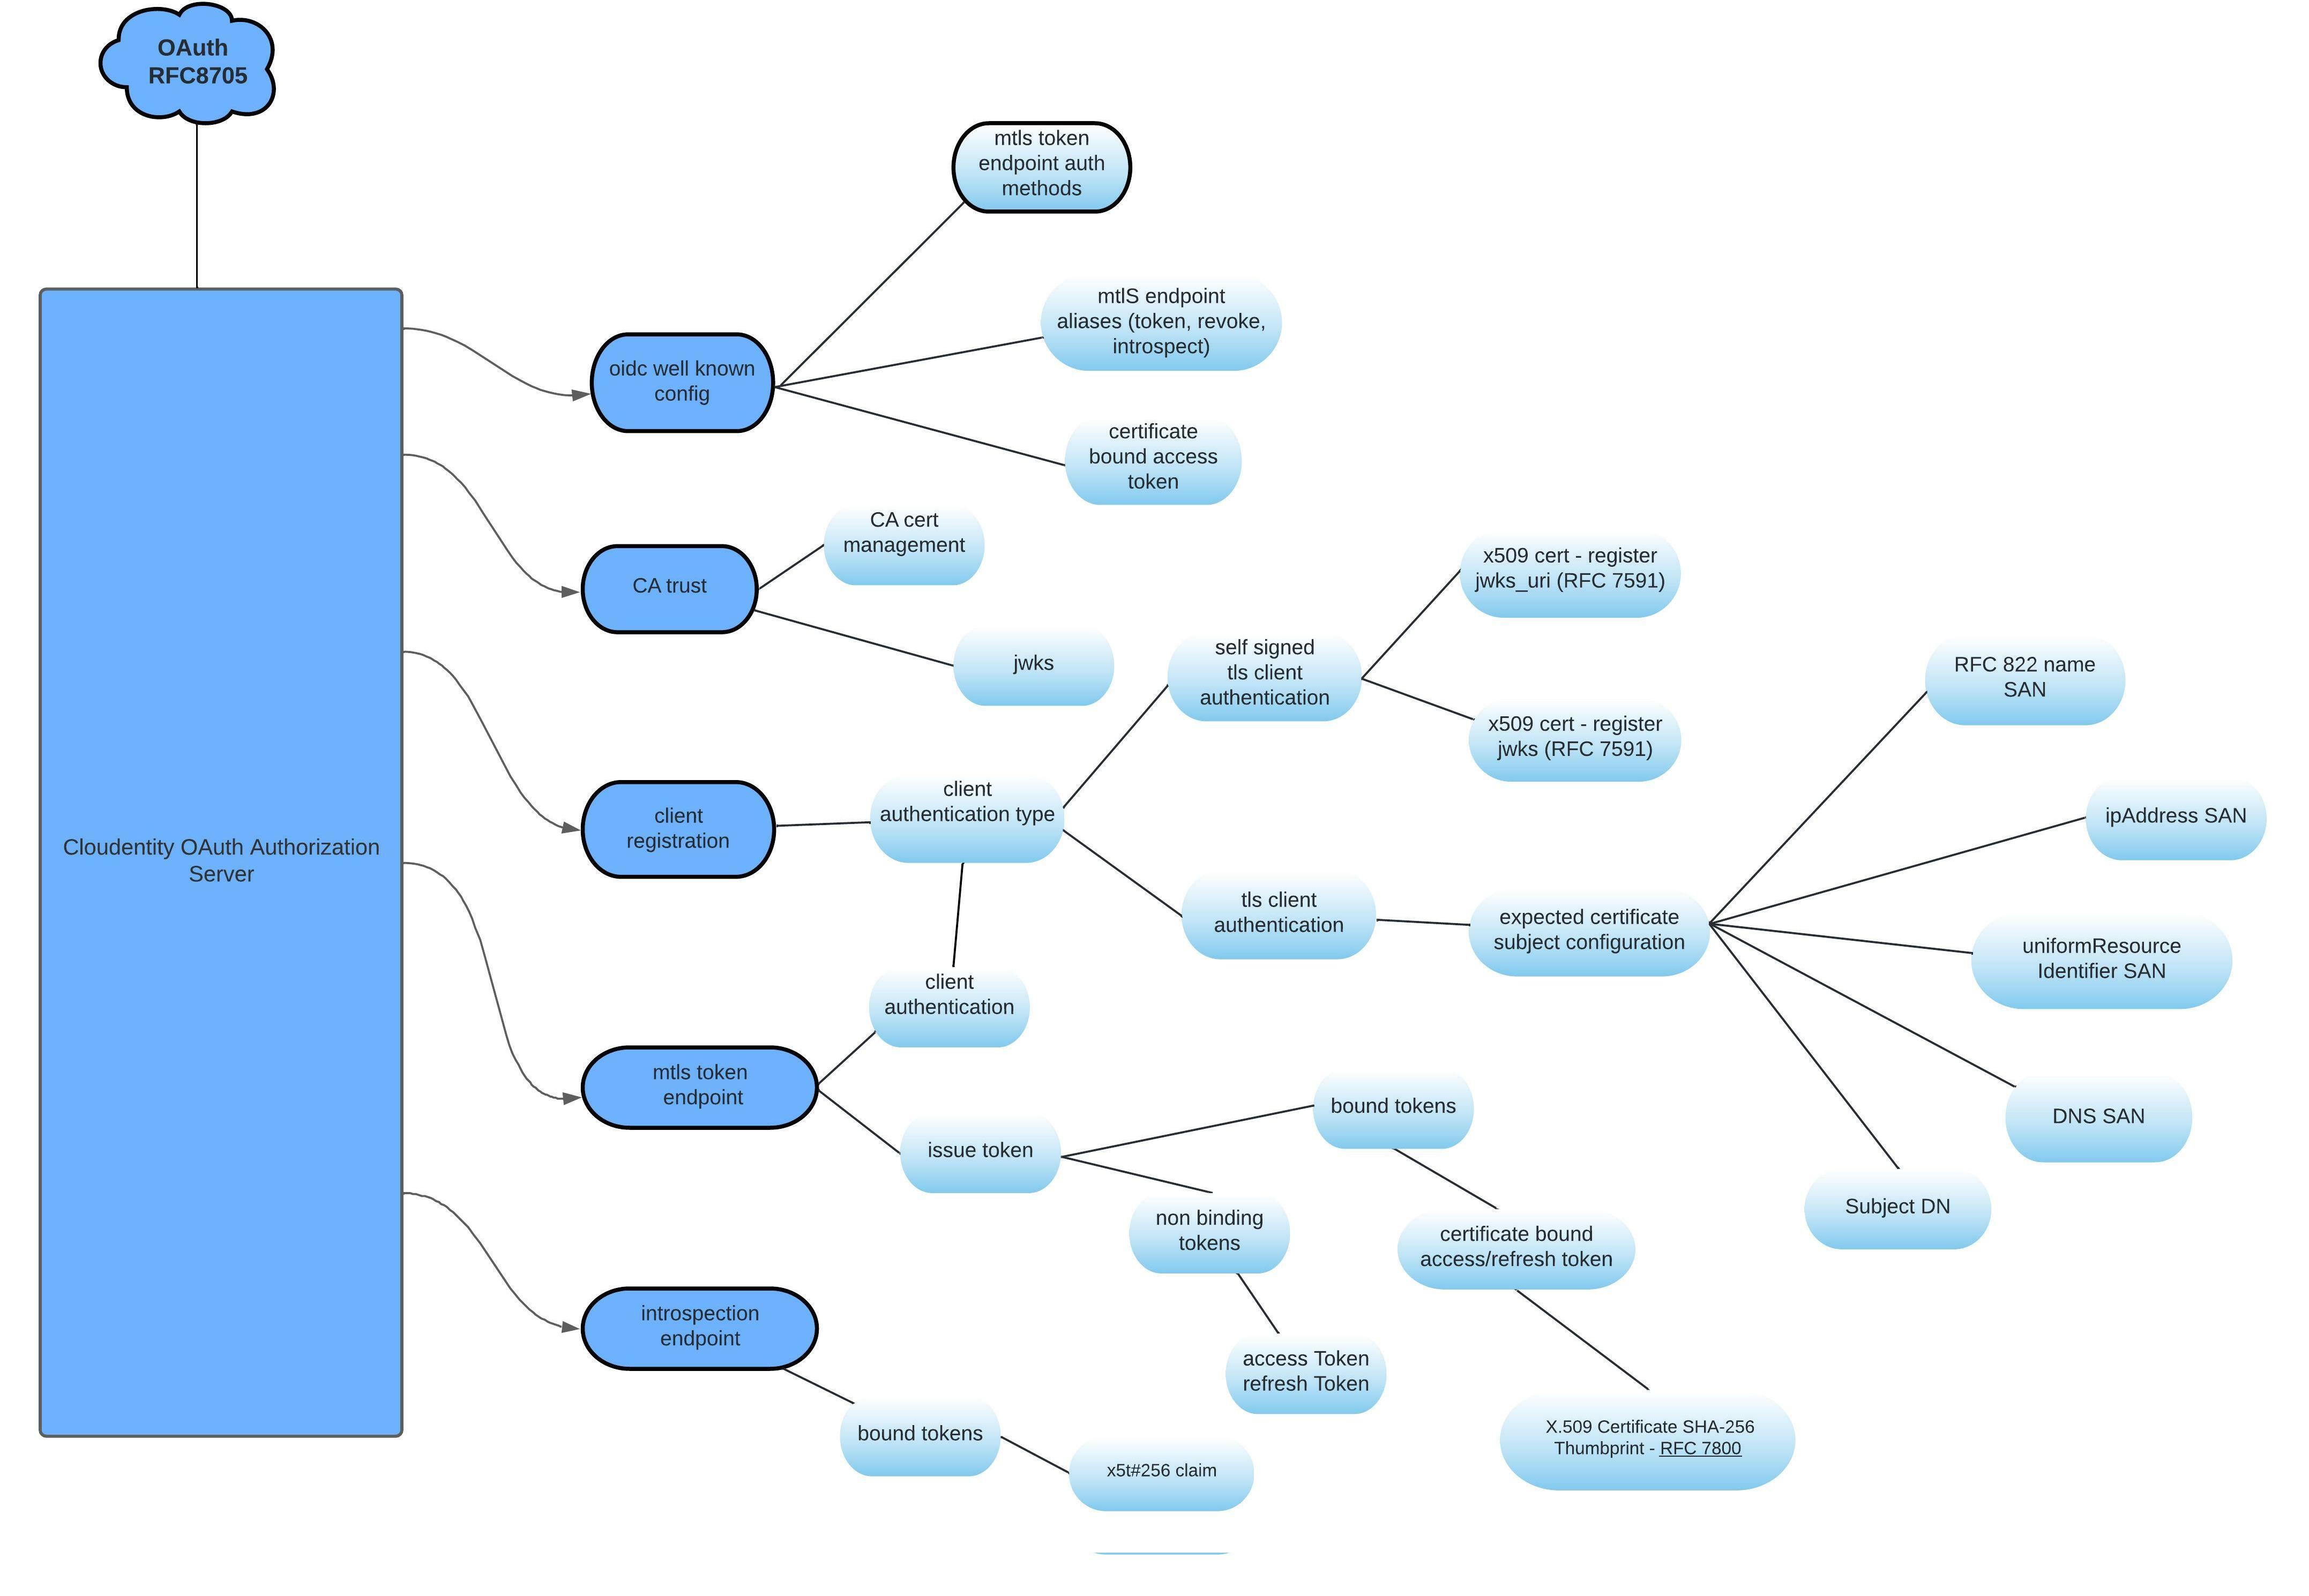
Cloudentity provides implementation of RFC8705 for OAuth 2.0 Mutual-TLS Client Authentication and Certificate-Bound Access Tokens. This specification enables developers to integrate and transform existing application integration architectures into more secure access patterns.
 .
.
In this tutorial, we will create a Node.js application and fetch a regular access token as well as a certificate bound access token obtained using the mTLS OAuth token endpoint.
mTLS Certificate Bound Tokens
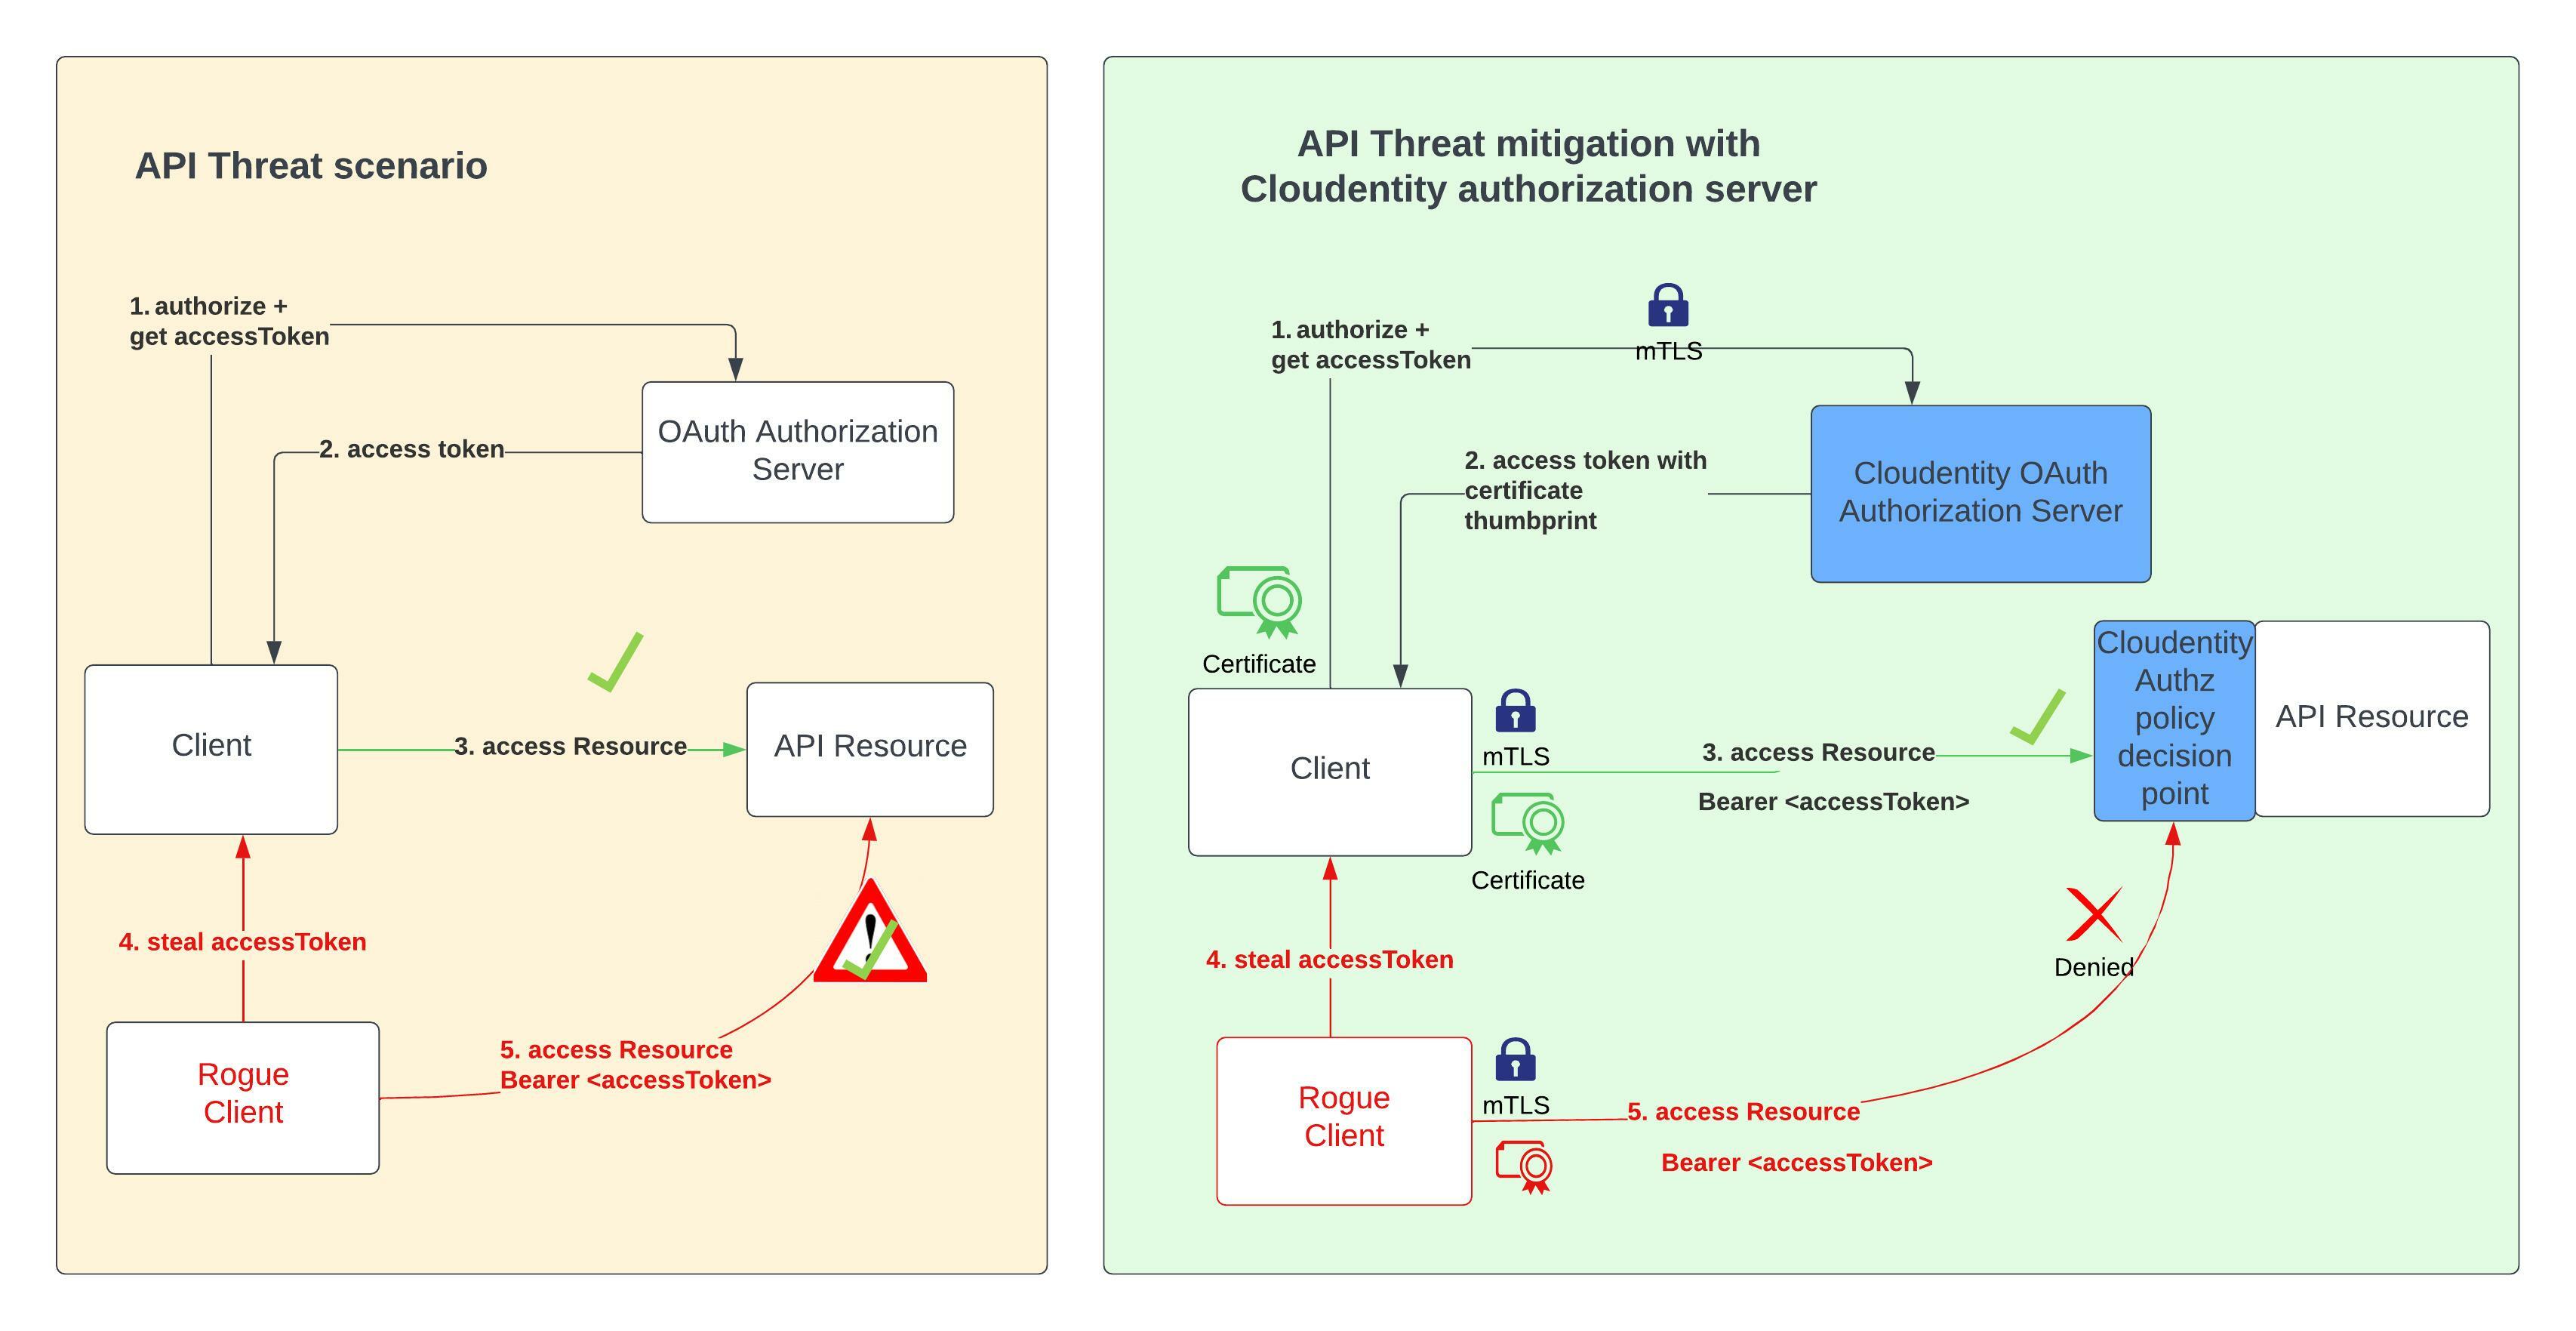
Let’s look at an overview of how mTLS client authentication and certificate bound access token helps to secure your application from rogue callers that have obtained an access token. Anyone in possession of the access token can access a protected resource using that access token unless the token is bound to a certificate of the actual client that requested the token.
 .
.
Mutual-TLS as described in RFC 8705 presents a solution to provide a proof of possession of tokens to prevent a rogue caller from using stolen access tokens. Even if a rogue caller obtains the access token issued to a client, it won’t be able to access the protected resources, since mTLS client authentication is used and the client certificate is bound to the access token. Since the rogue caller does not have access to the certificate, the rogue caller attempts to use the access token and the resource server can now deny access to the protected resource since the presented certificate does not match the certificate thumbprint bound to the access token.
Prerequisites
- Cloudentity SaaS tenant
- Development
Reference Repository

Check out the below GitHub repo for a complete source code of the reference application in this tutorial
Node.js OAuth mTLS Client Authentication
Building Node.js Application
Import Required Packages
In the index.js file. import the required npm packages.
var axios = require('axios');
var qs = require('qs');
var express = require('express');
var app = express();
var jwt_decode = require('jwt-decode');
var fs = require('fs');
var https = require('https');

var mustacheExpress = require('mustache-express');
var bodyParser = require('body-parser');
var path = require('path')
require('dotenv').config();
Set Up Views and Pages
-
Set up the express app to serve some views and html pages.
app.set('views', `${__dirname}/views`); app.set('view engine', 'mustache'); app.engine('mustache', mustacheExpress()); app.use (bodyParser.urlencoded( {extended : true} ) ); app.use(express.static(path.join(__dirname, "/public"))); -
Set up the port and log the URL for the starting point of the application. Then a
/healthendpoint is set up to verify that everything is up and running.const port = process.env.PORT; app.listen(port); console.log(`Server listening at http://localhost:${port}/home`); app.get('/health', function (req, res) { res.send('Service is alive and healthy') }); -
Define a
/homeroute to render the home page that displays various. It will serve the traffic for the OAuth flow.app.get('/home', function(req, res) { res.render('home', {} ) })
Define Environment Variables
Next, lets define some variables to configure the client credentials and OAuth token URL for the non-mTLS OAuth client application from our environment variables.
const client_id = process.env.OAUTH_CLIENT_ID;
const client_secret = process.env.OAUTH_CLIENT_SECRET;
const token_url = process.env.OAUTH_TOKEN_URL;
const auth_token = Buffer.from(`${client_id}:${client_secret}`, 'utf-8').toString('base64');
Using Mutual-TLS requires the use of a certificate and public key.
These are read
from the file system used to initialize the https.Agent. The environment variables used with mTLS
OAuth server are then read in.
const httpsAgent = new https.Agent({
  cert: fs.readFileSync('client.crt'),
  key: fs.readFileSync('client.key'),
});

const mtls_client_id = process.env.MTLS_OAUTH_CLIENT_ID;
const mtls_token_url = process.env.MTLS_OAUTH_TOKEN_URL;
Tip - Insight
We will use the above HTTPS Agent to ensure the API calls uses the above certificate and key files during the TLS handshake with both Cloudentity and the actual resource server.
Route for Regular Access Token
When the user selects Get Access Token from the application’s UI,
the route /auth is called which fetches a regular access token that is not certificate bound.
Here
the client_credentials grant type is used.
The token is then decoded and displayed in the UI.
app.get('/auth', function(req, res) {
  getAuth().then(value => {
   if(value !== undefined) {
     var decoded = jwt_decode(value);
    res.render('home', {accessToken: JSON.stringify(decoded, null, 4)} )
   } else {
     res.send("No token fetched!")
   }
 }, err => {
   res.send("Unable to fetch token!")
 })

});

const getAuth = async () => {
  try {
    const data = qs.stringify({'grant_type':'client_credentials'});
    const response = await axios.post(token_url, data, {
      headers: {
        'Authorization': `Basic ${auth_token}`,
        'Content-Type': 'application/x-www-form-urlencoded'
      }
    })
    return response.data.access_token;
  } catch(error){
    console.log(error);
  }
}
Route for Certificate Bound Access Token
Now
let’s define the /mtlsauth route that fetches a certificate bound access token. The getMtlsAuth
function is invoked with the grant type set to client credentials and then the token endpoint is
called. RFC 8705 states
For all requests to the authorization server utilizing mutual-TLS client authentication, the client
MUST include the “client_id” so the client ID is included.
The httpsAgent is used which includes the certificate and the public key for establising the mTLS connection.
app.get('/mtlsauth', function (req, res) {
  getMtlsAuth().then(value => {
    if (value !== undefined) {
      var decoded = jwt_decode(value);
      res.render('home', { certificate_bound_access_token: JSON.stringify(decoded, null, 4) })
    } else {
      res.send("No token fetched!")
    }
  }, err => {
    res.send("Unable to fetch token!")
  })
});

const getMtlsAuth = async () => {
  try {
    const data = qs.stringify({ 'grant_type': 'client_credentials', 'client_id': mtls_client_id });

    const httpOptions = {
      url: mtls_token_url,
      method: "POST",
      httpsAgent: httpsAgent,
      headers: {
        'Content-Type': 'application/x-www-form-urlencoded'
      },
      data: data
    }

    const response = await axios(httpOptions)
    return response.data.access_token;
  } catch (error) {
    console.log(error);
  }
}
Application Configuration
Prepare Certificate and JWKS
Create a self-signed certificate
used to establish communication between the OAuth client application,
the Cloudentity authorization server and the resource server.
Once you have an RSA key pair, use the public key to generate the JWKS that includes the alg and
x5c keys.
Tip - Reuse
In case you want to use one of the existing cert/key pairs, use the follwing artifacts:
Below, you can see a sample RSA Public key in pem format:
-----BEGIN CERTIFICATE-----
MIIFezCCA2OgAwIBAgIJAJPiYxyvuQq0MA0GCSqGSIb3DQEBCwUAMFQxCzAJBgNV
BAYTAkFVMRMwEQYDVQQIDApTb21lLVN0YXRlMSEwHwYDVQQKDBhJbnRlcm5ldCBX
aWRnaXRzIFB0eSBMdGQxDTALBgNVBAMMBHRlc3QwHhcNMjIwMzA4MDA1MDEyWhcN
MjMwMzA4MDA1MDEyWjBUMQswCQYDVQQGEwJBVTETMBEGA1UECAwKU29tZS1TdGF0
ZTEhMB8GA1UECgwYSW50ZXJuZXQgV2lkZ2l0cyBQdHkgTHRkMQ0wCwYDVQQDDAR0
ZXN0MIICIjANBgkqhkiG9w0BAQEFAAOCAg8AMIICCgKCAgEAw+zfZjdHRm36hvCw
hQjWlfzSJ47KHri+pdMNt5DJxgrDMkNIiu2NvYS7seJ2FRbUL0auOP84icBhRfF3
xdeJK7OLTvty4KnBY3iU2Uh1xt2KwLe3biyZpVBziCf0zfFkkTX0eT2WV5eunuQ5
+tq6V2qsXy0gSoBsolBFr3CfyXsfxzdaBseja8H4kTIpGv9lTRpNcFNOGl66VtXm
I1q4m00IfTpWzj0EivsvHIvPwHhSFw2oHYTUzabpttv6tyuZXnZqfBqw27F6Tljn
PR3W0mAxKugYrBbfcFY8dN3TETLDpFs9NiLgdHBNBwUsieLoHwJRPuBUxcCcjdMD
57+ksCLtof/0uCzZdbut8oapS8s4946TiM9YgiVy57OLzVMm7sa7RMpxvQgmNleM
1sYP4qvHf9o1HIBezwPum98la0zbR6zMWKBjCYWq5cPWC8V8+hASMbGx483str1T
A+J7nBzmQBK1v1w4Cpcho2iPSMvnbBRhLRbmYQTdD93e1EXTG/TbHiZrygRx+hJY
rx4PYi8JDSSqHwxKKEEIUKUdbFzkIWde0grgZDuxRvRnKZVc9PYv7LuqxABMyaXs
cPWMrbhAbfXvaFQKmTHomDk9Zn3go3ZuNVSR6kZ6/ht6edONfMKbLgWRLrFyhaTo
oM2wErJhIOxb+gZpIcVYlMou+VUCAwEAAaNQME4wHQYDVR0OBBYEFDbdhIObv4Gv
pY9awCqeLU8hs9rUMB8GA1UdIwQYMBaAFDbdhIObv4GvpY9awCqeLU8hs9rUMAwG
A1UdEwQFMAMBAf8wDQYJKoZIhvcNAQELBQADggIBAELdLrm+wkvVlpQoG41a+nNC
vzqYbDLJs2DFQqoibicYo+kQvqSVIZM3lFvRMOyXgnO+a0Qk5tQ+bPmpgQV8X43c
D9awzJYz0Cua7nSPgyAI2hFzg1bk0Ohn5gihAJ0NRnqBP53FEmoygCZJUF8Trcvb
E+vHiqgjiHPpBokcm0qoUcojQz453B0XR3io00vmvXeWH+IVxOtqQGKgjOee0B8a
RuUHp3e0UhG+2FhAzKbKZ6uYSw5XmrybRV8sNDbTPfMYd/EmjK/wuc6C29VysuXr
uSSBW5eEE/Ltvb43MhQpt+ylmWY2YM0FcPGJfuSCuzYby1uiAdiAGvI7iW1DKi88
7R9L+LH9rbV2LM6q5jX1MiMPNDq0btGtcpjP2uPF5F0vkwBrdL1u98WDbCqeHoS4
GSTV0DUMNqNfzRVVcu9BLA5xa396hvBjsY3vskw9YwYlKwoN25Umtccy5QxLN+eG
PB7JYvHmM1X/iw27G2RGSq3Fzj9Ib1NVhrMv9ZjkceV9ZR1S08Y415iuzLGfAQKm
DpCT6D4jwPnRv4RcPSWz45fFUo8fflP14tkTX1W93KCA65LHTVbetuBSCyu459Ia
nJB8N3lL8S5CUyhmoQHvmDtzH2u9lPYfb2K7xQKRJaOEqLOy9hD2fTJvSSNeUG8K
Ymm1oFHEg+8e5ZYTEsc8
-----END CERTIFICATE-----
Generated JWKS should be of the given format:
{
"keys": [
    {
      "kty": "RSA",
      "kid": "534877c8-1af6-43fd-b073-9be9eaea72fa",
      "alg": "RS256",
      "n": "w-zfZjdHRm36hvCwhQjWlfzSJ47KHri-pdMNt5DJxgrDMkNIiu2NvYS7seJ2FRbUL0auOP84icBhRfF3xdeJK7OLTvty4KnBY3iU2Uh1xt2KwLe3biyZpVBziCf0zfFkkTX0eT2WV5eunuQ5-tq6V2qsXy0gSoBsolBFr3CfyXsfxzdaBseja8H4kTIpGv9lTRpNcFNOGl66VtXmI1q4m00IfTpWzj0EivsvHIvPwHhSFw2oHYTUzabpttv6tyuZXnZqfBqw27F6TljnPR3W0mAxKugYrBbfcFY8dN3TETLDpFs9NiLgdHBNBwUsieLoHwJRPuBUxcCcjdMD57-ksCLtof_0uCzZdbut8oapS8s4946TiM9YgiVy57OLzVMm7sa7RMpxvQgmNleM1sYP4qvHf9o1HIBezwPum98la0zbR6zMWKBjCYWq5cPWC8V8-hASMbGx483str1TA-J7nBzmQBK1v1w4Cpcho2iPSMvnbBRhLRbmYQTdD93e1EXTG_TbHiZrygRx-hJYrx4PYi8JDSSqHwxKKEEIUKUdbFzkIWde0grgZDuxRvRnKZVc9PYv7LuqxABMyaXscPWMrbhAbfXvaFQKmTHomDk9Zn3go3ZuNVSR6kZ6_ht6edONfMKbLgWRLrFyhaTooM2wErJhIOxb-gZpIcVYlMou-VU",
      "e": "AQAB",
      "x5c": [
     "MIIFezCCA2OgAwIBAgIJAJPiYxyvuQq0MA0GCSqGSIb3DQEBCwUAMFQxCzAJBgNVBAYTAkFVMRMwEQYDVQQIDApTb21lLVN0YXRlMSEwHwYDVQQKDBhJbnRlcm5ldCBXaWRnaXRzIFB0eSBMdGQxDTALBgNVBAMMBHRlc3QwHhcNMjIwMzA4MDA1MDEyWhcNMjMwMzA4MDA1MDEyWjBUMQswCQYDVQQGEwJBVTETMBEGA1UECAwKU29tZS1TdGF0ZTEhMB8GA1UECgwYSW50ZXJuZXQgV2lkZ2l0cyBQdHkgTHRkMQ0wCwYDVQQDDAR0ZXN0MIICIjANBgkqhkiG9w0BAQEFAAOCAg8AMIICCgKCAgEAw+zfZjdHRm36hvCwhQjWlfzSJ47KHri+pdMNt5DJxgrDMkNIiu2NvYS7seJ2FRbUL0auOP84icBhRfF3xdeJK7OLTvty4KnBY3iU2Uh1xt2KwLe3biyZpVBziCf0zfFkkTX0eT2WV5eunuQ5+tq6V2qsXy0gSoBsolBFr3CfyXsfxzdaBseja8H4kTIpGv9lTRpNcFNOGl66VtXmI1q4m00IfTpWzj0EivsvHIvPwHhSFw2oHYTUzabpttv6tyuZXnZqfBqw27F6TljnPR3W0mAxKugYrBbfcFY8dN3TETLDpFs9NiLgdHBNBwUsieLoHwJRPuBUxcCcjdMD57+ksCLtof/0uCzZdbut8oapS8s4946TiM9YgiVy57OLzVMm7sa7RMpxvQgmNleM1sYP4qvHf9o1HIBezwPum98la0zbR6zMWKBjCYWq5cPWC8V8+hASMbGx483str1TA+J7nBzmQBK1v1w4Cpcho2iPSMvnbBRhLRbmYQTdD93e1EXTG/TbHiZrygRx+hJYrx4PYi8JDSSqHwxKKEEIUKUdbFzkIWde0grgZDuxRvRnKZVc9PYv7LuqxABMyaXscPWMrbhAbfXvaFQKmTHomDk9Zn3go3ZuNVSR6kZ6/ht6edONfMKbLgWRLrFyhaTooM2wErJhIOxb+gZpIcVYlMou+VUCAwEAAaNQME4wHQYDVR0OBBYEFDbdhIObv4GvpY9awCqeLU8hs9rUMB8GA1UdIwQYMBaAFDbdhIObv4GvpY9awCqeLU8hs9rUMAwGA1UdEwQFMAMBAf8wDQYJKoZIhvcNAQELBQADggIBAELdLrm+wkvVlpQoG41a+nNCvzqYbDLJs2DFQqoibicYo+kQvqSVIZM3lFvRMOyXgnO+a0Qk5tQ+bPmpgQV8X43cD9awzJYz0Cua7nSPgyAI2hFzg1bk0Ohn5gihAJ0NRnqBP53FEmoygCZJUF8TrcvbE+vHiqgjiHPpBokcm0qoUcojQz453B0XR3io00vmvXeWH+IVxOtqQGKgjOee0B8aRuUHp3e0UhG+2FhAzKbKZ6uYSw5XmrybRV8sNDbTPfMYd/EmjK/wuc6C29VysuXruSSBW5eEE/Ltvb43MhQpt+ylmWY2YM0FcPGJfuSCuzYby1uiAdiAGvI7iW1DKi887R9L+LH9rbV2LM6q5jX1MiMPNDq0btGtcpjP2uPF5F0vkwBrdL1u98WDbCqeHoS4GSTV0DUMNqNfzRVVcu9BLA5xa396hvBjsY3vskw9YwYlKwoN25Umtccy5QxLN+eGPB7JYvHmM1X/iw27G2RGSq3Fzj9Ib1NVhrMv9ZjkceV9ZR1S08Y415iuzLGfAQKmDpCT6D4jwPnRv4RcPSWz45fFUo8fflP14tkTX1W93KCA65LHTVbetuBSCyu459IanJB8N3lL8S5CUyhmoQHvmDtzH2u9lPYfb2K7xQKRJaOEqLOy9hD2fTJvSSNeUG8KYmm1oFHEg+8e5ZYTEsc8"
      ]
    }
  ]
}
Register mTLS OAuth Client
Let’s register a trusted OAuth Client Application in Cloudentity and configure
the client application for mTLS specifications. We chose the client application type as
service as this is a trusted backend application as it can securely store the secrets/credentials
used in this application for OAuth flow. Then, internally set the grant type for the application as
client_credentials.
Creating Client Applications
If you need help with creating your client application, check out the Creating and Configuring Client Applications article.
For your application:
-
Select the Token Endpoint Authentication Method as Self Signed TLS Client Authentication.
-
Configure the JSON Web Key Set with the above generated JWKS block that has the self-signed certificate.
-
Check the box for Certificate bound access token to get the certificate thumbprint bound to the access token. This enables a new JWT Confirmation Method member
"x5t#S256"that adheres to the RFC-8700 - Proof of Possession semantics specifications for JSON web tokens.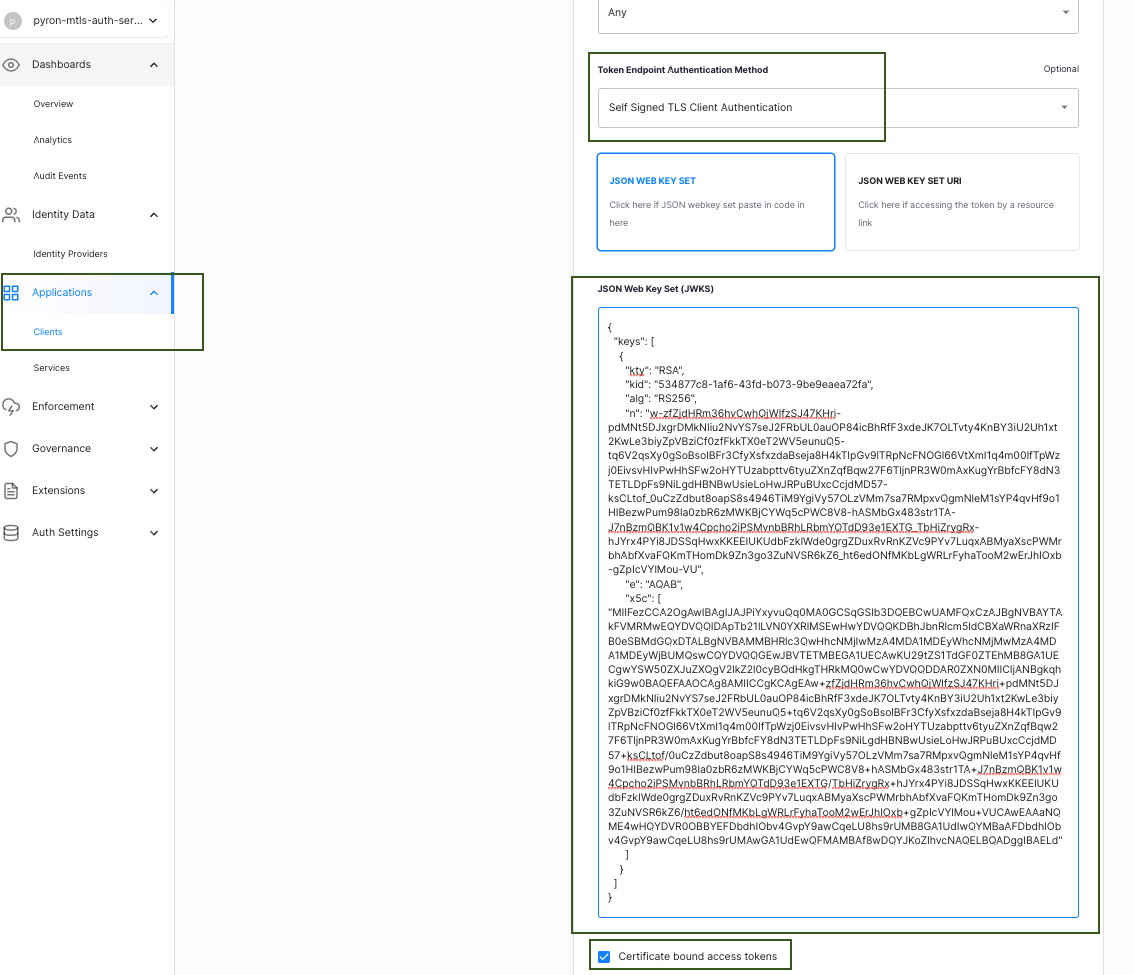
Register Regular OAuth Client
Let’s register a regular trusted OAuth Client Application. We chose the client application type as
service as this is a trusted backend application as it can securely store the secrets/credentials
used in this application for OAuth flow. Then, internally set the grant type for the application as
client_credentials.
Creating Client Applications
If you need help with creating your client application, check out the Creating and Configuring Client Applications article.
For your new client application, set the Token Endpoint Authentication Method to Client Secret Basic.
Configure Node.js Application with OAuth Client
Now that we have 2 OAuth clients that are required to demonstrate the flow in the Node.js application, let’s go ahead and configure the application with the above OAuth client info.
Go to the root of the sample-nodejs-mtls-oauth-client project. From the root of the repository,
enter the following command in the terminal:
cd sample-nodejs-mtls-oauth-client
In the .env file
enter the OAuth server variables copied before:
OAUTH_CLIENT_ID="`<your oauth client id that is not using mtls>`"
OAUTH_CLIENT_SECRET="`<your oauth client secret that is not using mtls>`"
OAUTH_TOKEN_URL="`<your oauth client token url that is not using mtls>`"
MTLS_OAUTH_CLIENT_ID="`<your oauth client id that is using mtls>`"
MTLS_OAUTH_TOKEN_URL="`<your oauth client token url that is using mtls>`"
Run Application
To run the application, enter the following command from the root of the project in the terminal
after you have added the required environment variables to .env.
npm start
Once the application is running and the end user visits http://localhost:5002/home, the user
is presented with the following UI.
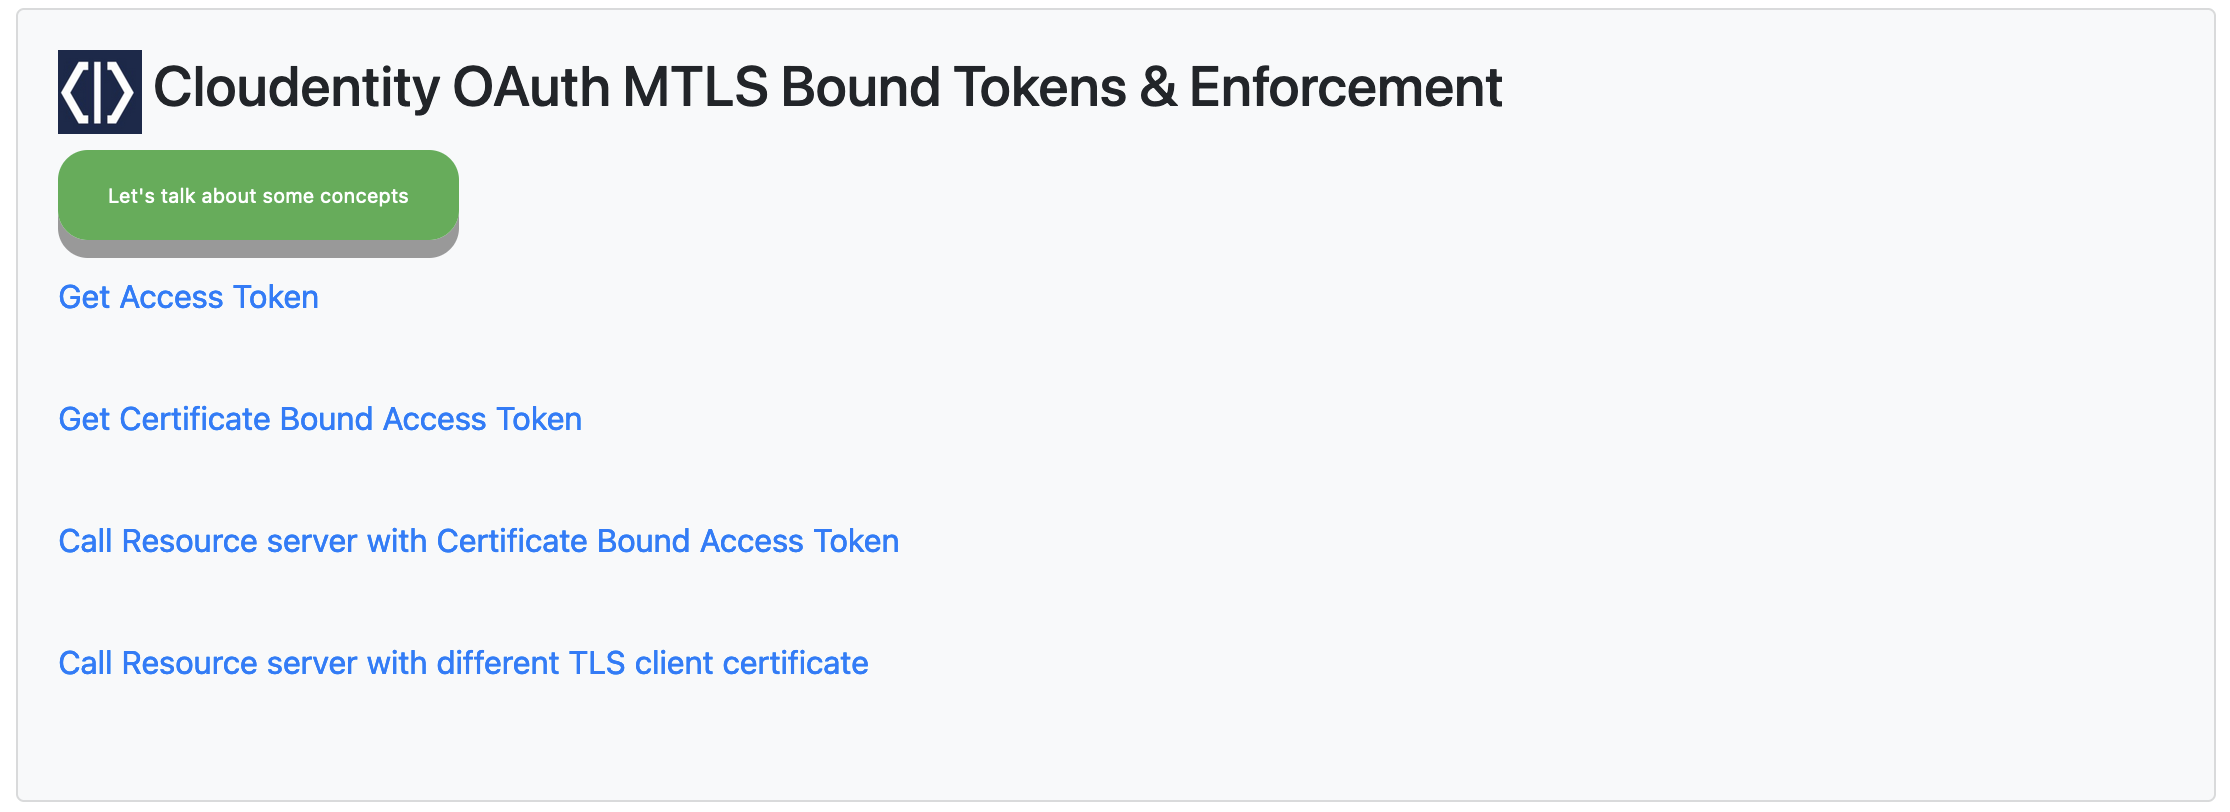
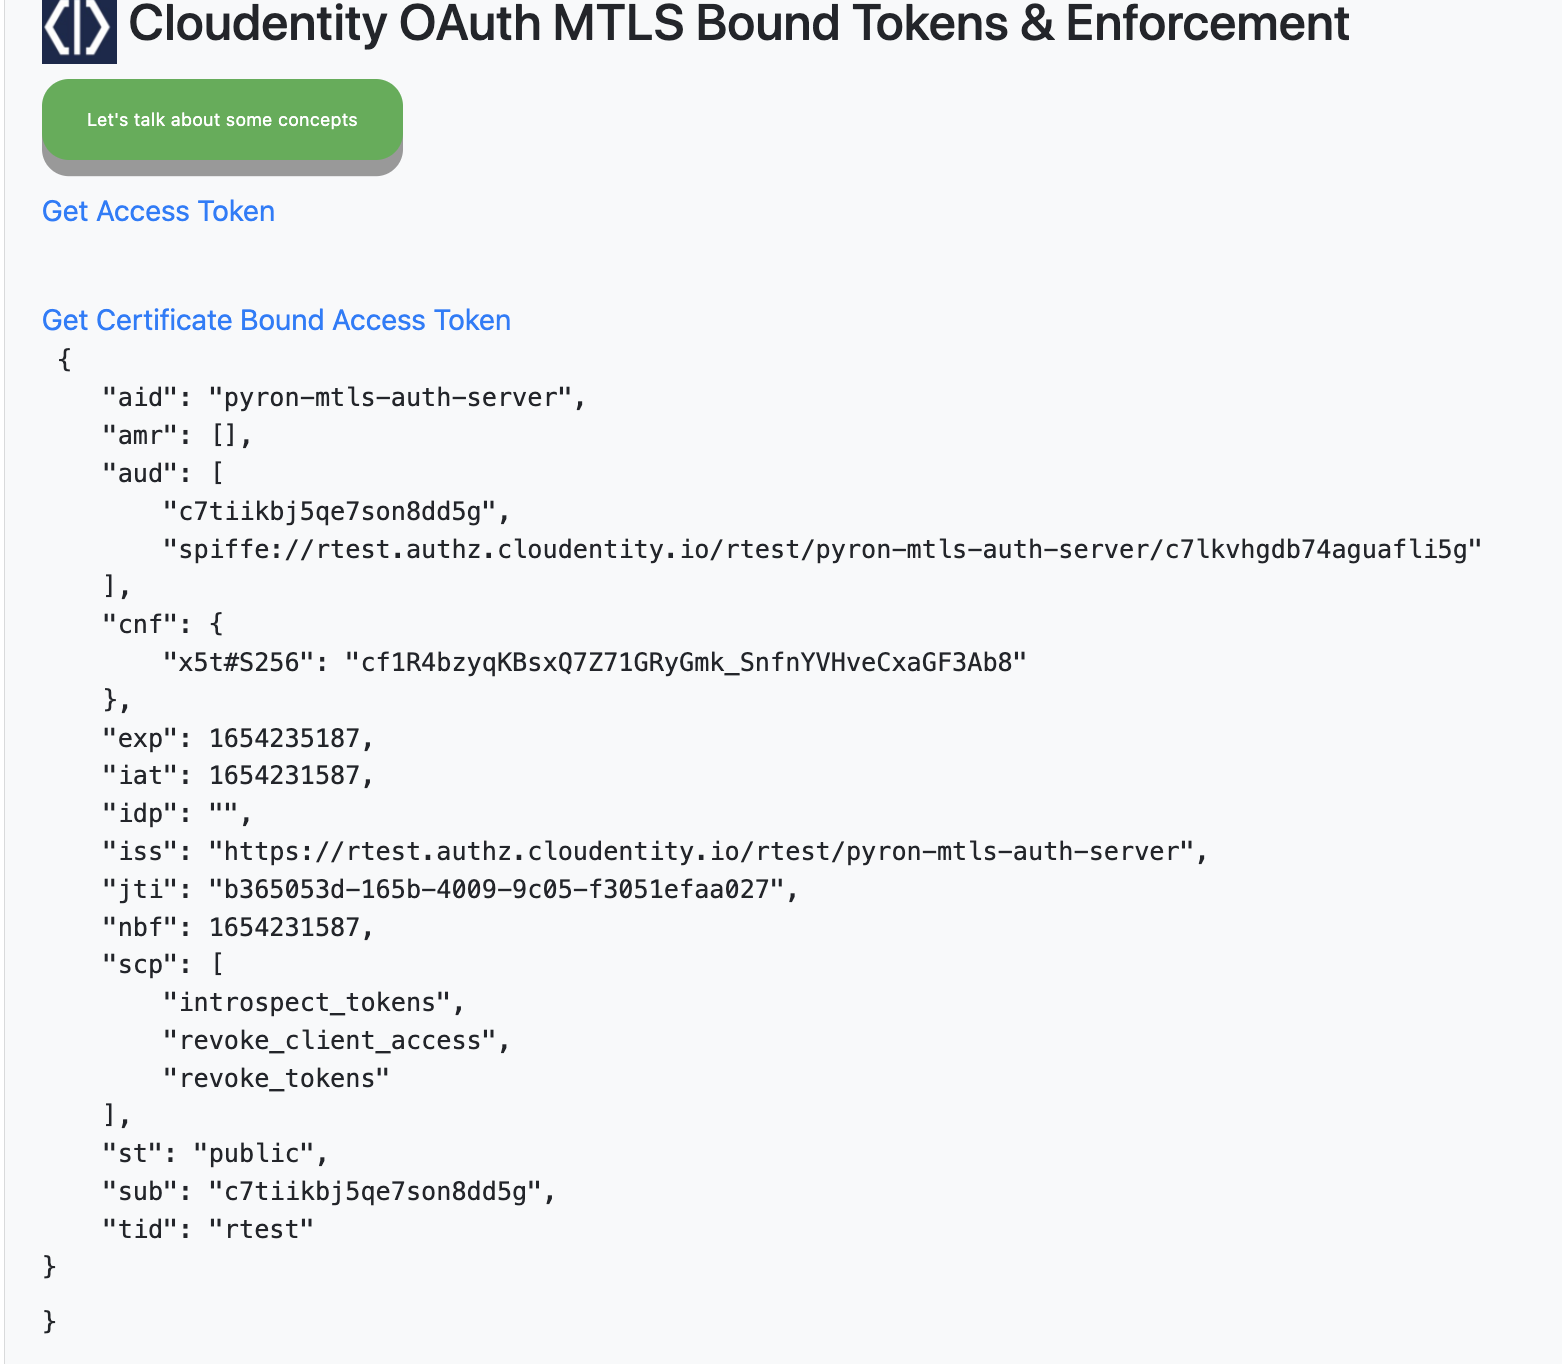
Select Get Access Token which invokes the /auth route in the Node.js application that fetches
and displays a regular access token from Cloudentity in the decoded format.

Select Get Certificate Bound Access Token which invokes the /mtlsauth route in the Node.js
application that fetches and displays a certificate bound access token in the decoded format.
The main difference between the previous token is the presence of the cnf claim with the
x5t thumbprint within this access token.
Summary
This wraps up our tutorial for the Node.js application that fetches two different flavors of access tokens: one certificate bound with the certificate thumbprint of the certificate presented during the mTLS handshake and the other one with no binding to a certificate.
After going through the tutorial, you will have accomplished the following:
- Build a simple Node.js application to obtain certificate bound access token
- Create an OAuth Application with the Cloudentity Authorization Platform
- Authorize and fetch OAuth access token in the Node.js app using OAuth mTLS client specification