

Authentication in Kafka
If you need to process and store large amounts of data in real-time, Apache Kafka is a great option. However, it’s important to secure your Kafka clusters since they may contain sensitive information like user data, financial data, or business information. In this blog post, we’ll cover the main aspects of Kafka security.
There are various options for implementing authentication. One approach is to use TLS with client certificates, which provides a secure channel and authenticates the client. Alternatively, you can configure TLS separately for connection encryption and use a SASL protocol for authentication.
There are several SASL-based protocols available, such as SASL PLAIN, which uses usernames and passwords for authentication, and SASL SCRAM, which uses salted hashes instead of plain text passwords. Both options require secure connections between Kafka clients, brokers, and ZooKeeper nodes, and store credentials in ZooKeeper.
For a more sophisticated option, the SASL GSSAPI mechanism can be used. This mechanism utilizes a central LDAP server to manage user permissions. However, setting it up can be quite complex, causing difficulty for many users. Fortunately, since the release of Kafka version 2.0.0, there is now a SASL OAUTHBEARER mechanism available.
Why OAuth
OAuth 2.0 is a standard that allows websites and apps to safely access resources hosted by other web apps on behalf of users. It replaced OAuth 1.0 in 2012 and has become the industry’s preferred authorization solution. Users can give consent for access, but the client app’s abilities are restricted to protect their login information and privacy.
It has two benefits. Firstly, a specialized identity service within the organization centrally handles user accounts and credentials for multiple services. Secondly, users simply need to provide their username and password to that particular server. Once authenticated successfully, a token with a limited time span is generated. The user can share this token with other services, which serves to identify the user and determine their access rights.
While the web is the primary platform for OAuth 2, the specification includes instructions on how to manage delegated access for various client types such as browser-based applications, server-side web applications, native/mobile apps, and connected devices.
Authentication flow
Setting Up Cloudentity
Create Authorization Server
Kafka Supports OAuth2 authentication using unsecured JWT tokens. We have to configure our own OAuth2 server for a proper OAuth2 flow.
Try it now
Cloudentity comes with multi-tenant authorization server as a service. All you need to do is sign up for a free tenant and create a workspace to get an associated authorization server.
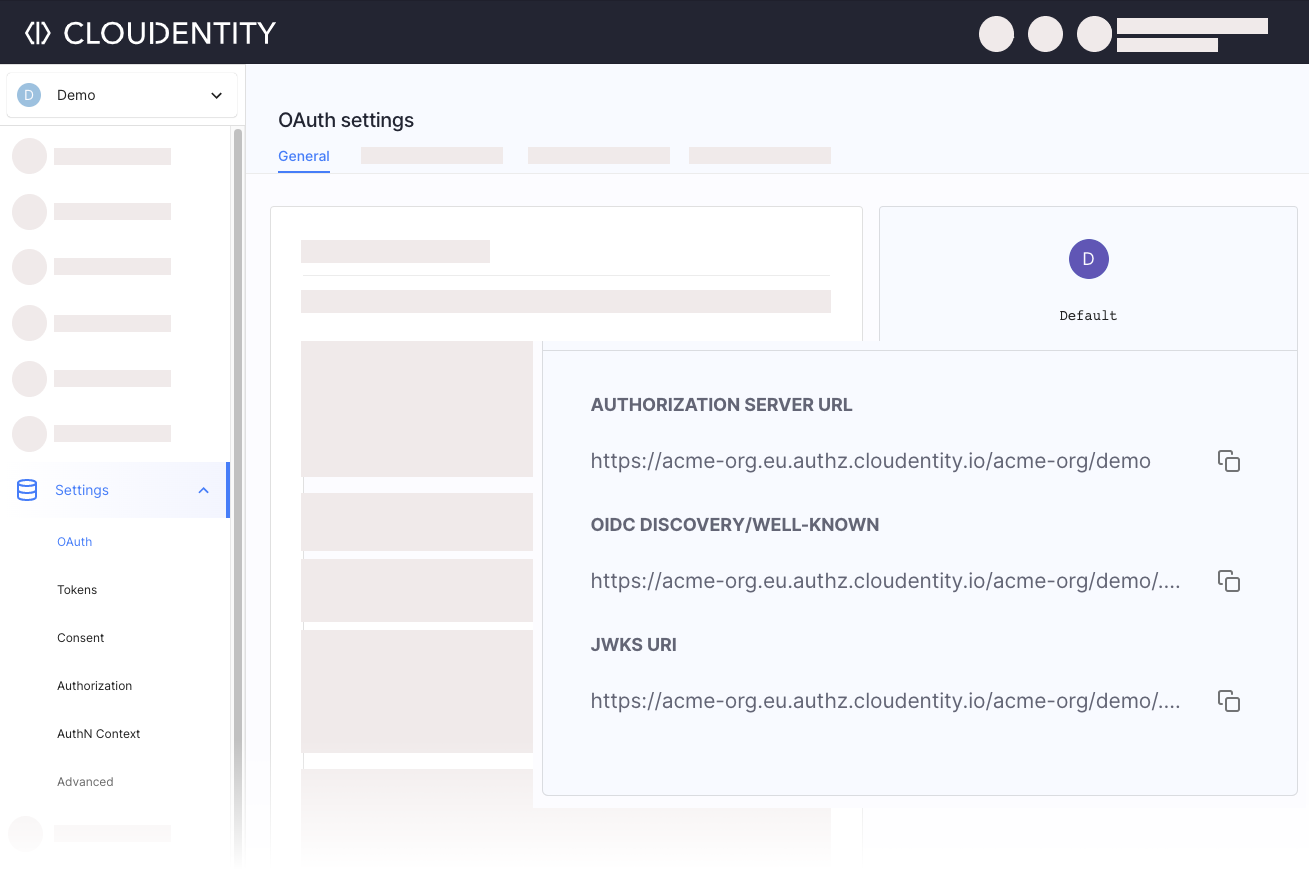
Once you created a workspace with an authorization server, go to OAuth » Authorization Server, and note down the Authorization Server URL, OIDC Discovery/WELL-KNOWN URL, and the JWKS URI. They will be needed later on.
Create and Configure OAuth2 M2M Client Application
-
Create a M2M OAuth Client Application in the workspace you created in the previous section.
-
Change the client authentication method to client_secret_basic
-
Copy client application’s identifier, secret, and the token endpoint (steps 4-5).
Set Up Kafka Cluster
There are numerous ways to set up a Kafka cluster, and we encourage you to choose the one that best suits your needs and skills. To simplify the understanding of this article, we will utilize the “managed” version of Kafka, which you can create on the Confluent platform.
Create Cluster in Confluent Cloud
Visit the Confluent registration page and choose the Cloud deployment.
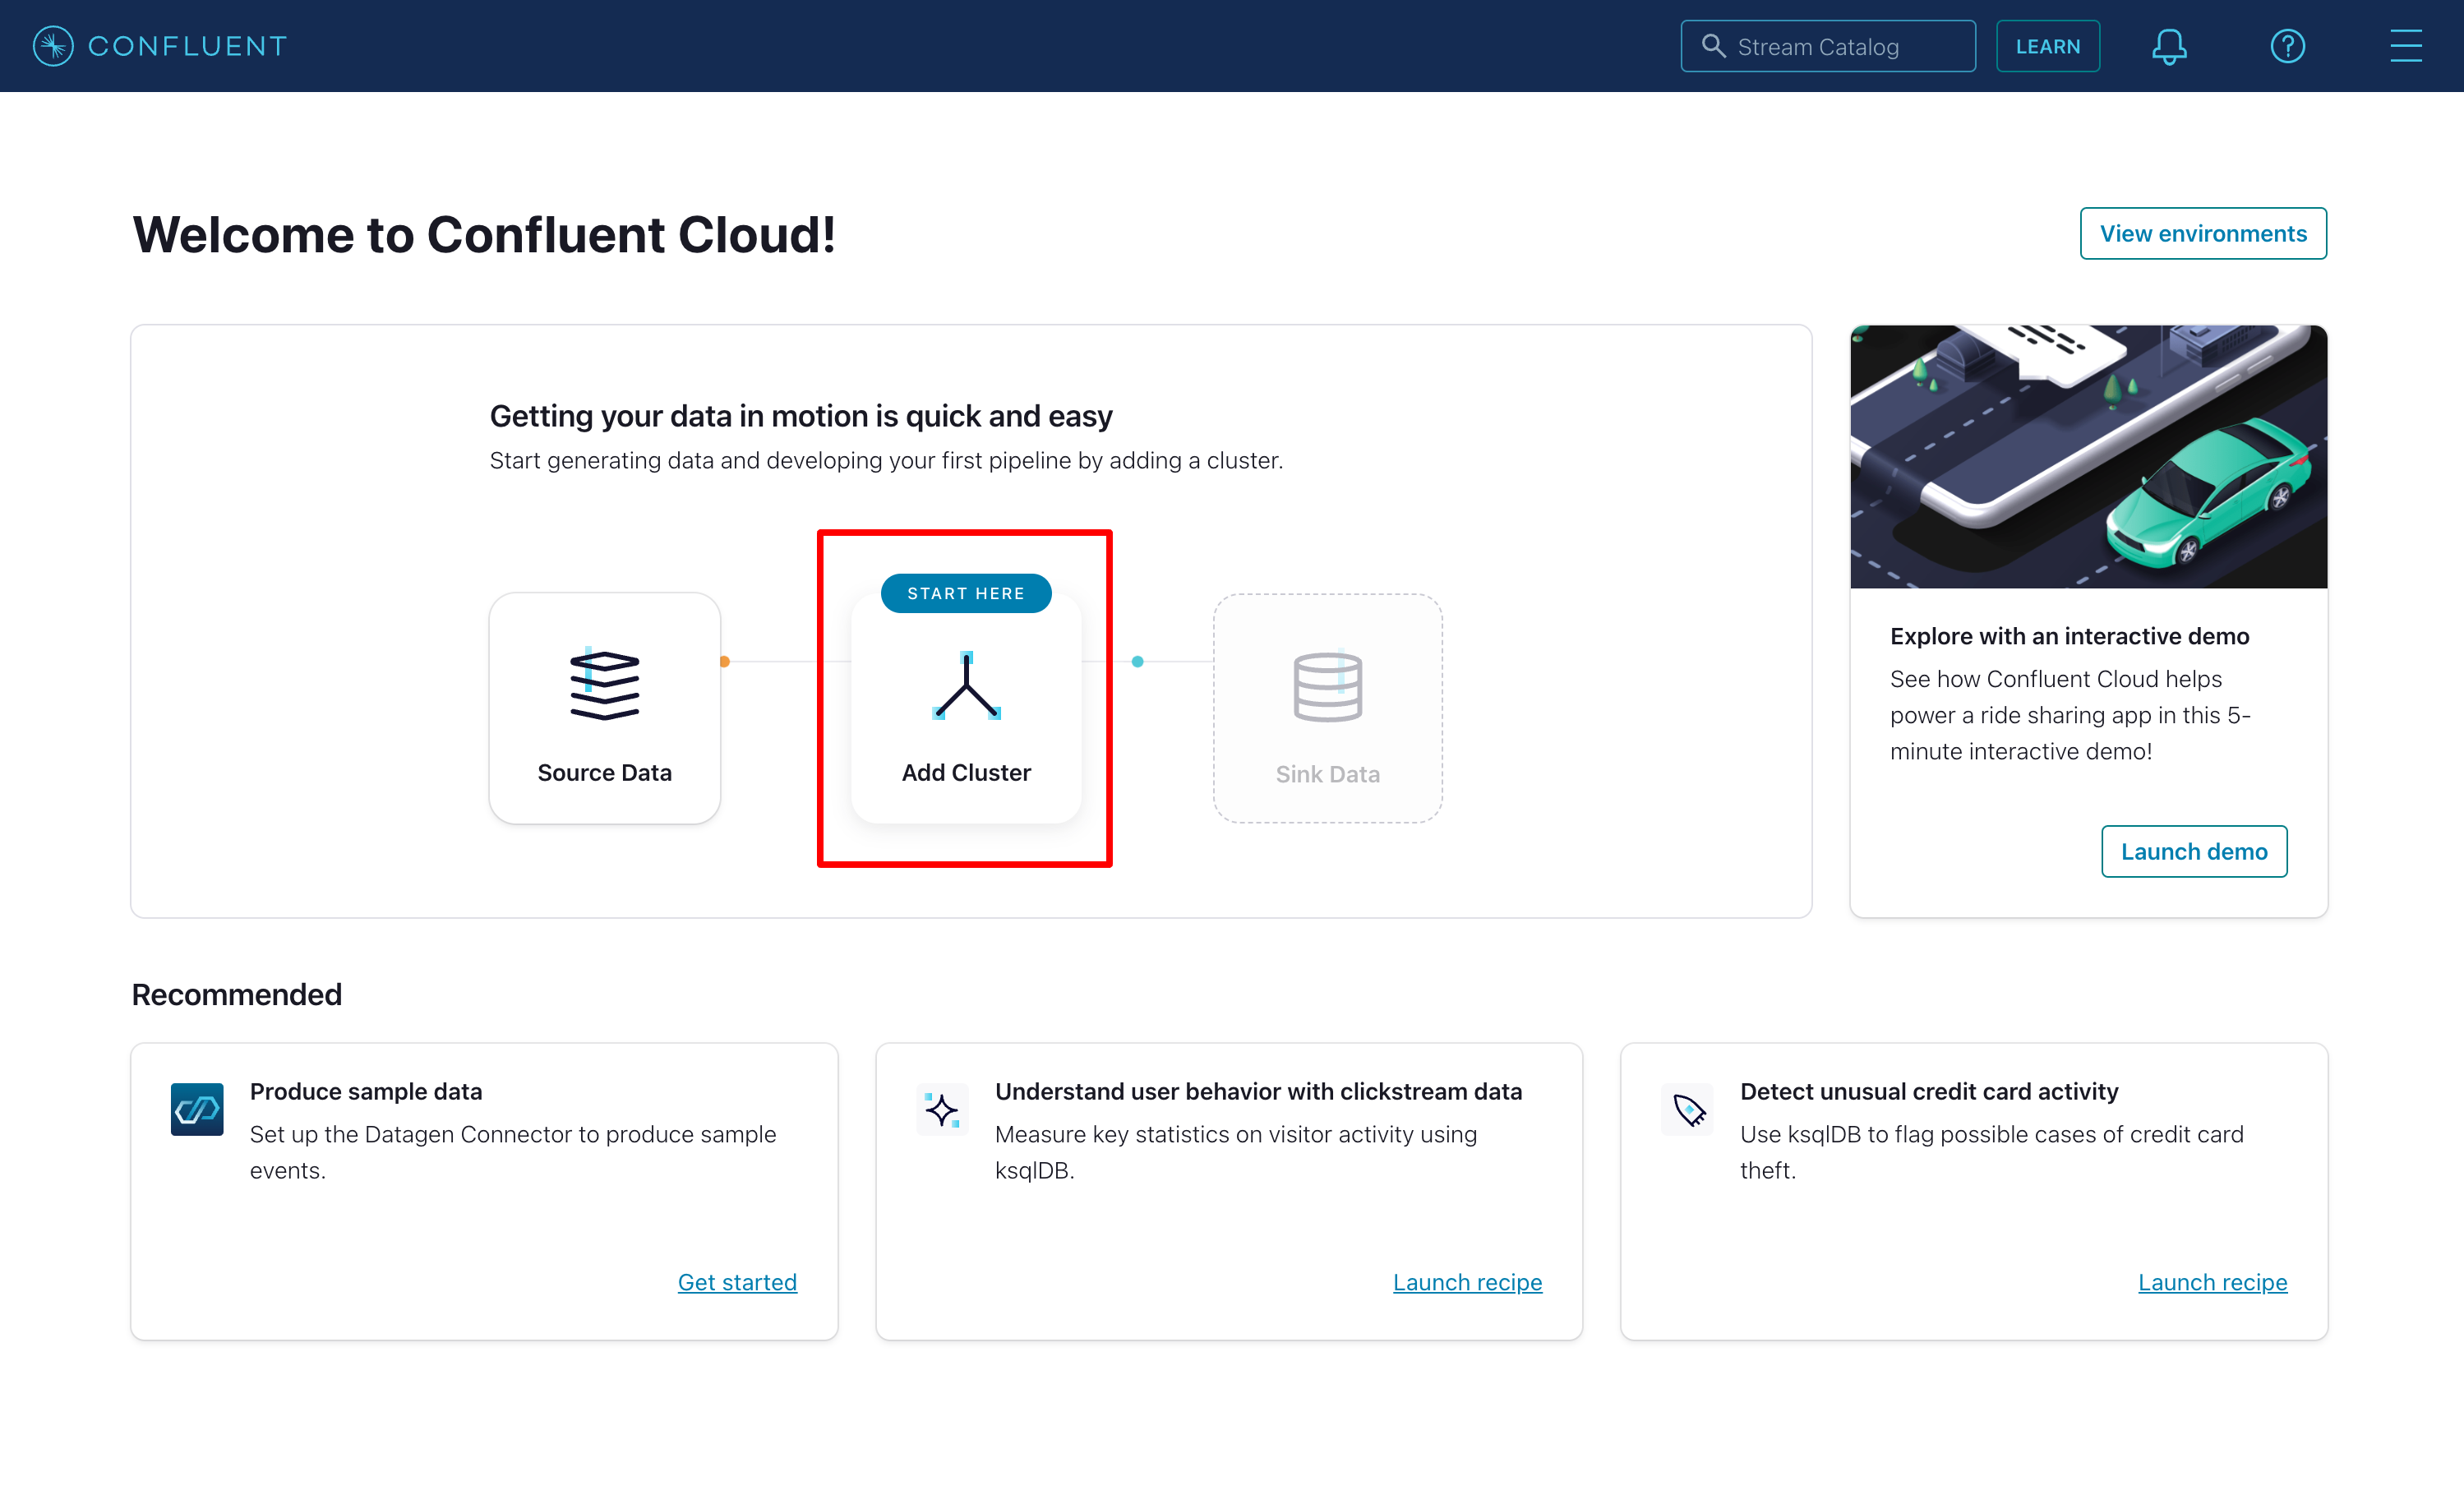
Once you are logged in, choose the Add Cluster option to start your first Kafka cluster:
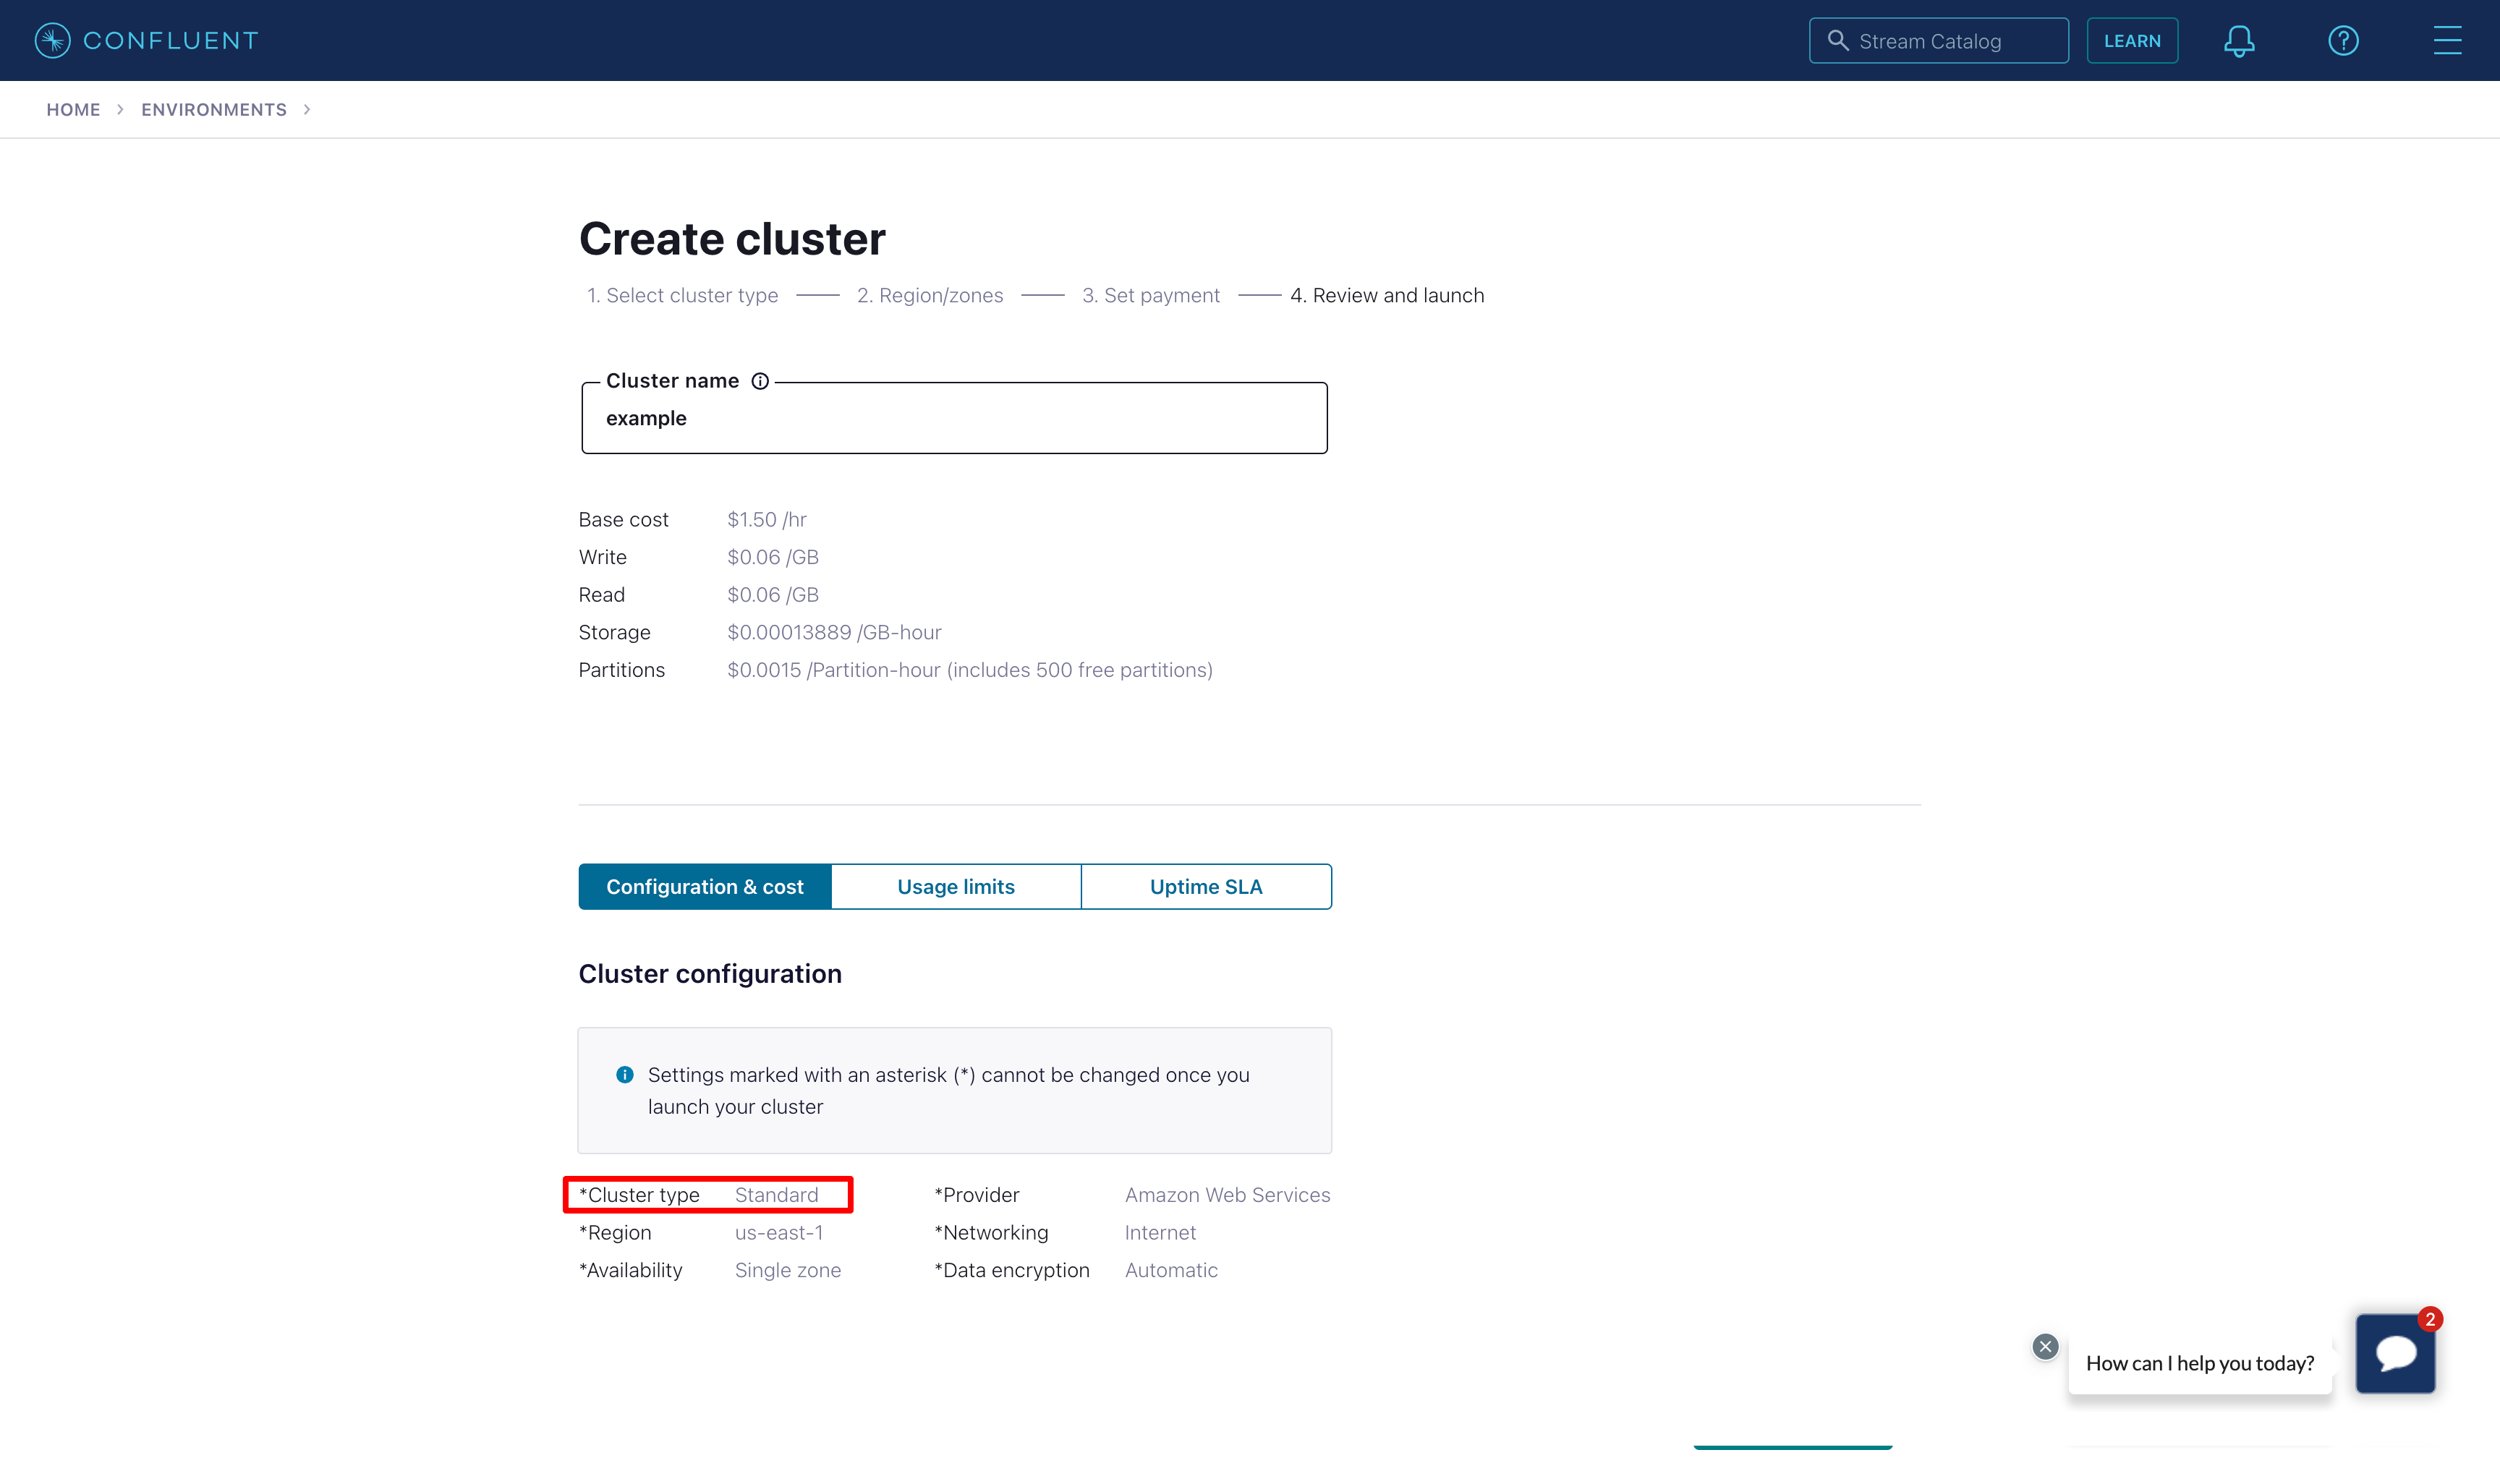
For testing purposes, we can start with the Standard plan. Select Begin configuration, choose the Cloud provider, region and availibity.
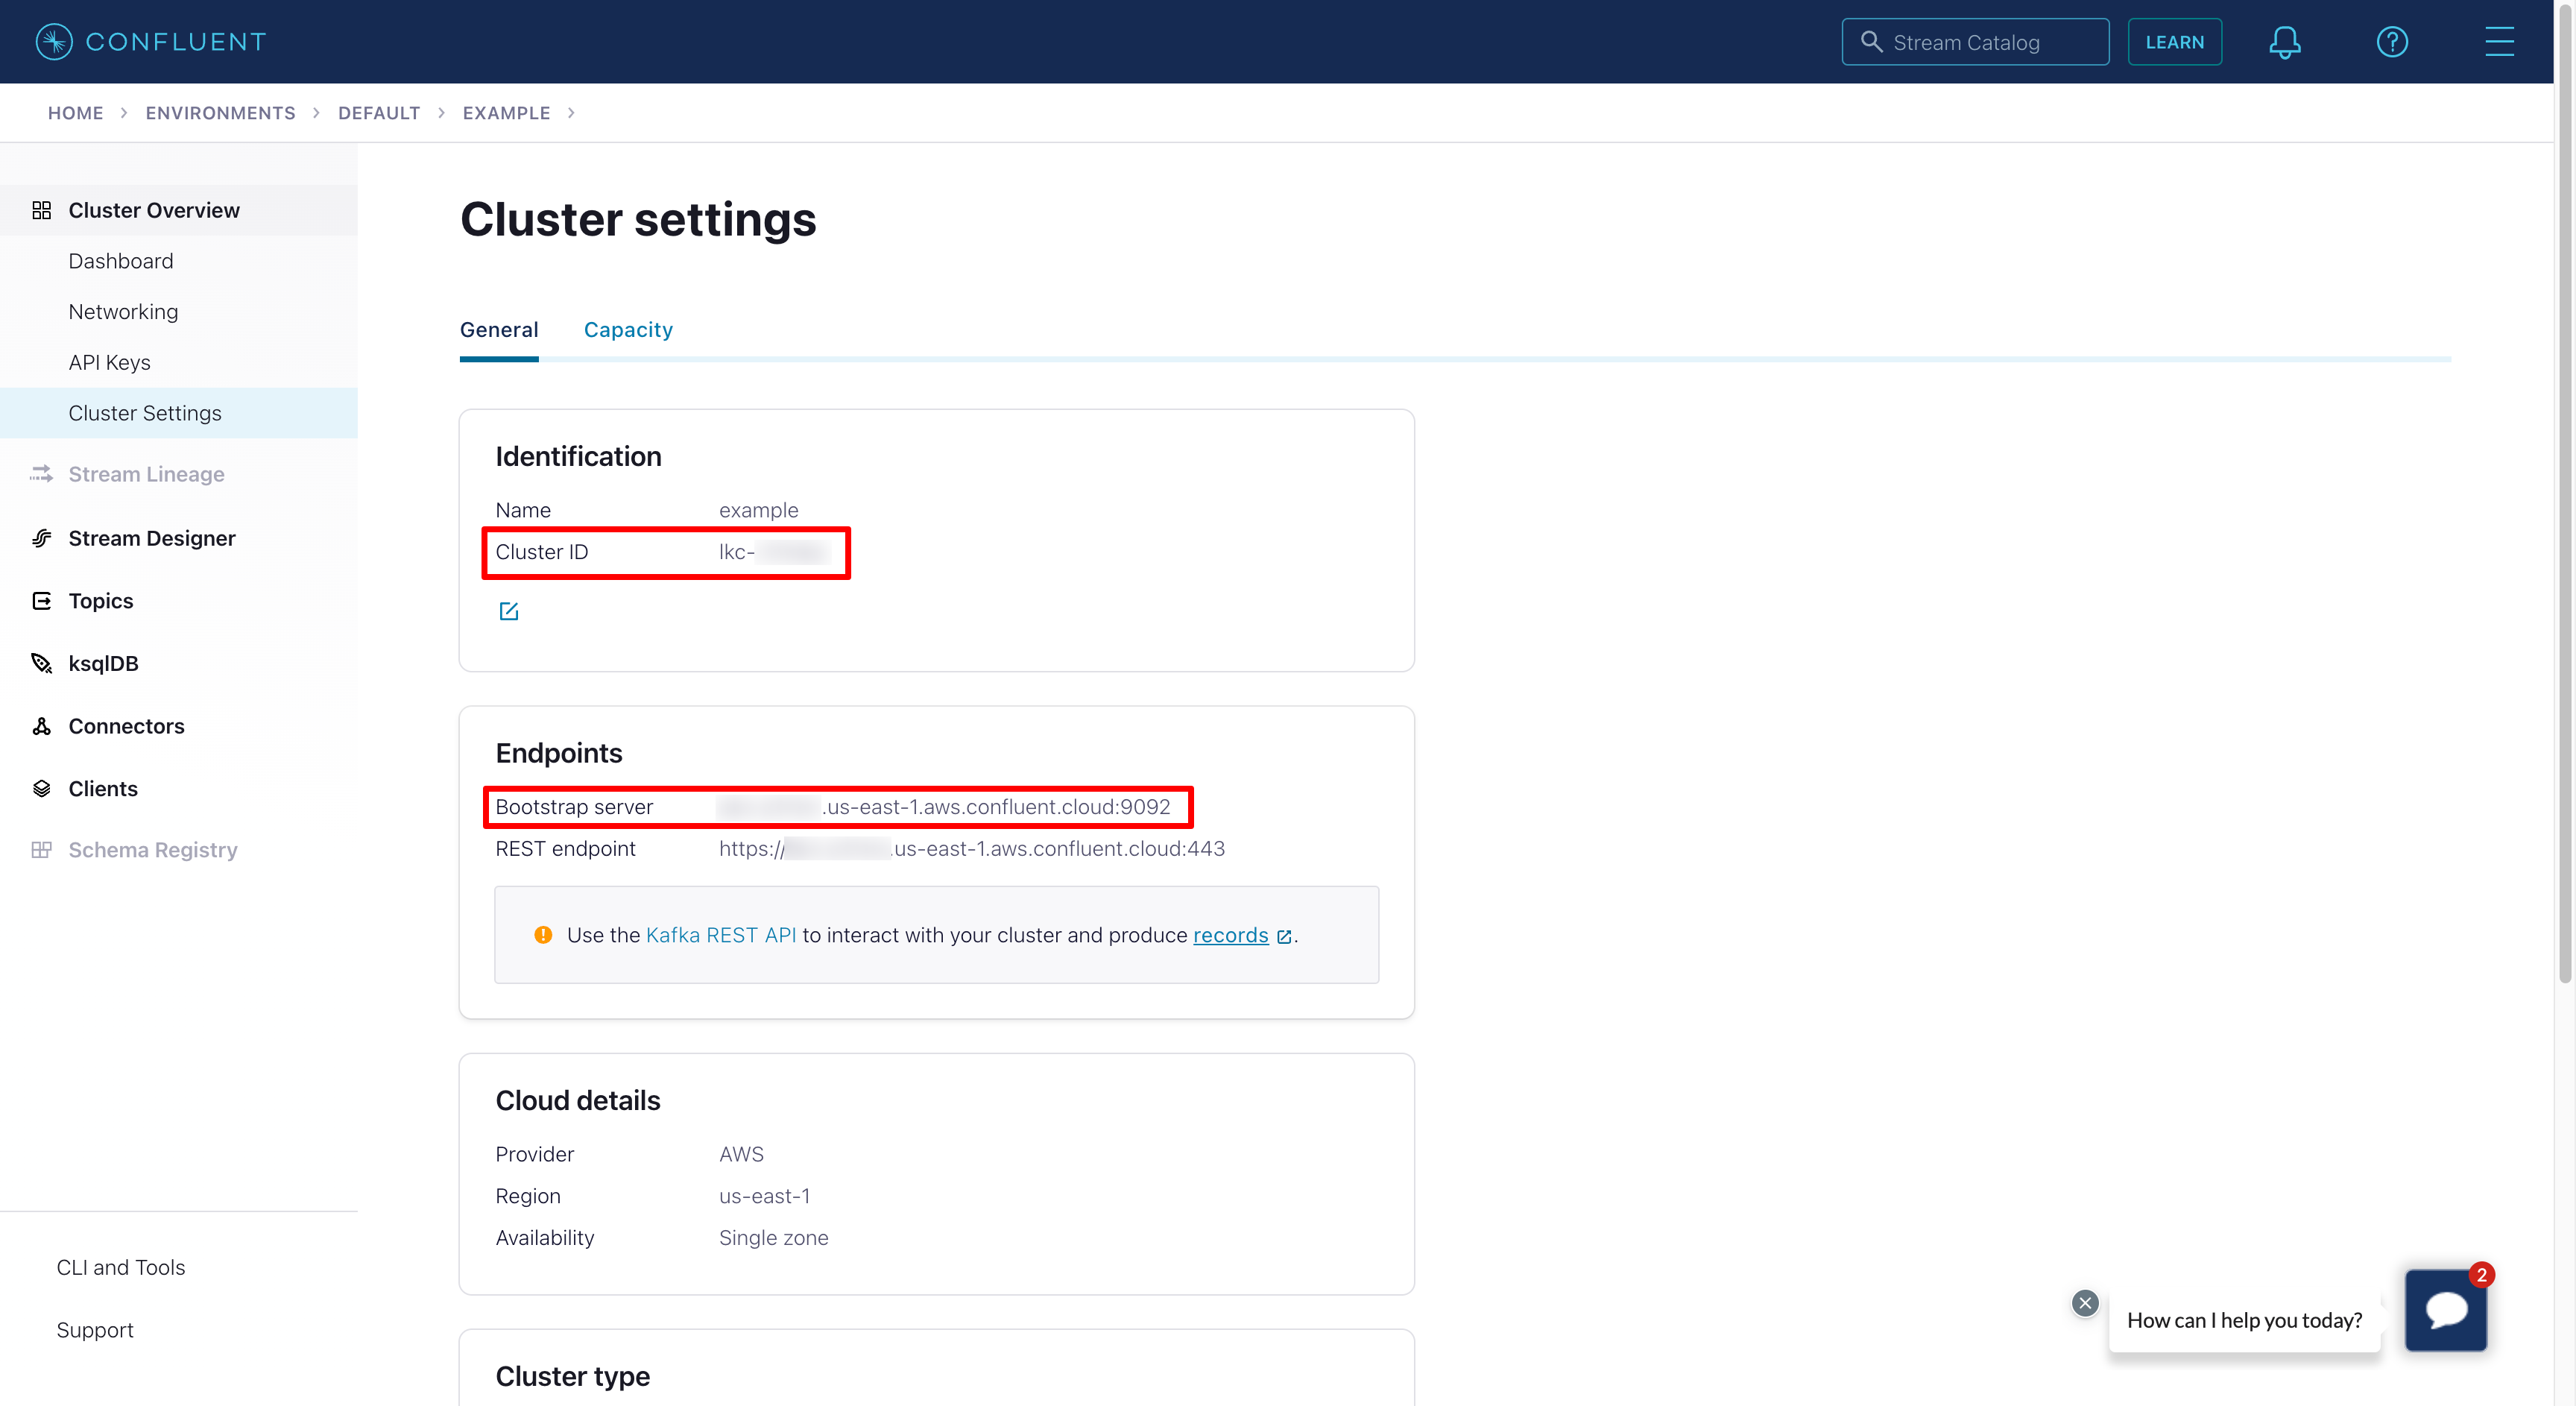
Once the Kafka cluster is created, we need to save it’s ID (LOGICAL_CLUSTER) and endpoint
(BOOTSTRAP-SERVER). You can obtain them by going to the cluster details and choosing the
Cluster Settings option.
Configure Identity Provider in Confluent Cloud
Visit Account & access in the Confluent Cloud Console.
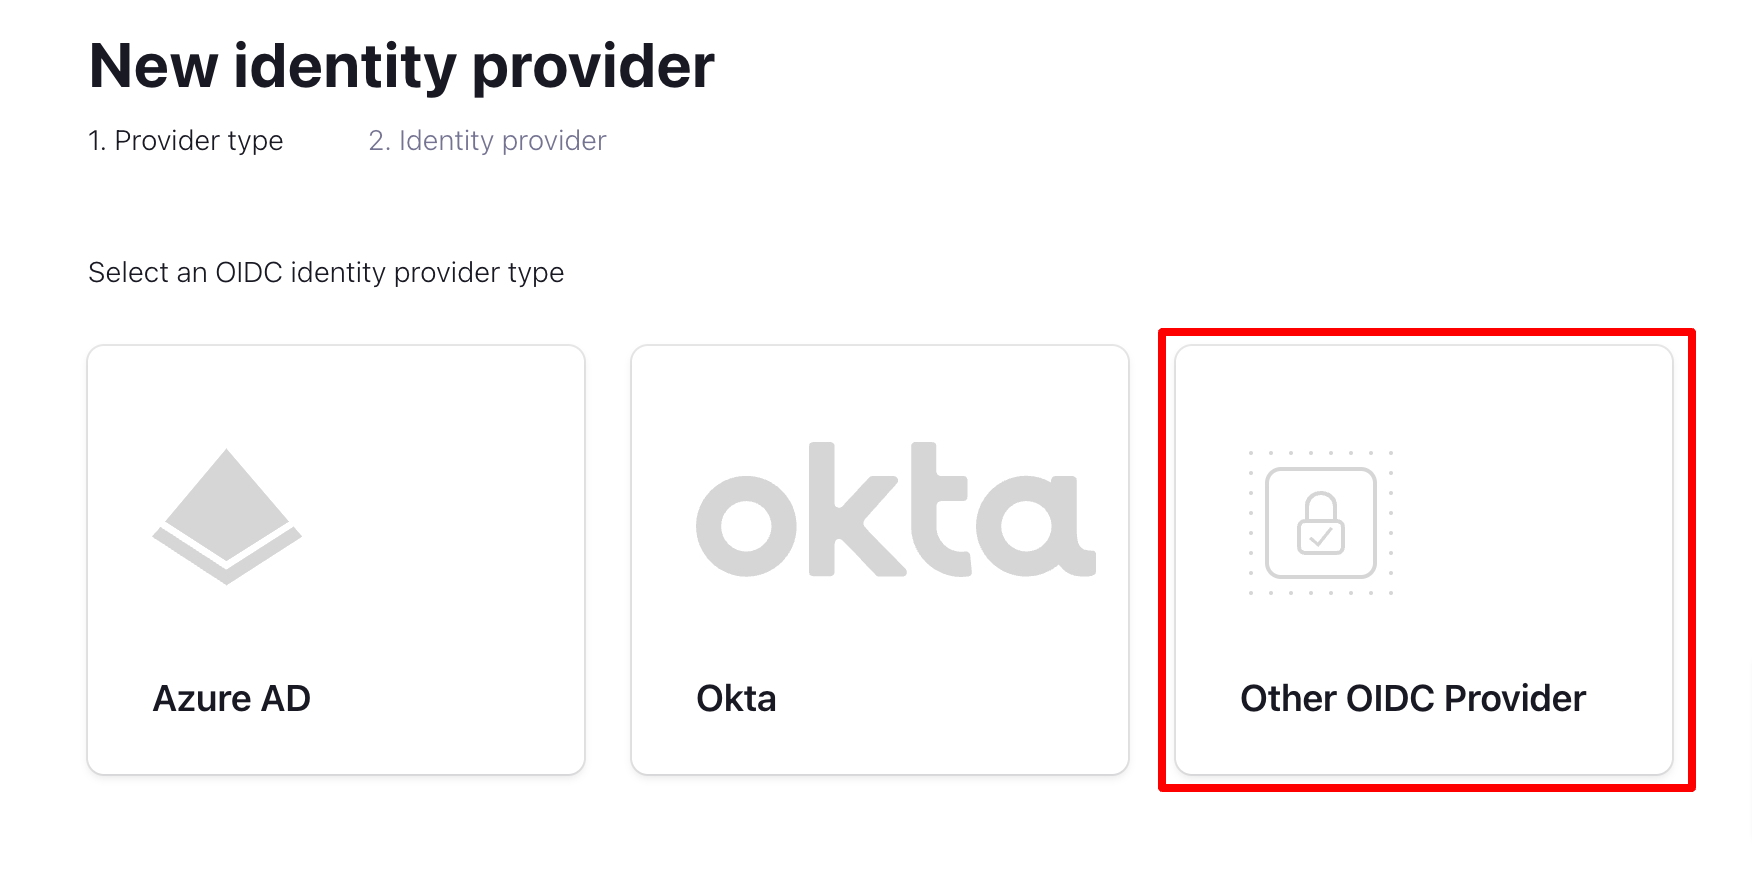
Select Add identity providers and choose Other OIDC provider.
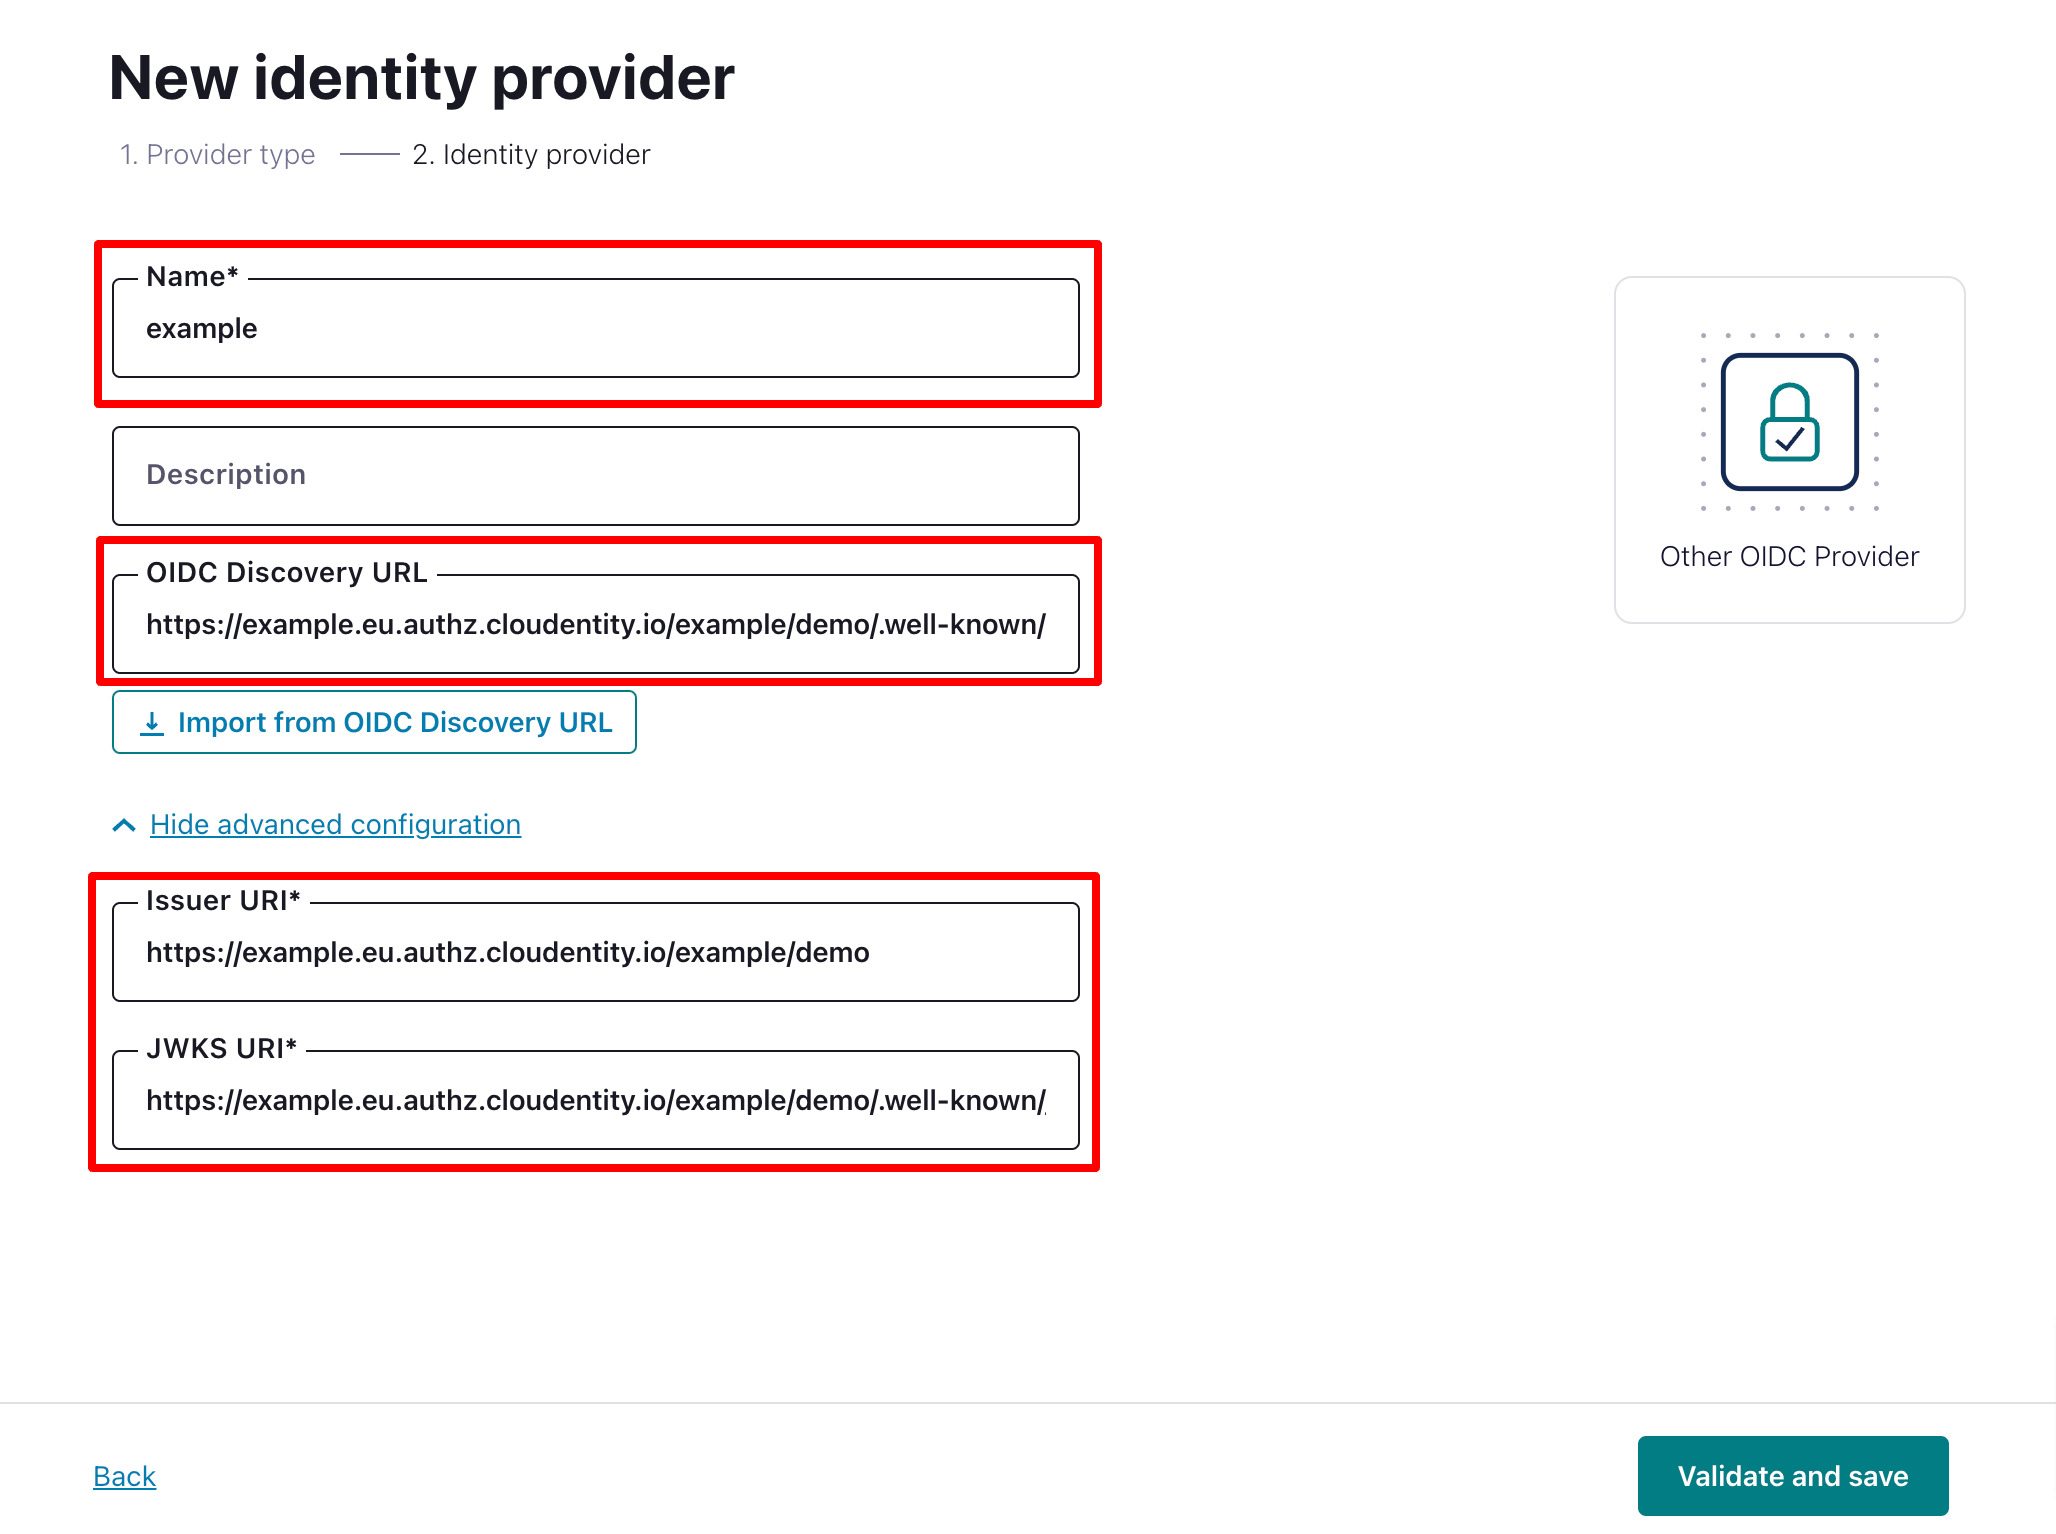
Provide your identity provider Name, OIDC Discovery URL (it is the value of OIDC DISCOVERY/WELL-KNOWN URL obtained in the previous section), Issuer URI (the authorization server URL), and JWKS URI (JWKS URI).
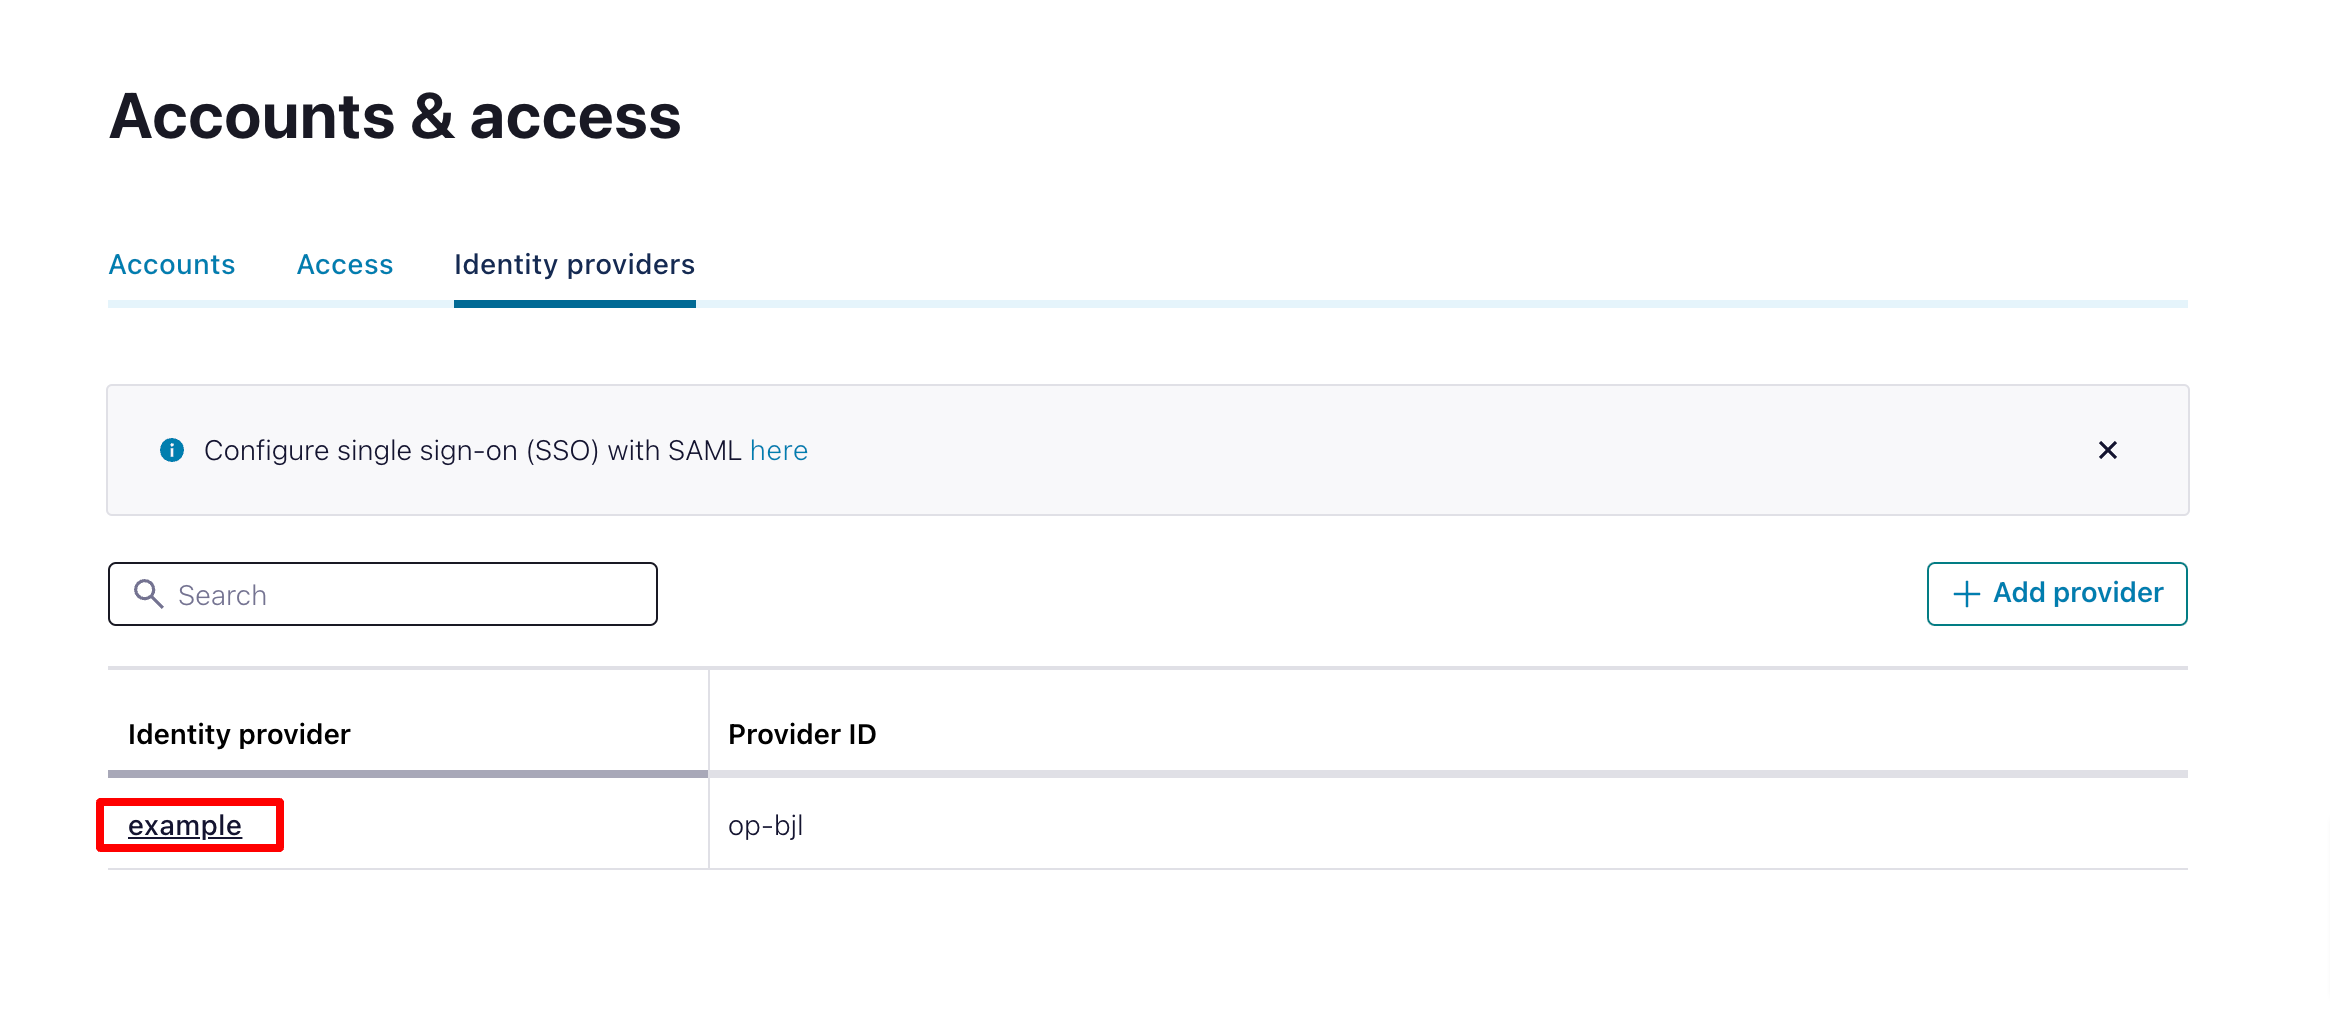
Configure Identity Pool in Confluent Cloud
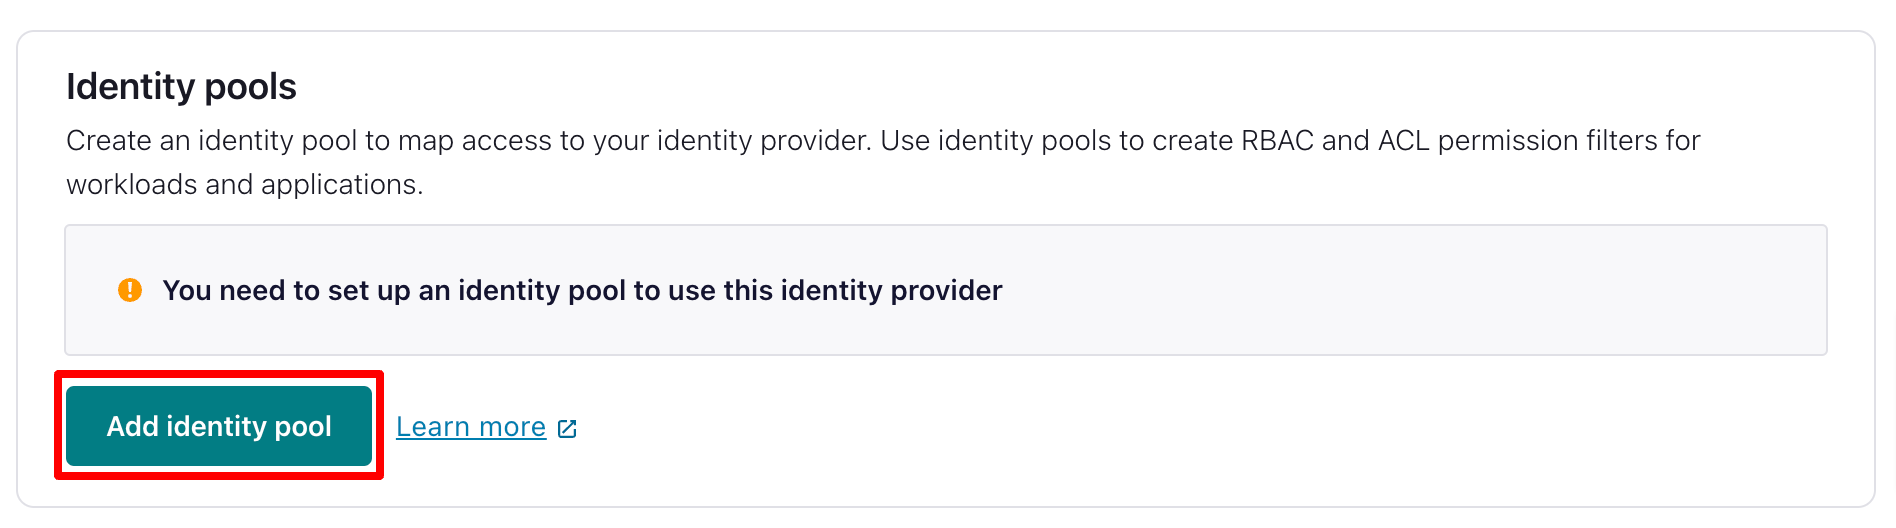
Now you need to set up an identity pool to use your new identity provider. Choose the identity provider you created:
And select Add identity pool.
Set Up Kafka Client
Prerequisites
In this section we will show you how to use the kafka-producer-perf-test.sh script to connect and
authorize in Confluent Kafka using Cloudentity OIDC server.
Clone the apache/kafka repository:
git clone git@github.com:apache/kafka.git
and build it:
cd kafka
./gradlew jar -PscalaVersion=2.13.11
> Configure project :
Starting build with version 3.6.0-SNAPSHOT (commit id f32ebeab) using Gradle 8.1.1, Java 1.8 and Scala 2.13.11
Build properties: maxParallelForks=10, maxScalacThreads=8, maxTestRetries=0

BUILD SUCCESSFUL in 8s
132 actionable tasks: 132 up-to-date
Client Configuration
Create a connection.properties file:
security.protocol=SASL_SSL
sasl.oauthbearer.token.endpoint.url=<TOKEN>
sasl.login.callback.handler.class=org.apache.kafka.common.security.oauthbearer.secured.OAuthBearerLoginCallbackHandler
sasl.mechanism=OAUTHBEARER
sasl.jaas.config=org.apache.kafka.common.security.oauthbearer.OAuthBearerLoginModule required clientId="<CLIENT ID>" clientSecret="<CLIENT SECRET>" extension_logicalCluster='<LOGICAL CLUSTER>' extension_identityPoolId='<IDENTITY POOL ID>';
where:
sasl.oauthbearer.token.endpoint.urlpoints to yourTOKENvalue,<CLIENT ID>points to your OAuth client ID,<CLIENT SECRET>points to your OAuth client secret,<LOGICAL_CLUSTER>points to your cluster ID,<IDENTITY POOL ID>points to your identity pool ID
for example:
security.protocol=SASL_SSL
sasl.oauthbearer.token.endpoint.url=https://example.eu.authz.cloudentity.io/example/demo/oauth2/token
sasl.login.callback.handler.class=org.apache.kafka.common.security.oauthbearer.secured.OAuthBearerLoginCallbackHandler
sasl.mechanism=OAUTHBEARER
sasl.jaas.config=org.apache.kafka.common.security.oauthbearer.OAuthBearerLoginModule required clientId="fe11bc101a834add902baf7b9f61dc10" clientSecret="CiSwWS63OehwI9vjeWgaXwsw_ymRE2aQ8T08D6JRABu" extension_logicalCluster='lkc-***' extension_identityPoolId='pool-***';
Run:
./bin/kafka-producer-perf-test.sh --topic example --num-records 50 --throughput 10 --record-size 1 --producer-props bootstrap.servers=<BOOTSTRAP-SERVER> --producer.config config.properties
where:
<BOOTSTRAP-SERVER>points to your cluster endpoint
Once the connection is established, you should see a log similar to:
SLF4J: Class path contains multiple SLF4J bindings.
SLF4J: Found binding in [jar:file:/Users/example/kafka/tools/build/dependant-libs-2.13.11/slf4j-reload4j-1.7.36.jar!/org/slf4j/impl/StaticLoggerBinder.class]
SLF4J: Found binding in [jar:file:/Users/example/kafka/trogdor/build/dependant-libs-2.13.11/slf4j-reload4j-1.7.36.jar!/org/slf4j/impl/StaticLoggerBinder.class]
SLF4J: Found binding in [jar:file:/Users/example/kafka/connect/runtime/build/dependant-libs/slf4j-reload4j-1.7.36.jar!/org/slf4j/impl/StaticLoggerBinder.class]
SLF4J: Found binding in [jar:file:/Users/example/kafka/connect/mirror/build/dependant-libs/slf4j-reload4j-1.7.36.jar!/org/slf4j/impl/StaticLoggerBinder.class]
SLF4J: See http://www.slf4j.org/codes.html#multiple_bindings for an explanation.
SLF4J: Actual binding is of type [org.slf4j.impl.Reload4jLoggerFactory]
49 records sent, 9.8 records/sec (0.00 MB/sec), 1827.7 ms avg latency, 4356.0 ms max latency.
50 records sent, 9.902951 records/sec (0.00 MB/sec), 1795.14 ms avg latency, 4356.00 ms max latency, 2049 ms 50th, 2884 ms 95th, 4356 ms 99th, 4356 ms 99.9th.
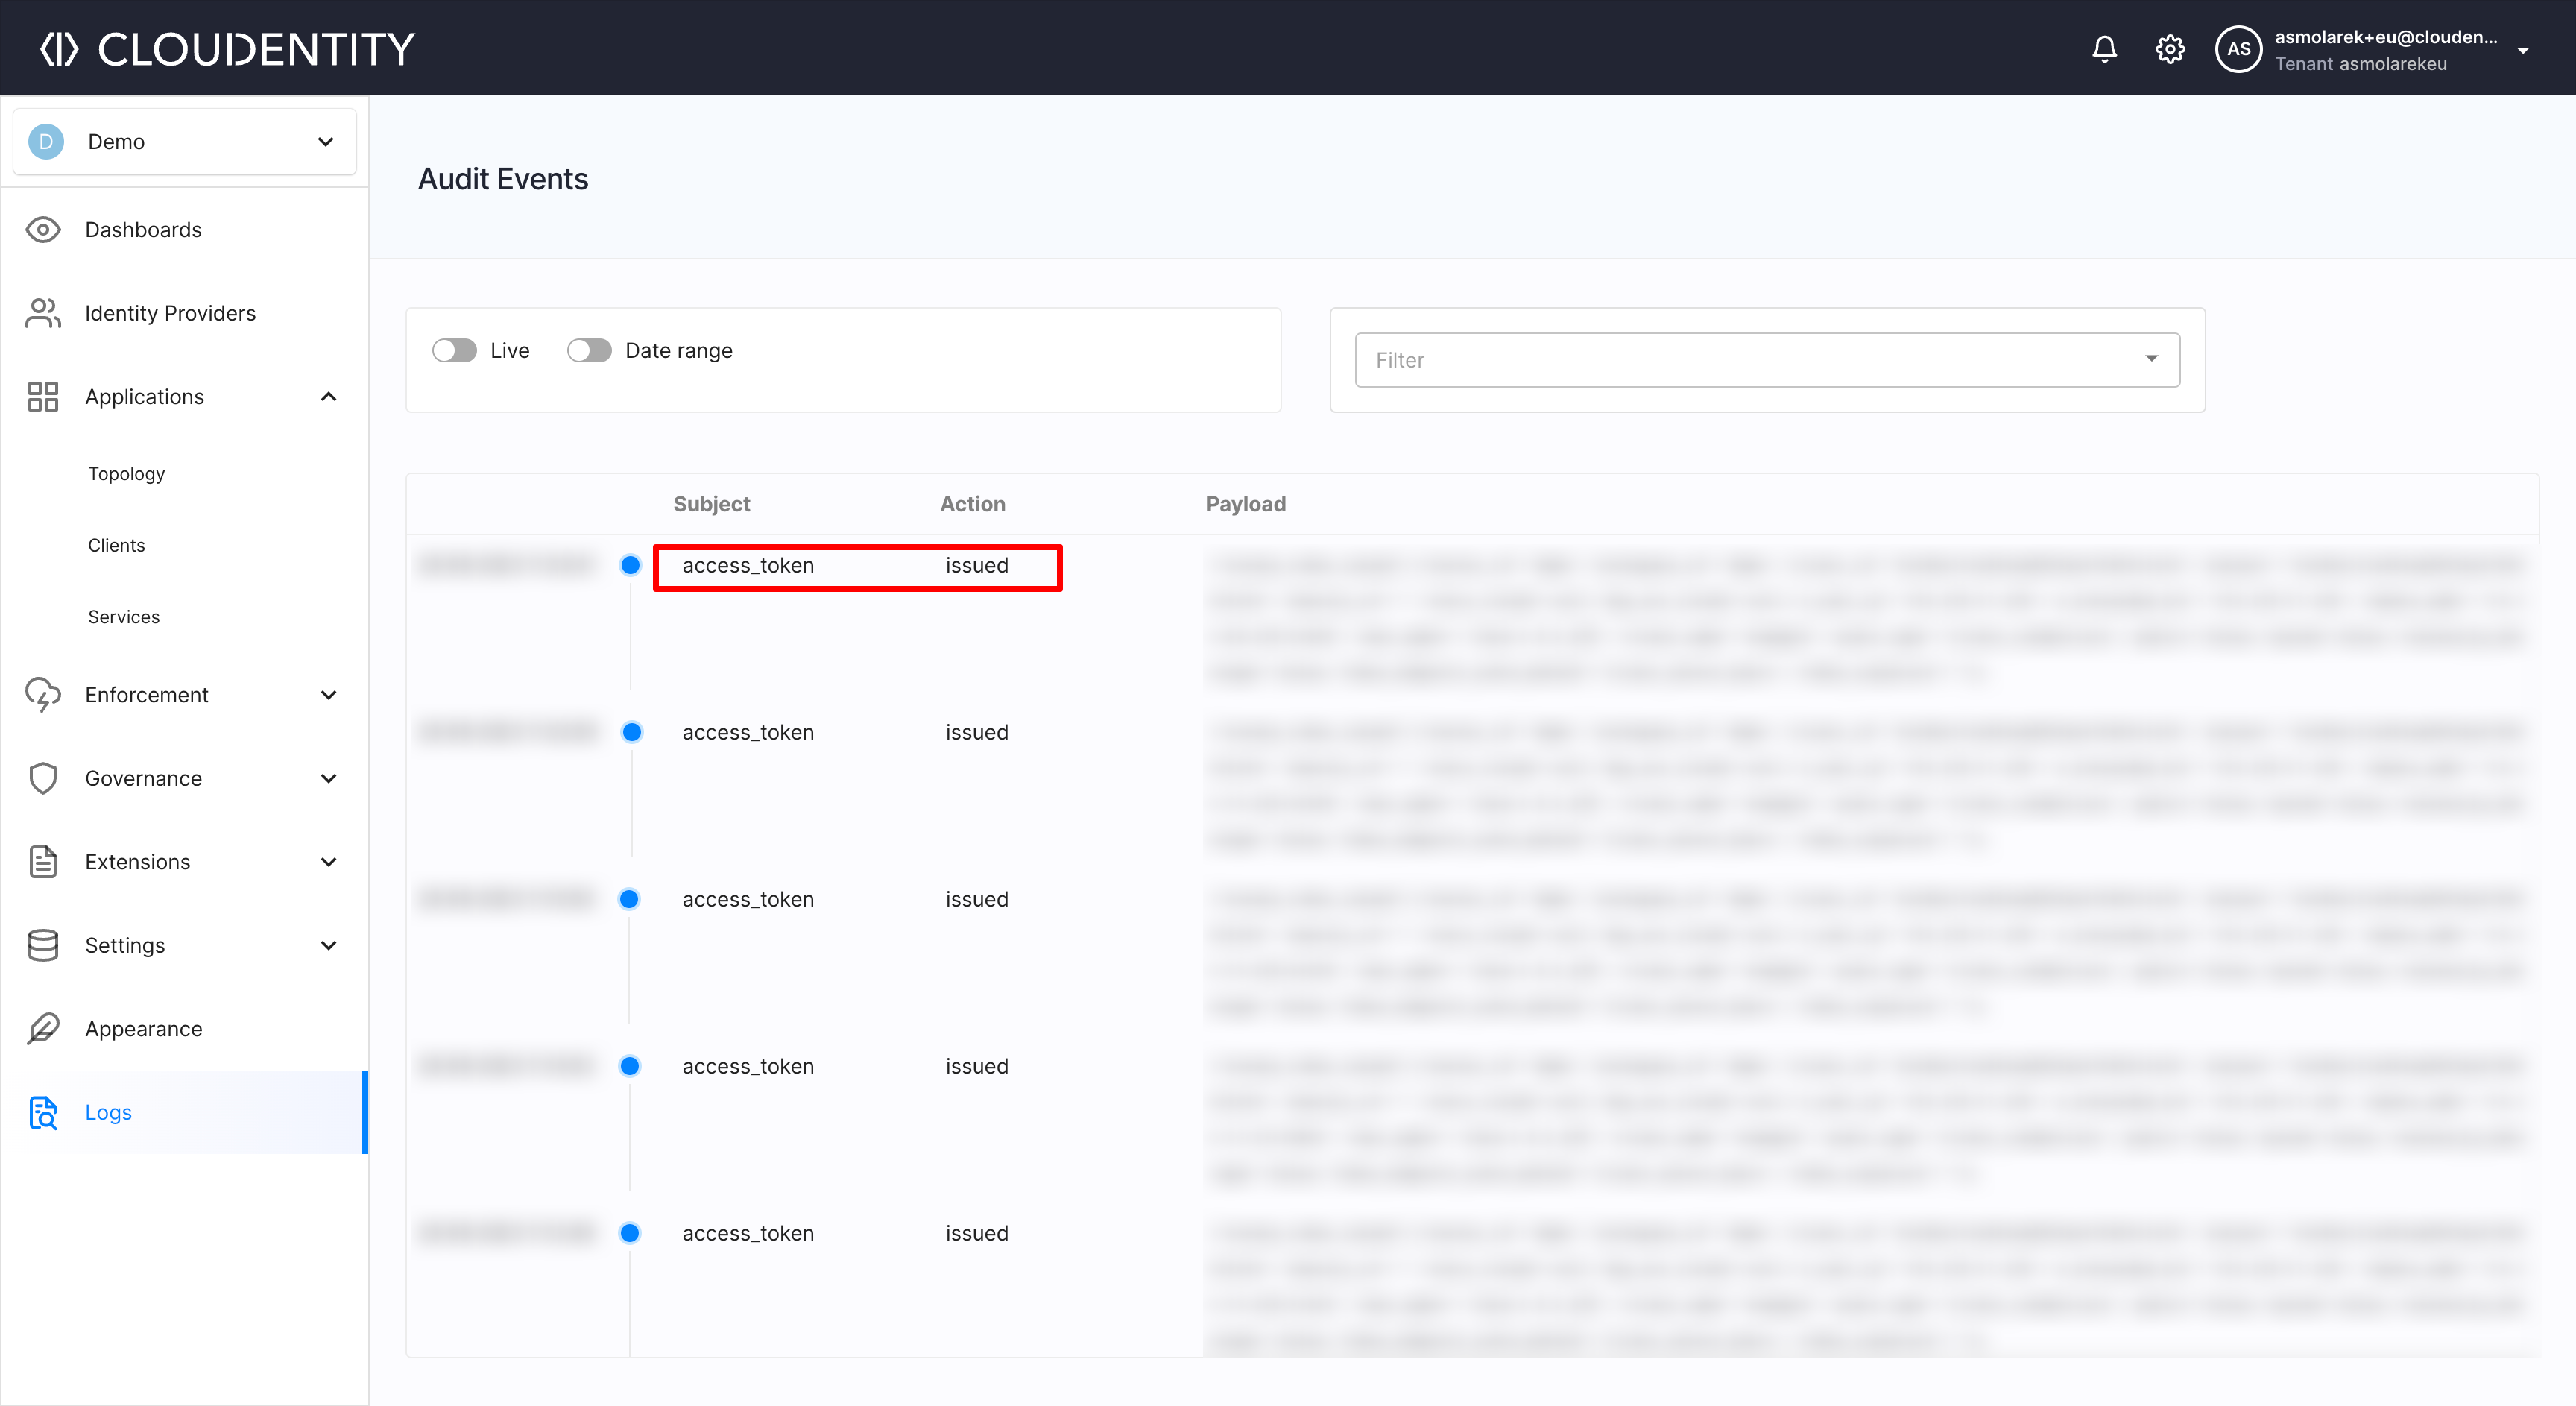
You can also confirm, that the authorization process is using Cloudentity IDP, by checking your Audit logs on our platform:
Summary
Cloudentity serves as an identity provider for both browser-based and machine-to-machine communication, as evidenced by its capabilities.
With Cloudentity, managing identities from a central location is possible, regardless of the type of application being used.