
Background
The sender constraint is a mechanism that ensures that only the authorized sender can use a particular access token to access protected resources. This is achieved by binding the access token to a specific cryptographic key and requiring the sender to prove possession of that key.
To implement sender-constrained access tokens, the following methods can be used:
- OAuth 2.0 Mutual-TLS Client Authentication and Certificate-Bound Access Tokens
- OAuth 2.0 Demonstrating Proof-of-Possession at the Application Layer (DPoP)
While the mTLS was already adopted by FAPI 1.0 Advanced and is widely used in Openbanking UK, Brasil and Consumer Data Rights implementations, the DPoP is relatively new.
This might change, as the new version of FAPI 2.0 Security Profile allows mTLS or DPoP to be used.
This article compares the pros and cons of each method and highlights their benefits in terms of security and authentication.
Flow in Depth
Let’s take a look at a simplified flow where the Client gets the token from the Authorization Server and then calls some protected resource.
No sender constraint
Authorization: Bearer $AT rs -> rs: validate $AT rs -->> client: Response
In this scenario, the access token is not bound to the client that it was issued for. If the access token is stolen or leaked, anyone can call a protected resource. This can be mitigated by using either mTLS or DPoP.
mTLS
To use certificate-bound access tokens, Public Key Infrastructure (PKI) is necessary. A PKI infrastructure consists of a certificate authority (CA) responsible for issuing and signing certificates. The CA should be recognized and accepted by the Authorization Server during the token authentication process. Typically, organizations either use a third-party CA or establish an internal CA for issuing certificates.
client certificate as -->> client: certificate bound Acess Token ($AT) client ->> rs: GET https://example.com/resource
Authorization: Bearer $AT
client certificate rs -> rs: validate $AT
compare confirmation hash with client certificate rs -->> client: Response
To get certificate bound access token (step 1), the client must present certificate when calling the /oauth2/token endpoint.
The issued access token/introspection endpoint contains the confirmation claim with a hash of the client certificate:
{
  "cnf": {
    "x5t#S256": "nyJ-boWc-MUQgAe7c2Fpy23enSim5-eKaGgC8dHmYX4"
  }
}
When the client makes a call to the protected resource (step 3), it must attach both the access token and the certificate (step 3). The resource server must then check whether the hash of the presented certificate matches the confirmation claim (step 4).
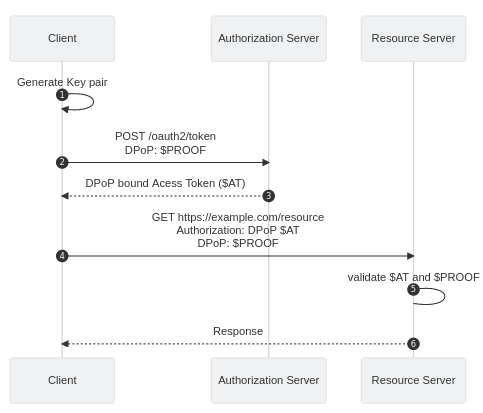
DPoP
DPoP was designed to work at Application Layer and it does not require PKI. It leverages asymmetric cryptography, and JSON Web Tokens.
DPoP: $PROOF as -->> client: DPoP bound Acess Token ($AT) client ->> rs: GET https://example.com/resource
Authorization: DPoP $AT
DPoP: $PROOF rs -> rs: validate $AT and $PROOF rs -->> client: Response
The flow starts with the client generating a key pair of private and public keys. These keys are specific to the token and the request being made.
Then calling the /oauth/token endpoint, the client signs a DPoP proof JWT using the private key that includes the public key, along with other information such as the HTTP method, URI, for example:
eyJhbGciOiJQUzI1NiIsImp3ayI6eyJrdHkiOiJSU0EiLCJuIjoibGw3eC1WQVFsc25mNFRkNXhLc0tHZ1F0RFVaajV1RzRGaC1tRE9EZTVuNml6X2E3T2Y0V1drVU1XYWN4NEpXdGJuanpKOE1mV1ZNY1lYZ0JreTFYUUI5SWNRN003b3RUNjBjVUxMS3FYQWxoeFg2QVdTbFR3Znl2TmVYT0ZjNGtqelp3VTZ5dmZ2NEhwUGxoek9vYjNjSW1qU3g0aEFXU3NEQzNpZ3p6SGRPREZydDNuVzhLQXBRT2JxUXBNRmNTdVFMdTNTc2hyQzlHTG5SWXM3Z3hjczlxdmZYY2dIa1BDbWNDZ2JWNFZqd2JUdHczT3lQZUhNbEowQW9IdF9aWFM2Z0lpd3pVS2xDcDZNS24wT0lIOFhNU3A0Zm9ZWU5sU1BXN09FMGlMY2E4QUpldzlEc2p0amhBVGJPLXBsZFRwbU5wWXFwZHJTMXYwRzNUenhldmZ3IiwiZSI6IkFRQUIifSwidHlwIjoiZHBvcCtqd3QifQ.eyJodG0iOiJQT1NUIiwiaHR1IjoiaHR0cHM6Ly9vYXV0aDJjLnVzLmF1dGh6LmNsb3VkZW50aXR5LmlvL29hdXRoMmMvZGVtby9vYXV0aDIvdG9rZW4iLCJqdGkiOiIzMWY4Y2ZhYS0yZWQyLTQ3OWEtYjFjZS1hZmU4NjRiNGEwN2UiLCJpYXQiOjE2ODQzMTM1NjN9.Tzc0oi3vSyrOt4AJdMPPwpGSrNcu8MhU8PoFw9327tSwxLzyB1Wnup0lbqxMX82IDjKA3658yBUj4RLqar6WF9mAEQwru4CF--zj629pqOtLbh5VQBcrrwbNbLuquKO4yFZTryBeEYBE2OWHnPrLubDXH2X9Vo-quGq11lcoZWU_XMdNZakUqREunMzY3F5q_0N3JOT7HkvT0jU6eSMn11kqzWMO-A4xNyglVOCMxKZd3pUuRni_iwxGG43OyrXoHSnp4na48NV5A9bBKfYxqxU6OD_QrI7K9wueMrpXgARgAir2H_7CnynzaVi9FYmgxXm2w-dhIANs1QN_xkJNPw
Decoded header:
{
  "alg": "PS256",
  "jwk": {
    "kty": "RSA",
    "n": "ll7x-VAQlsnf4Td5xKsKGgQtDUZj5uG4Fh-mDODe5n6iz_a7Of4WWkUMWacx4JWtbnjzJ8MfWVMcYXgBky1XQB9IcQ7M7otT60cULLKqXAlhxX6AWSlTwfyvNeXOFc4kjzZwU6yvfv4HpPlhzOob3cImjSx4hAWSsDC3igzzHdODFrt3nW8KApQObqQpMFcSuQLu3SshrC9GLnRYs7gxcs9qvfXcgHkPCmcCgbV4VjwbTtw3OyPeHMlJ0AoHt_ZXS6gIiwzUKlCp6MKn0OIH8XMSp4foYYNlSPW7OE0iLca8AJew9DsjtjhATbO-pldTpmNpYqpdrS1v0G3Tzxevfw",
    "e": "AQAB"
  },
  "typ": "dpop+jwt"
}
Decoded payload:
{
  "htm": "POST",
  "htu": "https://oauth2c.us.authz.cloudentity.io/oauth2c/demo/oauth2/token",
  "jti": "31f8cfaa-2ed2-479a-b1ce-afe864b4a07e",
  "iat": 1684313563
}
The issued access token/introspection endpoint contains the confirmation claim with the hash of the public key included in the DPoP header:
{
  "cnf": {
    "jkt": "RDweqX6qcVfPJYxuCw543HmetWz2RfjJGcOrEH9e3Hg"
  }
}
When the client makes a call to the protected resource (step 3), it must attach the access token and generate new DPoP proof JWT per every request (step 3).
{
  "htm": "GET",
  "htu": "https://example.com/resource",
  "jti": "afe864b4a07e-2ed2-b1ce-479a-31f8cfaa",
  "iat": 1684314808
  "ath": "7msSQlMTsPnQTiXfgyf804NTDYNUMcQ5wj88J2dFDN4"
}
Compared to step 1, the DPop proof JWT when calling the protected resource contains an additional ath claim with access token hash.
The resource server must check whether this claim matches the hash of the access token sent in the request.
Comparison
Both mTLS and DPoP are designed to provide sender constraint and ensure the legitimacy of the token sender. However, they approach the problem from different angles.
mTLS pros:
- Strong security: mTLS relies on Public Key Infrastructure (PKI) and certificate-based authentication, providing strong security guarantees.
- Widely adopted: mTLS has been adopted by standards like FAPI 1.0 Advanced and is widely used in Open Banking implementations.
mTLS cons:
- Requires PKI infrastructure: can be complex and cumbersome to deploy, especially for organizations without prior experience with PKI.
- Additional configuration may be necessary on the proxy level (if used) to establish a trust relationship and propagate the certificate
- It can be only used by confidential clients that can store the certificate in a secure manner
DPoP pros:
- No PKI requirement: DPoP does not rely on PKI infrastructure, making it easier to implement compared to mTLS.
- Application-layer security: DPoP operates at the application layer, leveraging asymmetric cryptography and lightweight JSON Web Tokens (JWTs).
- It can be used by both public and confidential clients
- Offers replay attack protection using
jticlaim - it must be unique
DPop cons:
- Relatively new: DPoP is a newer method compared to mTLS, which means it may not have the same level of widespread adoption and established tooling.
Summary
Both mTLS and DPoP aim to address the sender constraint by binding access tokens to specific cryptographic keys and requiring senders to prove possession of those keys. The choice between the two methods depends on factors such as the existing infrastructure, security requirements, complexity considerations, and the level of adoption and support within the ecosystem.
If you would like to run mTLS or DPoP examples please take a look at our oauth2c tool.
If you want to read more about Mutual TLS authentication check out our article and sample apps in nodejs and golang.