OAuth

Authenticate Client Application Using OAuth 2.0 Token Exchange On-Behalf-Of (Delegation) Flow

OAuth 2.0 Token Exchange on-behalf-of (delegation) flow enables client applications to act on behalf of a different entity, for example, another client application or a user. We are here to show you how you can implement it to your system using the Cloudentity platform!

About Authenticating Client Apps Using OAuth 2.0 Token Exchange Delegation Flow

OAuth 2.0 provides the support of token exchange in the delegation or “on-behalf-of” scenario. A common use case for the delegation is to allow a resource (actor) to make calls to a backend service on behalf of the requesting user (subject). In practice, the resource needs an access token of the requesting user without direct user interaction. It can be accomplished by leveraging the JWT Bearer Flow or Client-Initiated Backchannel Authentication (CIBA) flow. If a trust is implicit and the authorization of the user can be assumed to be acted on, the JWT Bearer Flow can be used. In case we need an explicit trust, we need a higher security level, and we want to obtain an authorization from the end user, then we can use the CIBA flow to fetch authorization from the user from a different consumption device.

In this tutorial, we will show how the JWT Bearer Flow can be used to obtain a JSON Web Token (JWT) and used to obtain the subject access token from the Cloudentity platform. We will show how to obtain the actor access token via the Cloudentity Demo Application. Finally, we will show how to request a delegation access token by providing both the actor and subject tokens in the Token Exchange API call.

Token Exchange Delegation Flow

Token Exchange Support at Cloudentity

Cloudentity supports both types of the OAuth 2.0 Token Exchange: Impersonation and Delegation. If you wish to learn more about the impersonation flow, see the Token Exchange Authorization Basics article. Additionally, for the impersonation flow, Cloudentity’s authorizers are capable of exchanging incoming third-party access tokens to internal access tokens and using them as the means of authenticating your request to access protected data.

The Postman collection is a quick way to illustrate the token exchange request and examine the request and response structures.

Prerequisites

  1. Cloudentity SaaS tenant

    Sign up for a free Cloudentity Authorization SaaS account.

    Activate the tenant and get ready to exchange the tokens using the on-behalf-of (delegation flow)!

  2. A JSON Web Key generator for creating JWKS

  3. JWT Generator for testing purposes

  4. Postman to invoke Cloudentity APIs and obtain access tokens

Configure Cloudentity Trusted Service Application for JWT Bearer Flow

Learn more

Cloudentity supports using JWT profile for OAuth 2.0 authorization flows

Configure Workspace

  1. Add a Demo Environment workspace or use an already existing one that has the Demo Application connected.

    We are adding the Demo Application as it is later on needed to retrieve an access token in a convenient way.

  2. Add a Sandbox IDP and a sample user that provides us with a possibility to test different scenarios involving users without a need of setting up any IDP integration.

  3. Enable the JWT Bearer Flow and Token Exchange in your workspace settings.

Create and Configure Service Application

  1. Within the workspace created and configured in the Configure Workspace section, create an application.

    For the purpose of this article, we recommend creating a Service application.

  2. In the OAuth tab of the client application settings, mark your application as trusted.

  3. Enable the JWT Bearer Flow and the Token Exchange for your client application.

  4. Prepare a JSON Web Key.

    You can use the JSON Web Key generator for creating JWKS or any other tool able to generate a JWK.

    1. Select the key size, algorithm, and key ID of your choice. Make sure that the Key Use (the purpose of the key) is set to signature.

    2. Copy the public/private keypair set (JWKS) and paste the public key into the JWKS Web Key Set configuration in your Cloudentity service application OAuth configuration.

    Example JWKS:


       {
        "keys": [
            {
                "p": "-khFUHsZVW_4II7zymeVNFxeaIz1bPFRXFi3XXYfKBMMrCP4kxKvGzJ1wGh3zL8r4qJhOD1wJIZ3ws7U7RZnfg0-klK3fCzrsnTHbH-9vAXBCB99i-OW9Q3CbiOgPrtukDXsZzT9rfQ7-LfGAHT_sw6uSL0Cci_3M-FxhBV0qe8",
                "kty": "RSA",
                "q": "mBVsPCAwZKvAwa7SpkNKKGo_z45LTSIuQCWqwJVAhdZO2rCUJDKkFTMiv0OEAYGakiIsOG_L73vzs5KQcip9L47ui-kIaeWOLJdhcOIe0F13Faauu2JOzOQoIoQpRA51qFWoA5koCjAovnynjiNX4NiuvxWZJ5aBpqyZ6hrW6jU",
                "d": "PDJaOJMVYvAyk8l2RAitz_fbrqjREIXNNgkkgkwBWu60dSWLNxrTH5Bwl9EZ6Rfqw1-Mb2e8j4Kaq7HMmjh6Fd3-jUBVnA3O1sejgnOgruhx-MShQ7Rgf1I5e755JDwguuukH--r1yx7i55_Qzfv9BpUOF-2Dnqciydx-MeNWBFBAF5IP47Z4QyFKPVwMjQwfPRXHDf_5CVIl_jw79lFpqCipeH5aWPS5zhNptkeXusnWSSYvZFFxXcoSkJpCryZsiZApFBeedMa_SfffUAa2eZomBP6NSAAdmPGsE4LmFJvzC-pcol72y2KSmNdsChbMLQazTqW_M9rh0ybwAbwuQ",
                "e": "AQAB",
                "use": "sig",
                "kid": "test",
                "qi": "Eoxomz8mrQhlHc9hgSS2i_FrOZwug1led0SJZqyQWjxNz2dh7fEETHeQHxRYqfClpUzR2kOxkDStwLT65svyJItKZuORV0_iHiUrl-1YKBESrpgWmEFMmBsPY9fuFItfQIQMG2XI3OqY4IakWehC6l9_b1hZMn56tKm8pRoCGg8",
                "dp": "puBjHvtE8_t5NLQ8Bruz9zqTVCCQT3hDaFBayn1E3uJ8s5Y0WlO932Nwsb62ChV5PF5KdkY4rJHf7kscG4yxqpFIJCX0413MNau5gDVYG7K2dyUP_6La9z-aYPduFAXC_XKG0nW5oy_SgM5_vbRE_W2PdT5ZECu9JqFtn8TyiY8",
                "alg": "RS256",
                "dq": "V4qdTs7IjGpA_jv_jSzWlwTxzit-NNwj-1CzRT-kcGW35jIWU-_Ce2F_8tCOP7-2lb-N7L6NiUC0Ov12oADNJn8D2Q0-hpZYjFpnAG9ohVAHqDLWCY7BBTef0p54knAwUcFcgRW78oFeMqfWWv8FKqwPinaIPj1oS-S2hAcHBrE",
                "n": "lK_a5r5Xrz07xX4iMF3giIVqB-WtNe7cqA7_sgvTVk4gZdQuPb_5xVpgssf9FovrTpu0E5ts1f4cVJnzvyxlIzA3h1ib9bqAdsakrdrsMnPYwx1v_eSoksIw0gZvMc60yCYyw_6vh_o8uk9vDz8QOCMLxKSCPEUmaGoasIWXqLG4-Z-b9xpPO3-EQGfAqJlmLzRjDAxO8TDKk6TOU9-hj4i2bj6Tn6VCxwRnnrITM1mJ0FA15AwSONOCDKHZ1ly8pkIe3bKNkdIdB_YU_yKz3mSIUOcSzmUXu3uF1yOE_fRQxMUg1UvOIKTfQ5x1XCpqyHPwzg68lyaazjAzaEWkew"
            }
          ]
       }
       

Prepare Postman Environment

  1. Import the following environment setup to your Postman workspace:


       {
      "id": "b3c204f3-e16f-43f9-87aa-f1039117c0a5",
      "name": "CE Token-Exchange",
      "values": [
        {
          "key": "url",
          "value": "",
          "type": "default",
          "enabled": true
        },
        {
          "key": "workspaceId",
          "value": "token-exchange-delegation",
          "type": "default",
          "enabled": true
        },
        {
          "key": "system_client_id",
          "value": "",
          "type": "default",
          "enabled": true
        },
        {
          "key": "subject_token",
          "value": "",
          "type": "default",
          "enabled": true
        },
        {
          "key": "actor_token",
          "value": "",
          "type": "default",
          "enabled": true
        },
        {
          "key": "jwt",
          "value": "",
          "type": "default",
          "enabled": true
        },
        {
          "key": "tenant_id",
          "value": "",
          "type": "default",
          "enabled": true
        },
        {
          "key": "system_client_secret",
          "value": "",
          "type": "default",
          "enabled": true
        }
      ],
      "_postman_variable_scope": "environment",
      "_postman_exported_at": "2022-08-10T15:11:56.292Z",
      "_postman_exported_using": "Postman/9.25.2"
    }
    
       
  2. Configure the following environment variables in Postman:

    Env Variable Description Sample Value
    url Tenant host url https://mytenant.us.authz.cloudentity.io
    tenant_id Tenant identifier mytenant
    workspaceId Name of the workspace you created token-exchange-delegation
    system_client_id Client ID of your service app 48936d3522da48a89aae1b6ddb40a22f
    system_client_secret Client secret of your service app 4GocoroBIggcqKepSmKroVbwpZS-qpecGFGLVsjfpk8

    Do not worry about the following variables yet, they will be populated later:

    Env Variable Description Sample Value
    subject_token Access token of the requester Automatically populated in Postman using JWT bearer flow
    actor_token Access token of the resource Obtained from authenticating the user created in Sandbox IDP via the Demo app in the Get Actor Token section.
    jwt The JSON Web Token obtain for JWT Bearer flow See the Get Token Using JWT Bearer Flow section.
  3. Import the following collection to your Postman workspace:

    Make sure your collection is imported to the same workspace you have your environment set up.


       {
      "info": {
        "_postman_id": "5f49a733-72c3-4ee8-9829-dc669395a471",
        "name": "Token exchange",
        "schema": "https://schema.getpostman.com/json/collection/v2.1.0/collection.json"
      },
      "item": [
        {
          "name": "Get access token from JWT",
          "event": [
            {
              "listen": "test",
              "script": {
                "exec": [
                  "var jsonData = JSON.parse(responseBody);",
                  "postman.setEnvironmentVariable(\"subject_token\", jsonData.access_token);"
                ],
                "type": "text/javascript"
              }
            }
          ],
          "protocolProfileBehavior": {
            "disabledSystemHeaders": {
              "content-type": true,
              "accept": true,
              "accept-encoding": true,
              "connection": true
            }
          },
          "request": {
            "method": "POST",
            "header": [
              {
                "key": "Content-Type",
                "value": "application/x-www-form-urlencoded",
                "type": "default"
              },
              {
                "key": "Accept",
                "value": "application/json",
                "type": "default"
              }
            ],
            "body": {
              "mode": "raw",
              "raw": "grant_type=urn:ietf:params:oauth:grant-type:jwt-bearer&client_id={{system_client_id}}&client_secret={{system_client_secret}}&assertion={{jwt}}",
              "options": {
                "raw": {
                  "language": "text"
                }
              }
            },
            "url": {
              "raw": "{{url}}/{{tenant_id}}/{{workspaceId}}/oauth2/token",
              "host": ["{{url}}"],
              "path": ["{{tenant_id}}", "{{workspaceId}}", "oauth2", "token"],
              "query": [
                {
                  "key": "subject_token",
                  "value": "eyJhbGciOiJFUzI1NiIsImtpZCI6Ijk0NDM4OTMzOTA0ODQzODA3NTkwNzk0NzE5MjM5NDI3NjQ5NDM1IiwidHlwIjoiSldUIn0.eyJhY3IiOiIwIiwiYWlkIjoiZGVtbyIsImFtciI6WyJwd2QiXSwiYXVkIjpbImRlbW8tZGVtbyIsInNwaWZmZTovL21nbS1wb2MudXMuYXV0aHouY2xvdWRlbnRpdHkuaW8vbWdtLXBvYy9kZW1vL2RlbW8tdXNlci1wcml2YWN5LWNvbnNlbnQiLCJzcGlmZmU6Ly9tZ20tcG9jLnVzLmF1dGh6LmNsb3VkZW50aXR5LmlvL21nbS1wb2MvZGVtby9kZW1vLXByb2ZpbGUiLCJzcGlmZmU6Ly9tZ20tcG9jLnVzLmF1dGh6LmNsb3VkZW50aXR5LmlvL21nbS1wb2MvZGVtby9kZW1vLW9hdXRoMiJdLCJlbWFpbCI6ImZpcnN0LmN1c3RvbWVyQG1haWxpbmF0b3IuY29tIiwiZXhwIjoxNjU4NzcyMjg5LCJpYXQiOjE2NTg3Njg2ODgsImlkcCI6IjEyMWE3ODA5NDgxOTRhYzY4ZWZhYjFlNWY1YzlkZDAxIiwiaXNzIjoiaHR0cHM6Ly9tZ20tcG9jLnVzLmF1dGh6LmNsb3VkZW50aXR5LmlvL21nbS1wb2MvZGVtbyIsImp0aSI6ImExYmYyZDVmLTFlOGYtNDUyMy1iMWNmLTYzMWUzNjdmYmFiOSIsIm5hbWUiOiJGaXJzdCBDdXN0b21lciIsIm5iZiI6MTY1ODc2ODY4OCwic2NwIjpbImVtYWlsIiwiaW50cm9zcGVjdF90b2tlbnMiLCJtYW5hZ2VfY29uc2VudHMiLCJvZmZsaW5lX2FjY2VzcyIsIm9wZW5pZCIsInByb2ZpbGUiLCJ2aWV3X2NvbnNlbnRzIl0sInN0IjoicHVibGljIiwic3ViIjoiY3VzdG9tZXIxIiwidGlkIjoibWdtLXBvYyJ9.XTnZZA3hoL20XSa9KBVfEAPGYGDaVgmHp1Yiq6L7_Bg-o5sfJ8DYpLiglTdSW45oPUmctp6uj2ex-mDAv2QpcA",
                  "disabled": true
                }
              ]
            }
          },
          "response": []
        },
        {
          "name": "Token exchange",
          "protocolProfileBehavior": {
            "disabledSystemHeaders": {
              "content-type": true,
              "accept": true,
              "accept-encoding": true,
              "connection": true
            }
          },
          "request": {
            "method": "POST",
            "header": [
              {
                "key": "Content-Type",
                "value": "application/x-www-form-urlencoded",
                "type": "default"
              },
              {
                "key": "Accept",
                "value": "application/json",
                "type": "default"
              }
            ],
            "body": {
              "mode": "raw",
              "raw": "grant_type=urn:ietf:params:oauth:grant-type:token-exchange&client_id={{system_client_id}}&client_secret={{system_client_secret}}&subject_token={{subject_token}}&subject_token_type=urn:ietf:params:oauth:token-type:access_token&actor_token={{actor_token}}&actor_token_type=urn:ietf:params:oauth:token-type:access_token&scope=profile",
              "options": {
                "raw": {
                  "language": "text"
                }
              }
            },
            "url": {
              "raw": "{{url}}/{{tenant_id}}/{{workspaceId}}/oauth2/token",
              "host": ["{{url}}"],
              "path": ["{{tenant_id}}", "{{workspaceId}}", "oauth2", "token"],
              "query": [
                {
                  "key": "subject_token",
                  "value": "eyJhbGciOiJFUzI1NiIsImtpZCI6Ijk0NDM4OTMzOTA0ODQzODA3NTkwNzk0NzE5MjM5NDI3NjQ5NDM1IiwidHlwIjoiSldUIn0.eyJhY3IiOiIwIiwiYWlkIjoiZGVtbyIsImFtciI6WyJwd2QiXSwiYXVkIjpbImRlbW8tZGVtbyIsInNwaWZmZTovL21nbS1wb2MudXMuYXV0aHouY2xvdWRlbnRpdHkuaW8vbWdtLXBvYy9kZW1vL2RlbW8tdXNlci1wcml2YWN5LWNvbnNlbnQiLCJzcGlmZmU6Ly9tZ20tcG9jLnVzLmF1dGh6LmNsb3VkZW50aXR5LmlvL21nbS1wb2MvZGVtby9kZW1vLXByb2ZpbGUiLCJzcGlmZmU6Ly9tZ20tcG9jLnVzLmF1dGh6LmNsb3VkZW50aXR5LmlvL21nbS1wb2MvZGVtby9kZW1vLW9hdXRoMiJdLCJlbWFpbCI6ImZpcnN0LmN1c3RvbWVyQG1haWxpbmF0b3IuY29tIiwiZXhwIjoxNjU4NzcyMjg5LCJpYXQiOjE2NTg3Njg2ODgsImlkcCI6IjEyMWE3ODA5NDgxOTRhYzY4ZWZhYjFlNWY1YzlkZDAxIiwiaXNzIjoiaHR0cHM6Ly9tZ20tcG9jLnVzLmF1dGh6LmNsb3VkZW50aXR5LmlvL21nbS1wb2MvZGVtbyIsImp0aSI6ImExYmYyZDVmLTFlOGYtNDUyMy1iMWNmLTYzMWUzNjdmYmFiOSIsIm5hbWUiOiJGaXJzdCBDdXN0b21lciIsIm5iZiI6MTY1ODc2ODY4OCwic2NwIjpbImVtYWlsIiwiaW50cm9zcGVjdF90b2tlbnMiLCJtYW5hZ2VfY29uc2VudHMiLCJvZmZsaW5lX2FjY2VzcyIsIm9wZW5pZCIsInByb2ZpbGUiLCJ2aWV3X2NvbnNlbnRzIl0sInN0IjoicHVibGljIiwic3ViIjoiY3VzdG9tZXIxIiwidGlkIjoibWdtLXBvYyJ9.XTnZZA3hoL20XSa9KBVfEAPGYGDaVgmHp1Yiq6L7_Bg-o5sfJ8DYpLiglTdSW45oPUmctp6uj2ex-mDAv2QpcA",
                  "disabled": true
                }
              ]
            }
          },
          "response": []
        }
      ]
    }
       

Get Tokens

You need to get both an actor and a subject token before exchanging them for a token using the on-behalf-of Token Exchange scenario.

Get Actor Token Using Demo Portal and Sandbox IDP

To get an actor token, you will use the Demo Application able to provide you with both decoded and encoded token.

  1. Navigate to Dashboards view within the workspace.

  2. Select Demo Portal in the Client Applications panel.

  3. Authenticate using the sample user you created in the second step of the Configure Workspace section.

  4. Select the Access Token tab and scroll down to the bottom of the view where a raw access token is visible.

  5. Copy the raw access token and paste it as the value of the actor_token environment variable in your Postman environment setup.

    Tip

    If your access token becomes invalid, just re-login to the Demo Portal to get a new one.

Get Subject Token Using JWT Bearer Flow

  1. Generate a JSON Web Token (JWT).

    You can use any tool able to generate a valid JWT. For the purpose of this article, we will use the JWT Generator.

    Sign the JWT with the public and private key pair you obtained in the fourth step of the Create and Configure Service Application section.

    Provide all mandatory claims as a payload for the JWT and generate the JSON Web Token.

    Example of a raw JSON Web Token:

    eyJhbGciOiJSUzI1NiIsInR5cCI6IkpXVCIsImtpZCI6Imh1R2UtbjVZWkQ3eFZOOV9RUWtJang1M2h0Z3hIRlREZGtIS2FpOU1QVlkifQ.eyJpc3MiOiJodHRwczovL3NhbXBsZS51cy5hdXRoei5zdGFnZS5jbG91ZGVudGl0eS5pby9zYW1wbGUvZGVmYXVsdCIsInN1YiI6InVzZXIiLCJhdWQiOiJodHRwczovL3NhbXBsZS51cy5hdXRoei5zdGFnZS5jbG91ZGVudGl0eS5pby9zYW1wbGUvZGVmYXVsdC9vYXV0aDIvdG9rZW4iLCJleHAiOjE2NjA5MTgzMDYsImlhdCI6MTY2MDc0NTMyNSwianRpIjoiNWI1N2Y4M2QtZTNjMC00OWRhLTgzMDAtNDAzNDBmNTU2MTQ3In0.XWTh9OfN10HfxmmsPpeiscTnHyr8Twm4c4UpbDD98FSWR-mdFmQgaukIVK3Ao-Nzuzvpr_mmxrWgzpKfsw93eMlSDINvmRwOwpfHAWFuvwx8giEgiSxka4_J4g4jVerob-2RazldbAZu_EsHYlCDo3ZXph_-pH8ggHtdHj9EdLbGyW7Yu6HDT5w-Ym-tXK6IU1yOCGMmtU6kDAsvlHkMxDbLMHQEgnRFbPNkt1pbRM2wBzDXcHTneimarDJxsLcYKS9GFSLrh7uO-gXkKybQ3eeuIk9-_04oDcpnmUOSiKmZ89GvXPFwbkFtX3p2J65PanQagPm_DOc4sd8D0vSOWw
    
  2. In your Postman environment setup, add the generated JSON Web Token as the value for the jwt environment variable.

  3. Send a request to the Get access token from JWT API using Postman.

    The Get access token from JWT API is a part of the collection you imported in the third step of the Prepare Postman Environment section.

    Once the request reaches the Cloudentity platform, Cloudentity mints an access token and provides it in the request response. The provided access token is used to populate the subject_token environment variable and identifies the Cloudentity Trusted Service Application we created earlier.

Exchange Tokens In On-Behalf-Of Scenario

Now that you have both the actor token and the subject token ready, you can exchange them using the on-behalf-of (delegation) Token Exchange scenario.

To exchange the tokens, we will use the Token Exchange API from our Postman collection. The API:

  • Calls the Cloudentity OAuth 2.0 Token Endpoint with the grant_type parameter set to urn:ietf:params:oauth:grant-type:token-exchange.

  • Uses the environment variables you provided in the Postman Environment Setup, but, additionally, it includes the subject_token_type and the actor_token_type parameters hardcoded to urn:ietf:params:oauth:token-type:access_token.

By the presence of the subject_token and the actor_token parameters, Cloudentity can distinguish which mode of the Token Exchange is used, you do not need to worry about setting it yourself!

The Token Exchange API from our Postman collection, exchanges the actor and the subject token for a token minted by the Cloudentity platform using the on-behalf-of scenario for the Token Exchange. In our case, the Demo Application is the actor and is identified as the acting party to whom the authority is delegated. Our Cloudentity Trusted Service Application is the subject. It means that the Trusted Service Party Application is the party on behalf of whom the new token is requested.

  1. Call the Token exchange API.

  2. Examine the delegation token.

    You can use a tool like JWT Debugger to examine the content of the exchanged token. It should include the actor claim act section to identify the resource (our Demo Application) which acts on-behalf-of the subject (our Trusted Service Application).

    Example of the decoded token:

    {
       "act": {
          "sub": "c37403831035079a4a814179c159ace600be7db8a07aac6212d03b9e54fd10f7"
       },
       "aid": "{aid}",
       "amr": [],
       "aud": "247125f6bfc8464490fdf9b293266c41",
       "exp": 1660145566,
       "iat": 1660141966,
       "idp": "",
       "iss": "https://{tid}.authz.cloudentity.io/{tid}/{aid}",
       "jti": "569d5e7a-1584-4ce7-9f32-10fa4032d6c7",
       "nbf": 1660141966,
       "scp": [],
       "st": "public",
       "sub": "da91ab1c90f947116e6b82aeaafe9fb5c3f97d874eff7fd629c68e52b1b3d5da",
       "tid": "{tid}"
    }
    

    Adding Additional Claims to act Claim

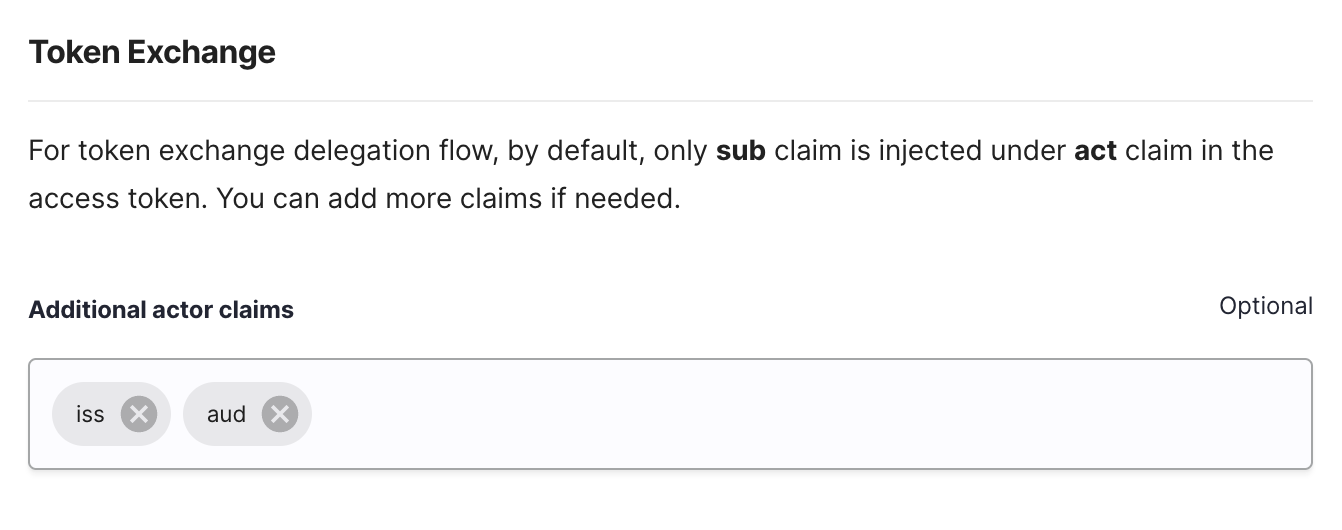
    When using the Token Exchange Delegation Flow, by default, the act claim of the exchanged token contains only the sub claim that identifies the subject of the actor token. Cloudentity makes it possible to define additional claims to be included in the act claim if needed.

    Additional claims can be added as part of the client application OAuth tab settings for a client that has the Token Exchange enabled.

    Add Claims to act Claim

Next Steps

Now that you have learned how to obtain a delegation access token using Token Exchange in Cloudentity. You can attach services with scope(s) to your service application and apply policies to govern whether a specific scope can be granted when the token is generated. See Restrict Access to Service and Configure Dynamic Scope.

Updated: Aug 23, 2022