About Token Exchange in Authorizers
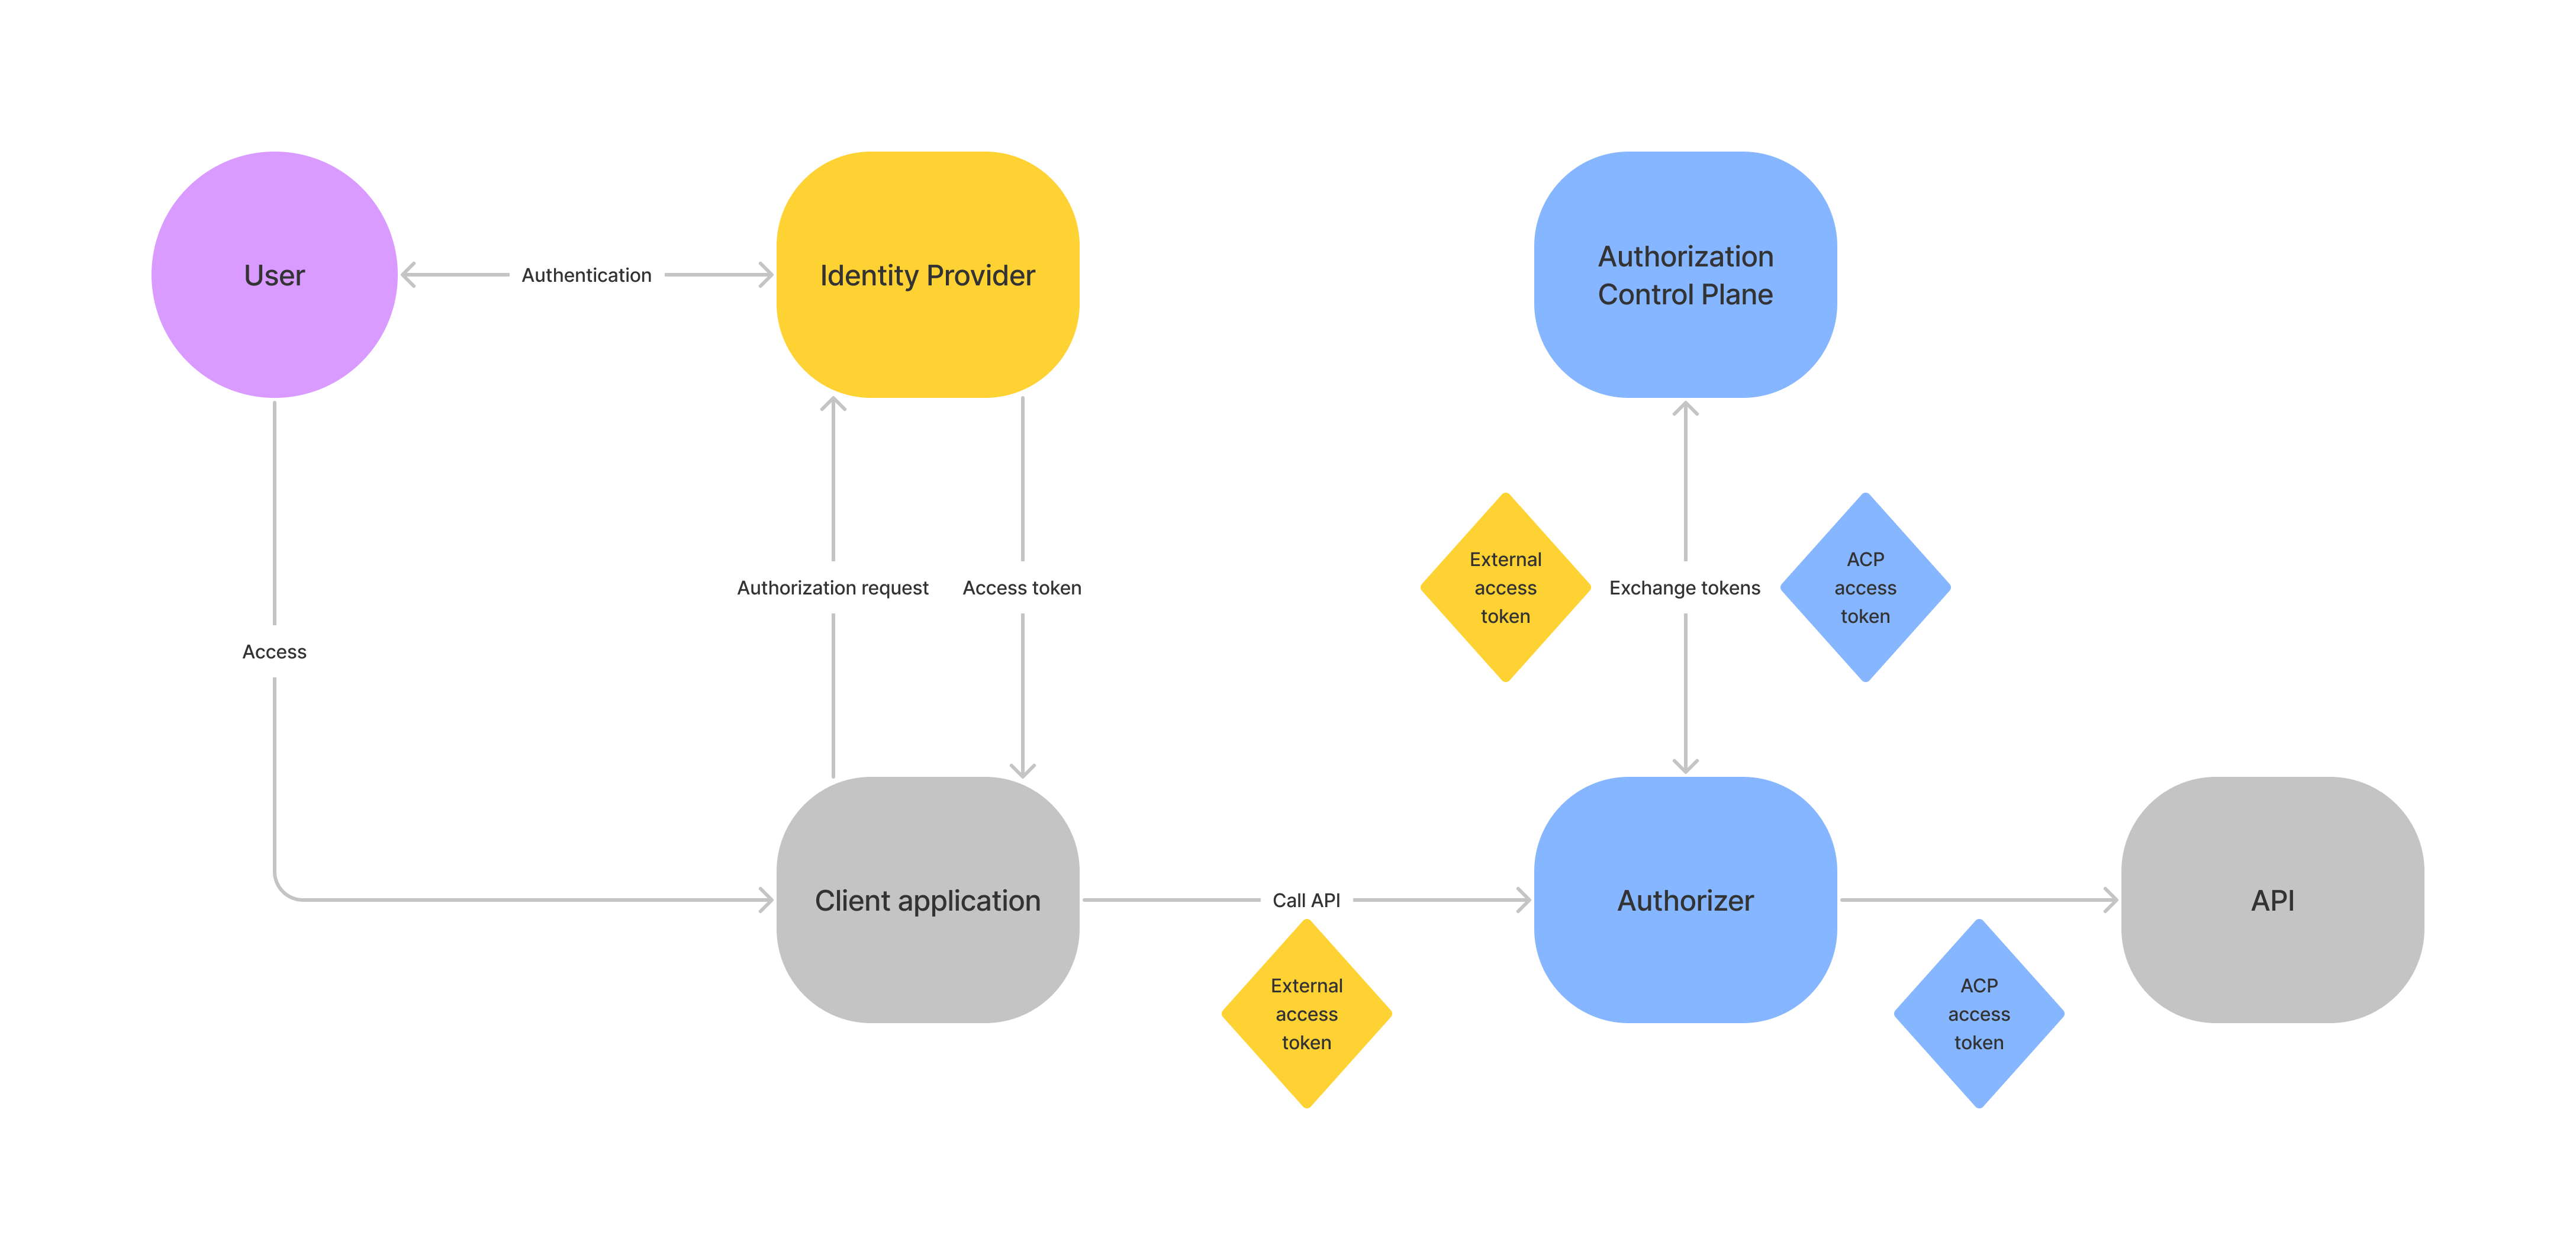
Cloudentity’s authorizers are capable of exchanging incoming third-party access tokens to internal access tokens and use them as the means of authenticating your request to access protected data. When an authorizer is created in Cloudentity and it has token exchange enabled, a separate client application is created within the same workspace as your authorizer. When an authorizer receives a third-party access token that comes from a trusted IDP (authorization server), it uses its dedicated client credentials to make a request to the Cloudentity’s OAuth token endpoint and uses the OAuth Token Exchange grant type to exchange the tokens.
The authorizer, by default, can cache up to 1000 exchanged tokens and use them until they reach their time-to-live period (60 seconds, by default). Both the amount of cached tokens and their time-to-live can be configured in your authorizer’s settings.
Istio Authorizer Unique Capabilities
For Istio Authorizer, you can decide which token is passed to the API/service. It can be either the original access token from the 3rd party authorization server, exchanged token that the client receives from Cloudentity, or both tokens. If both tokens are passed, one of the headers that is used to pass access tokens needs to be renamed.
This behavior is configurable in Istio Authorizer settings. You can adjust the behavior to your needs using the following configuration options:
inject_token:
   mode: InjectExchangedToken # inject mode, oneof InjectOriginalToken, InjectExchangedToken, InjectBothTokens
   original_token_header_name: "" # original token header name
   exchanged_token_header_name: Authorization # exchanged token header name
   strip_bearer: false # strip bearer token
Prerequisites
-
IDP is connected to Cloudentity and has the token exchange enabled in its settings.
The IDP must be Okta, Auth0, or any IDP connected using the Cloudentity’s OIDC Generic Connector.
This article is based on the natively supported by Cloudentity Auth0 IDP.

-
You have an access token obtained from your IDP through a client application registered within this IDP. You are going to exchange this token for Cloudentity’s access token.
Auth0 Sample Applications
If you are using Auth0, you can, for example, use any of their sample applications like a JavaScript client or a client application written in Go.
You can either modify their sample code to get a token in a way that is convenient for you, or you can login to their application (using the Auth0 IDP) and get the token from your browser’s developer tools (Network tab).
-
If your IDP uses any custom claims, you have created corresponding claims in Cloudentity and mapped them to the attributes in the IDP’s configuration in Cloudentity.
Learn More
You can learn more about claims, attributes, and mapping by reading the following articles:
-
Connecting identity providers to Cloudentity and an article corresponding to the type of the IDP you are using to learn about IDP attributes and mapping.
Scenario with using custom claims in an IDP is covered in the mapping claims section.
-
Gateway is set up in Cloudentity and a service is deployed behind it.
For the purpose of this article, an Istio Service Mesh is deployed on Kubernetes using the acp-on-k8s GitHub repository. The service mesh exposes the httpbin.org service.
You can use any gateway/service mesh and expose any service behind it.
Tip
For instructions on how to set up Istio Service Mesh and expose an httpbin service, see the Protecting APIs on Istio documentation and the Deploying and protecting HTTP services article.
-
An authorizer created within the same workspace as your IDP with token exchange and APIs that you deployed behind your gateway are discovered.
Extra Environment Variables
Customers that run Cloudentity on-premise and their Cloudentity’s version is lower than 2.0 must enable the token exchange for their authorizer by adding the
TOKEN_EXCHANGE_ENABLEDenvironment variable to their authorizer’s configuration and setting its value totrue.You can use any authorizer. This article is based on Cloudentity integration with Istio Service Mesh using Istio Authorizer.
-
3rd Party Token Providers (Identity providers) are enabled in your authorizer’s settings.
Configuring Trusted IDPs
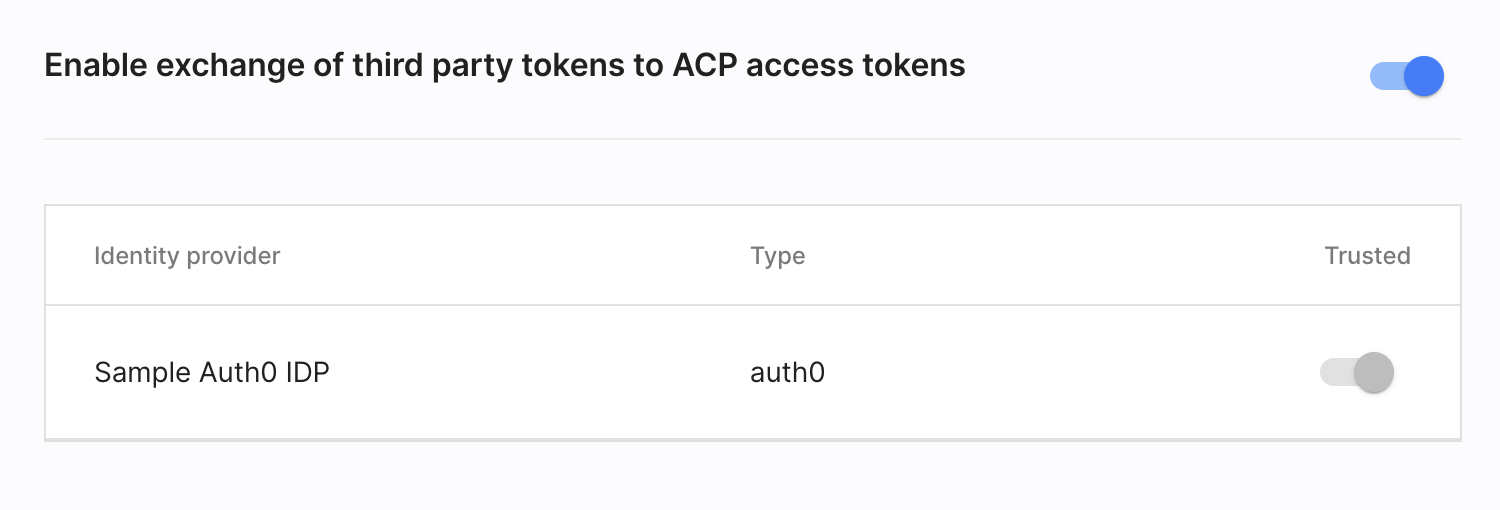
In the 3rd Party Tokens tab of your authorizer’s settings, you can set trusted IDPs. Authorizers exchange tokens only for the trusted IDPs. If only one IDP in your workspace has the token exchange grant enabled, it is configured as trusted by default and it cannot be changed.
Exchange Tokens When Accessing Protected APIs
-
In Cloudentity, go to your discovered APIs and apply an authorization policy that requires an access token to be present in the request.
For the purpose of this article, an authorization policy that always accepts a request is applied to the httpbin
GET /anythingendpoint to illustrate the token exchange. TheGET /anythingAPI always returns anything that is passed in the request data so it is possible to see which token is passed to the service to authenticate the client.Tip
To learn more about authorization policies and how you can create your policies, see the following articles:
-
In Cloudentity, go to Authorization » Policies » + CREATE POLICY.
-
Create an API request Cloudentity policy with a name and ID of your choice.
-
Remove the Fail validator and add the Pass validator.
-
Save your changes.
-
Go to APIs and apply your new policy to the
GET /anythingAPI from the httpbin service.
-
-
Get a token from your IDP and copy it. For tips, see the second step in prerequisites.
Access Token
The token that you use must not be a machine token that is minted for applications working in a machine-to-machine environments. In other words, this token cannot be minted as a result of client authentication using the OAuth client credentials grant type.
-
Make a request to the API that is protected by your authorizer with the policy that you have applied in the first step.
Access Token
Remember that your request must contain the token that you have received after authenticating your client application with your IDP.
To make a request to the httpbin service deployed on Kubernetes using the acp-on-k8s GitHub repository you need to execute your request from one of your Kubernetes pods.
-
Create a sleep pod in your K8s container by executing the following commands in your terminal:
kubectl apply -f https://raw.githubusercontent.com/istio/istio/release-1.9/samples/sleep/sleep.yaml -
Check for pods in your Default Kubernetes namespace.
kubectl get pods NAME READY STATUS RESTARTS AGE httpbin-7fb9b9479b-9xtlw 1/1 Running 0 5h5m sleep-557747455f-wqrjh 2/2 Running 0 18s -
Execute into the shell of your sleep container.
kubectl exec -it sleep-557747455f-wqrjh sh -
Call your protected API.
curl http://httpbin:80/anything -H "Authorization: Bearer $AT"$ATis an environment variable which value points to the third-party access token.Requesting Scopes
The exchanged token that the authorizer receives from Cloudentity can include the same scopes as there are in the 3rd party access token provided that the scopes exist in Cloudentity. If you want any custom scopes to be requested, add them in Cloudentity to replicate the scopes that are included in the third-party access token and assign them to your authorizer’s client application.
If it is not possible to get the same scopes, all scopes assigned to the client application are requested.
The
openidandoffline_accessscopes are filtered out to avoid issuing any additional tokens.
-
Once you call your protected API, your authorizer exchanges the tokens with Cloudentity and uses the token it received to as the client authentication for your request. If any IDP-specific claims were included in the 3rd party access token, Cloudentity maps your custom to claims configured in Cloudentity.
If you call the httpbin’s GET /anything API, you can see that it returns a JSON body similar to
the following:
You can see that the Authorization header includes an access token ({AT_FROM_ACP}). You can check its content
using, for example, JWT decoder and compare it with the token that you got from Auth0.
Mapping Claims
When Cloudentity exchanges tokens, it maps claims from the 3rd party access tokens to claims that are configured in Cloudentity.
The following guide is illustrated based on the example of Auth0 IDP
and its sample application written in Go. It assumes you have completed the steps from
the Exchange tokens when accessing protected APIs
section.
Since the sample Auth0 application does not expose any APIs, the token that comes from the IDP is an
opaque token. In this scenario, Cloudentity must call the /userinfo API of the Auth0
IDP to get information about the user.
-
In Auth0, create an Auth0 Rule that is responsible for adding attributes to a user.
Choose the Add attributes to a user for specific connection template.
Rules in Auth0
Auth0 Rules are custom JavaScript snippets that run in a secure, isolated sandbox. You can use them, for example, to modify authentication context, enable MFA, enrich user profile, and more.
-
Replace the template’s snippet with the following:
function addAttributes(user, context, callback) {

var namespace = 'https://example.com/';
   user.groups = ['user','admin'];

   context.idToken[namespace + 'groups'] = user.groups;

callback(null, user, context);
}
This script defines a list of hardcoded groups the user belongs to and adds them to the ID token so that Cloudentity can get them by calling the IDP’s
/userinfoendpoint. The custom attribute follows Auth0’s covnention for prefixing custom claims through URL. -
In Cloudentity, go to your workspace Settings > Claims > Access Tokens.
-
Add a groups claim with the source type set to AuthN Context and a source path set to
groups. -
Go to Identities > your Auth0 IDP > Attributes.
-
Add an Attribute with:
-
Variable name set to
https://example\.com/groupsVariable Names with Dots
If the attribute variable name contains dots, the dot must be explicitly escaped using
\.. -
Display name of your choice
-
Data type set to List of strings as the groups attribute holds a list of group names.
-
Source set to User info which indicates Cloudentity that to get this attribute Cloudentity must call IDP’s
/userinfoendpoint.
-
-
In the Mappings tab, add a mapping from the
https://example\.com/groupssource name to the List of groups that user belongs to target name. -
Get access token from your Auth0 IDP.
-
Call your protected API.
curl http://httpbin:80/anything -H "Authorization: Bearer $AT"$ATis an environment variable which value points to the third-party access token you got from Auth0.The httpbin
GET /anythingAPI returns a JSON with anything that was passed in the request. -
Get the access token that you can find in your request response and decode it using the JWT decoder
You can see that the payload among other claims also contains the groups claim and user groups
that are defined in the Auth0 rule.