About Salesforce as OIDC Identity Provider
Salesforce integration is supported by Cloudentity via the generic OIDC connector. This article shows how to configure and connect to Salesforce using the Generic OpenID Connector. The handshake between Cloudentity and Salesforce uses the OIDC pattern for user authentication and Salesforce provides Cloudentity with an ID Token containing user claims.
Prerequisites
- Salesforce account with enough privileges to create connected apps, configure user profiles and other configurations as described below
Connect Salesforce IDP
To integrate Cloudentity with the Salesforce organization, we will create a connected app within Salesforce that implements OpenID Connect for user authentication. Then we will configure the connected app with the OpenID Connect scope for use by Cloudentity. The OpenID Connect scope passes user information in an ID token. Users can then log in to Cloudentity with their Salesforce or Experience Cloud credentials.
Salesforce instructions & images
This section contains images that reflect the state of the Salesforce portal at the time of publication. The actual Salesforce GUI may differ from the examples shown here. Use this guide as a reference and adapt the instructions to suit the current Salesforce GUI as necessary.
Configuring Salesforce
-
You have an OAuth Connected App registered within Salesforce. Follow Salesforce documentation for detailed instructions.
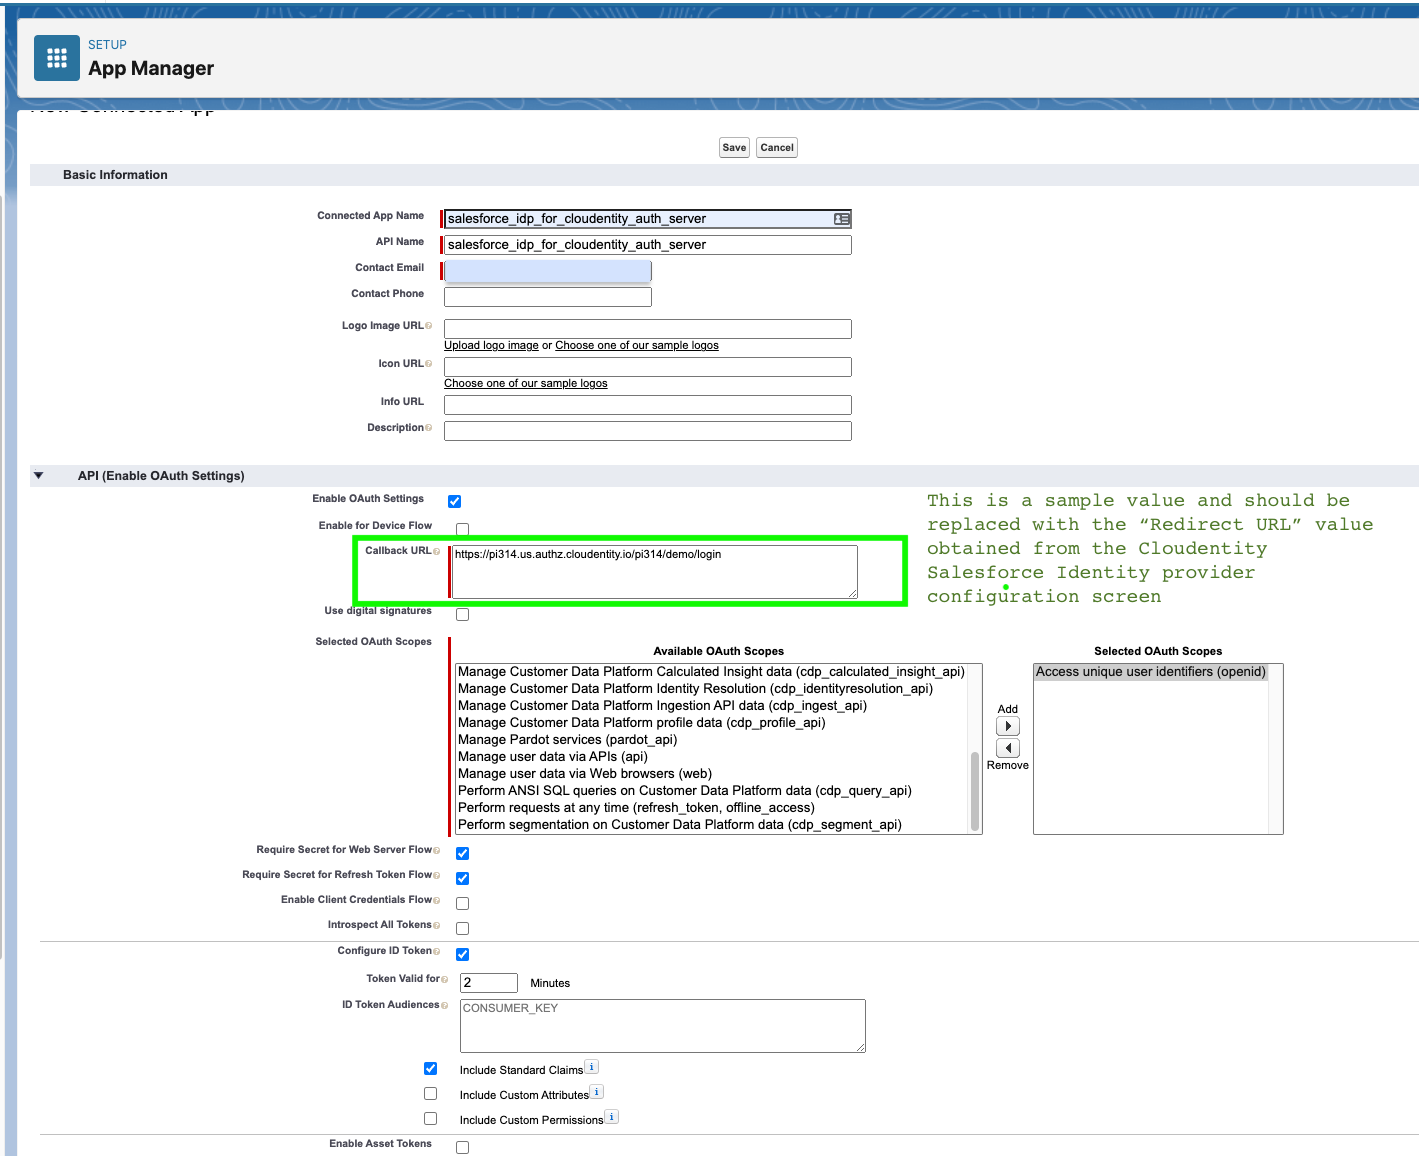
Callback URL for Salesforce Connected App
When prompted for the Callback URL in Salesforce, use the Redirect URL from Cloudentity once you have registered a Salesforce connection in Cloudentity. Start the configuration setup in Cloudentity in a different browser tab as described in below Configuring Cloudentity section and you can find this in Step 3.
Result
-
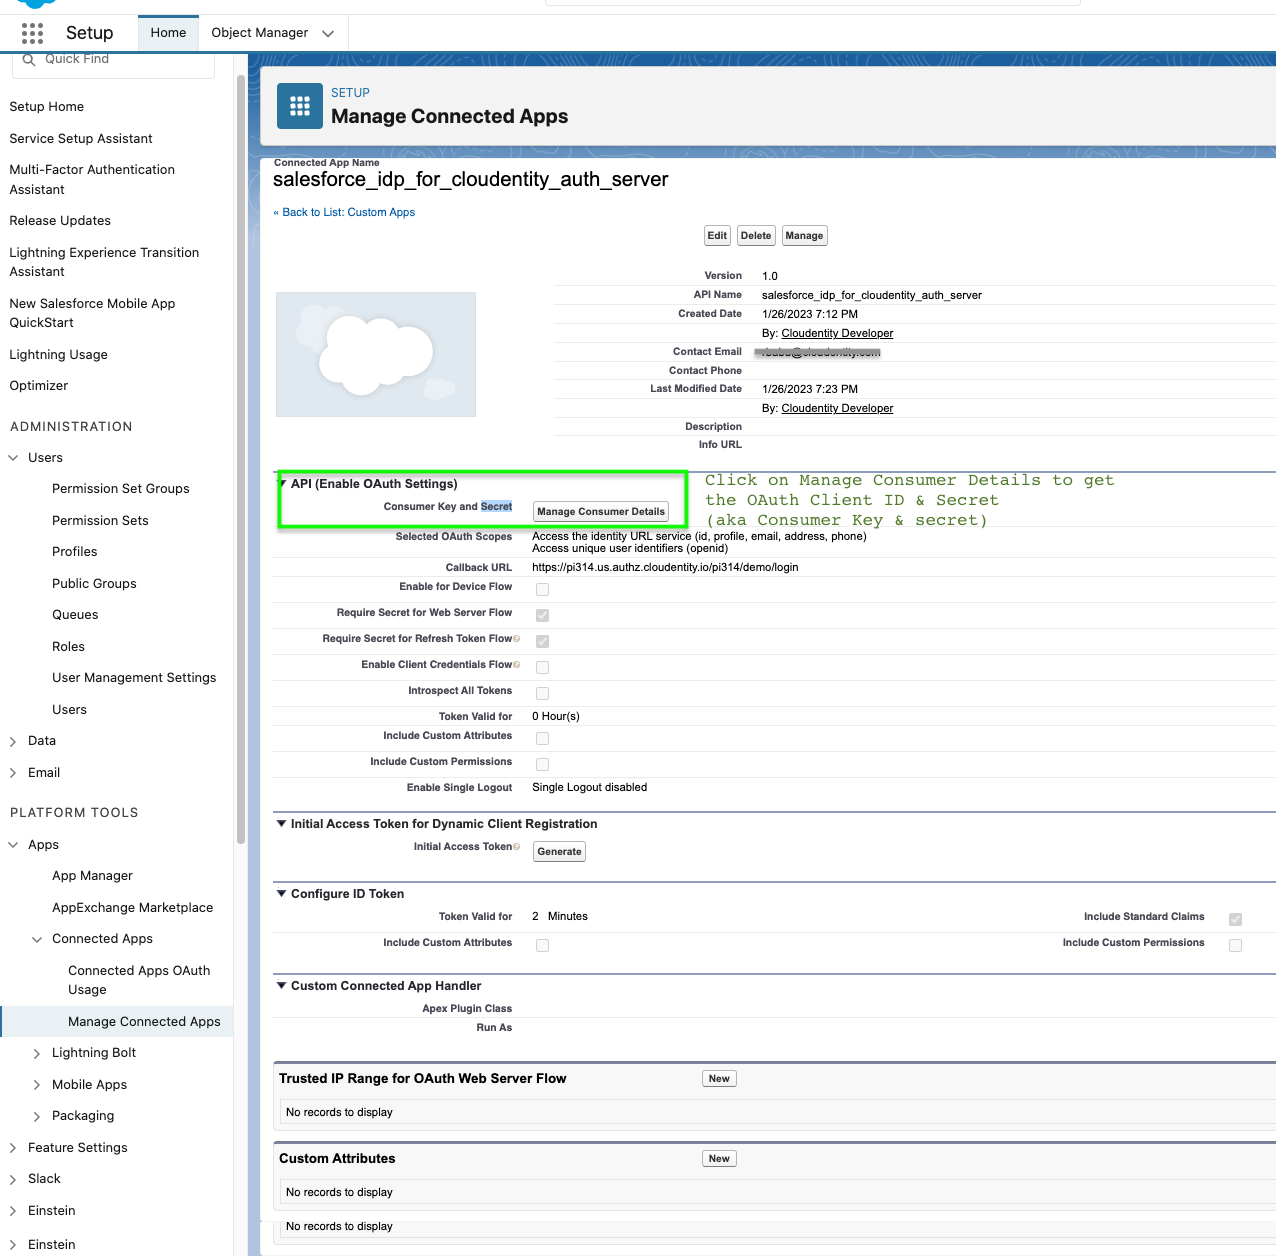
Once the app is created, obtain the Consumer Key and secret (Client ID & Secret) from the Salesforce Connected App Management screen. Details about how to reach the page within Salesforce can be found here. These credentials are required for Cloudentity configuration as described in Step 4 of the Configuring Cloudentity section below.
Result
Configuring Cloudentity
-
In your workspace, go to Authentication » Providers » Create Connection.
-
Select the OpenID Connect template under Third party providers and click Next.
-
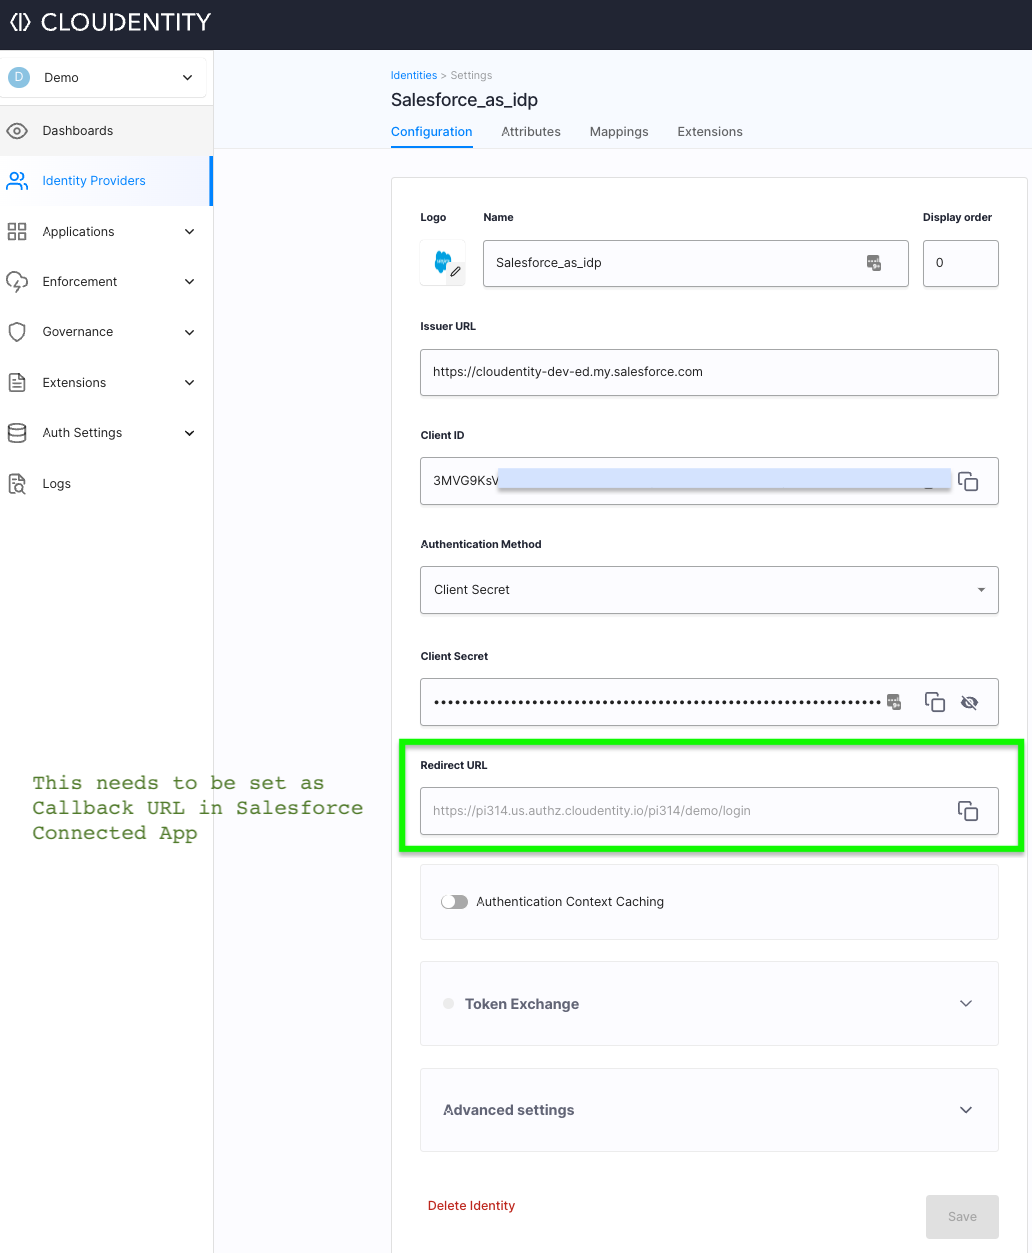
You will see a Redirect URL prepopulated within the form. This is the Callback URL for Salesforce and needs to be populated when the connected app is being created in Salesforce (as described in previous section).
-
In the Register OpenID Connect form, enter the Logo, Name, Issuer URL, Client ID, and Client Secret.
Parameter Description Issuer URL OpenID configuration of Salesforce OIDC provider. The general format is https://<your-domain>.my.salesforce.com, for examplehttps://cloudentity-dev-ed.my.salesforce.com. Do not append/.well-known/openid-configuration.Client ID Client ID of the Connected App registered in Salesforce above. Authentication method Set it as Client Secret. Client secret Client Secret of the Connected App registered in Salesforce above. Result
-
Select Save.
Result
Your Salesforce identity provider connection with Cloudentity is created and listed in the Identities view. Users can now authenticate via Salesforce as Identity Provider
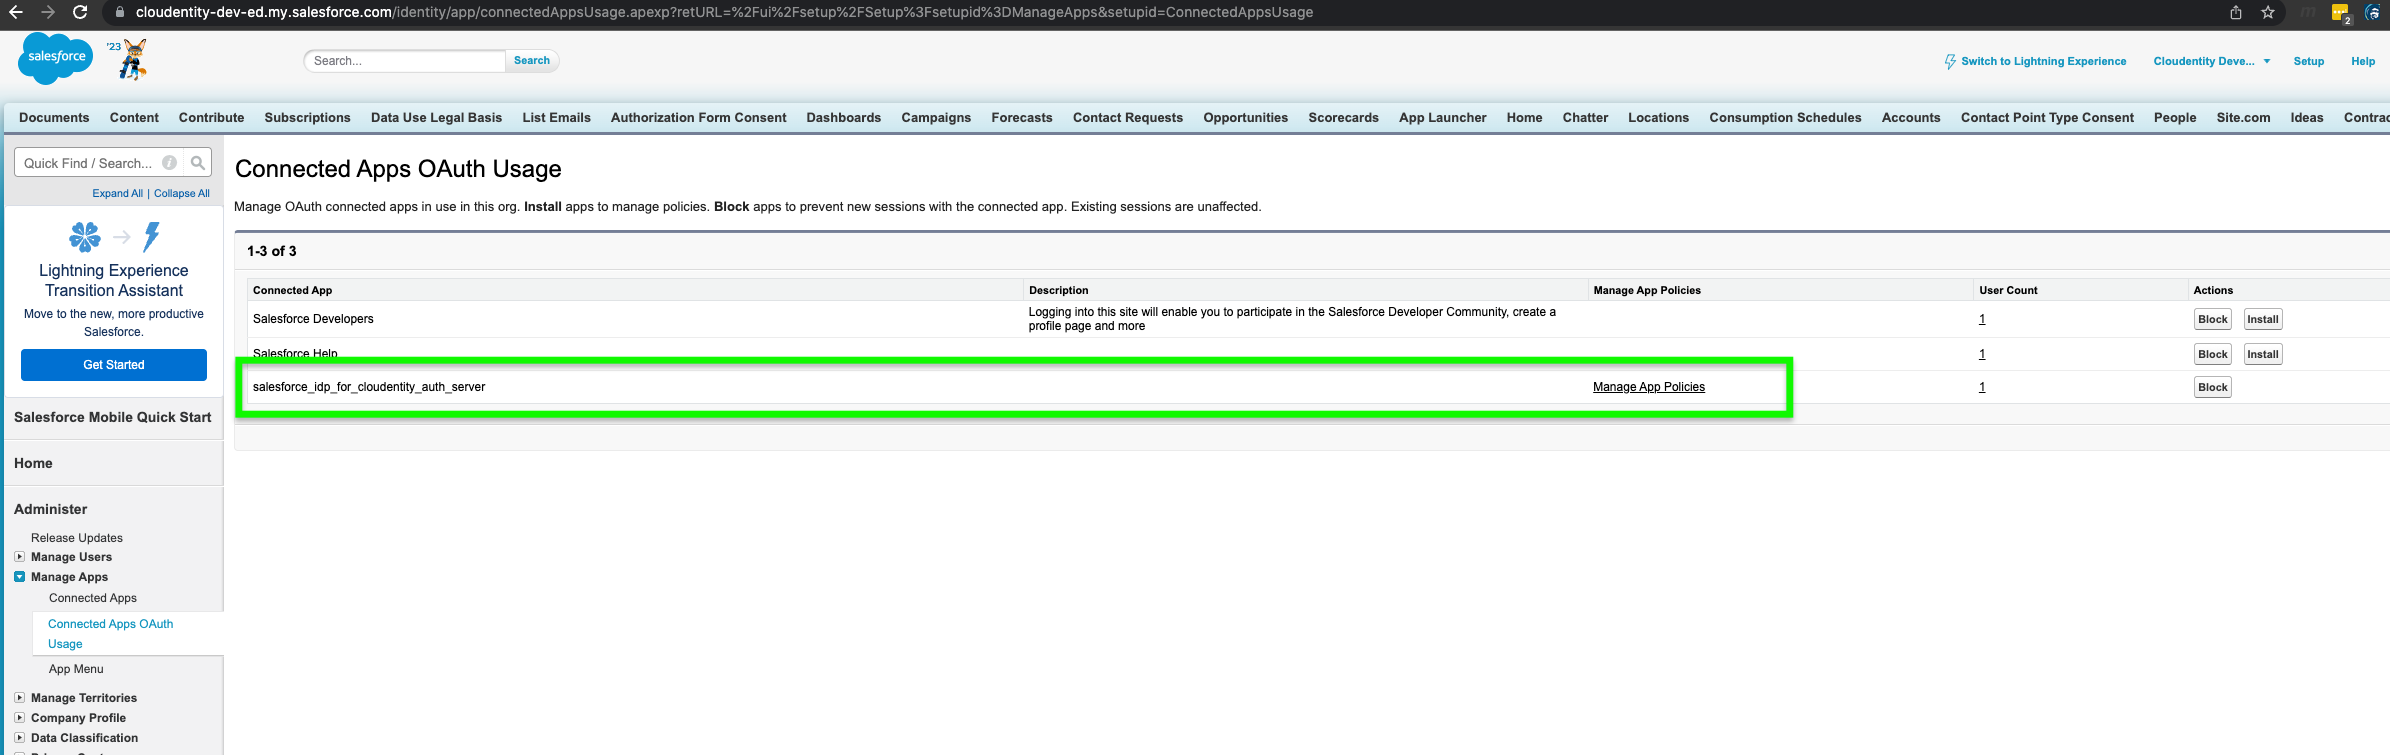
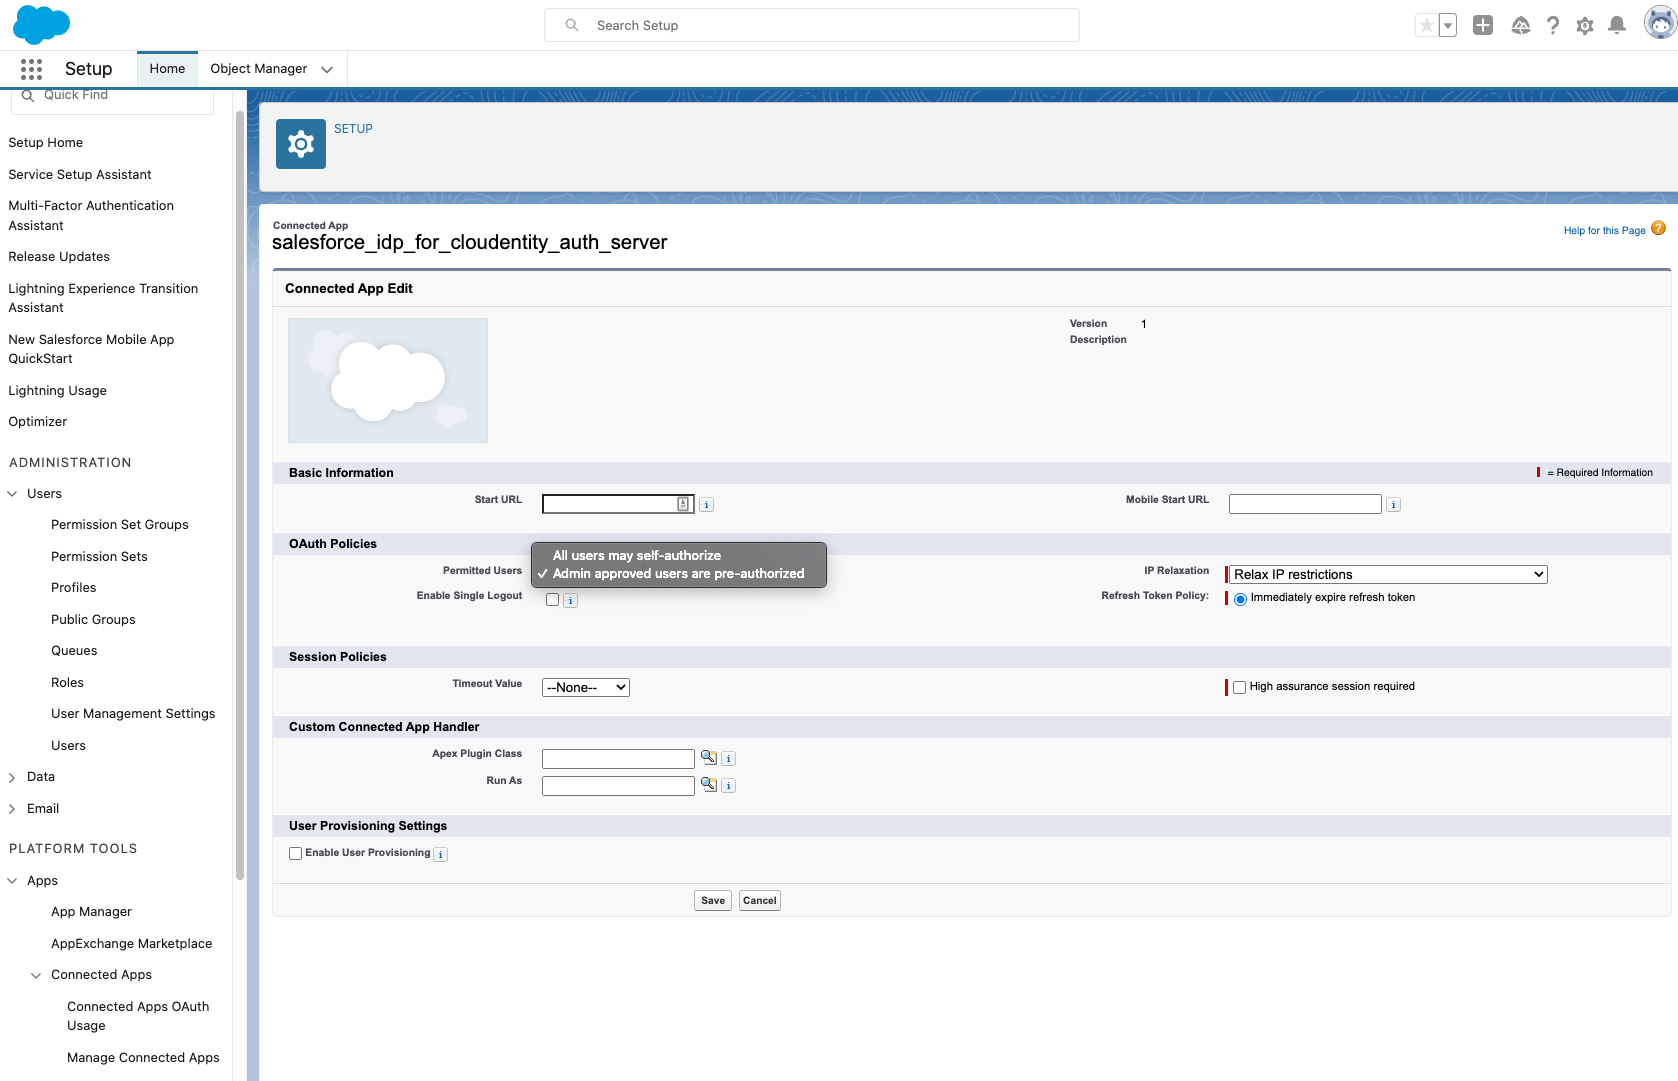
Connected App OAuth Access Policy in Salesforce
While integrating with Cloudentity, Connected App access policy must be configured within Salesforce. It is recommended to Set Permitted Users to Admin-approved users are pre-authorized instead of the default setting of All users may self-authorize. Salesforce profile for the external users must be configured to allow above created connected app usage. More details on managing oAuth access policies for connected app can be found here.
Result
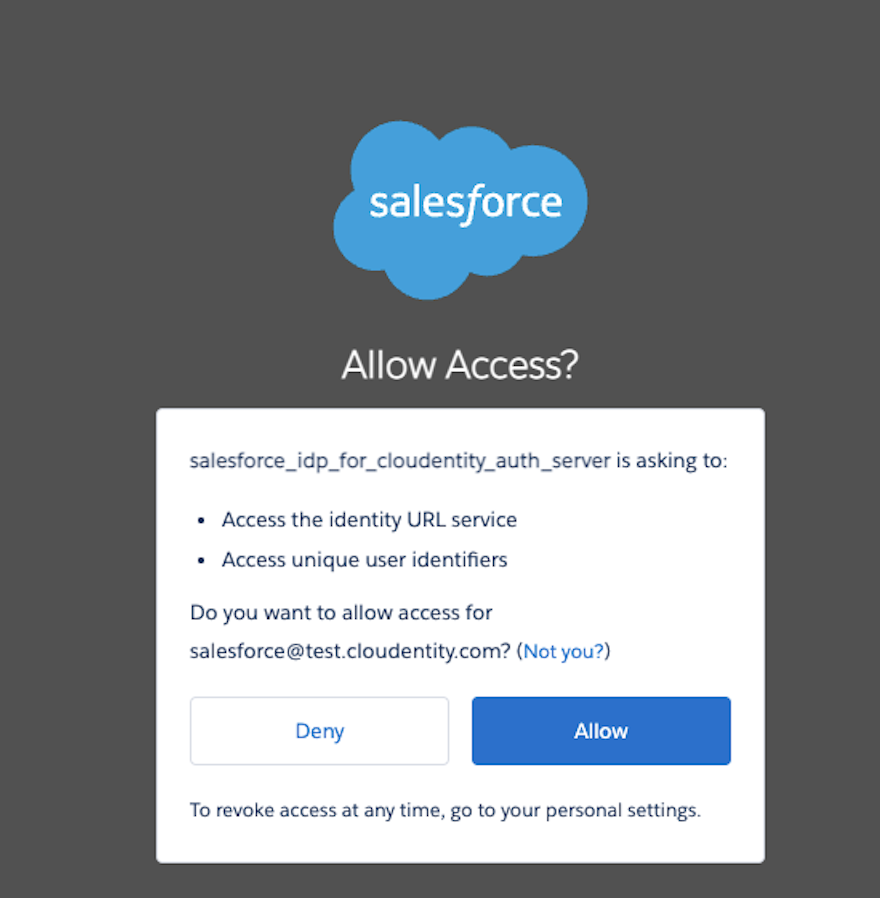
User Experience Issue
If the above recommended setting is not configured, the user experience is not seamless as the end user would see the following prompt from Salesforce during the authentication process handshake between Cloudentity and Salesforce.
Test your IDP
Prerequisites
- Salesforce IDP is enabled for user authentication.
- Demo workspace is created with the Demo Portal connected.
Test
-
Open the Demo Portal (Dashboards -> Client Applications-> Demo Portal -> Click on the launch icon on the right side of the text).
-
Select LOGIN TO DEMO APP.
-
Select your configured Salesforce Identity Provider and, next, authenticate in Salesforce. If there is only one identity provider, the selection screen is skipped.
Result
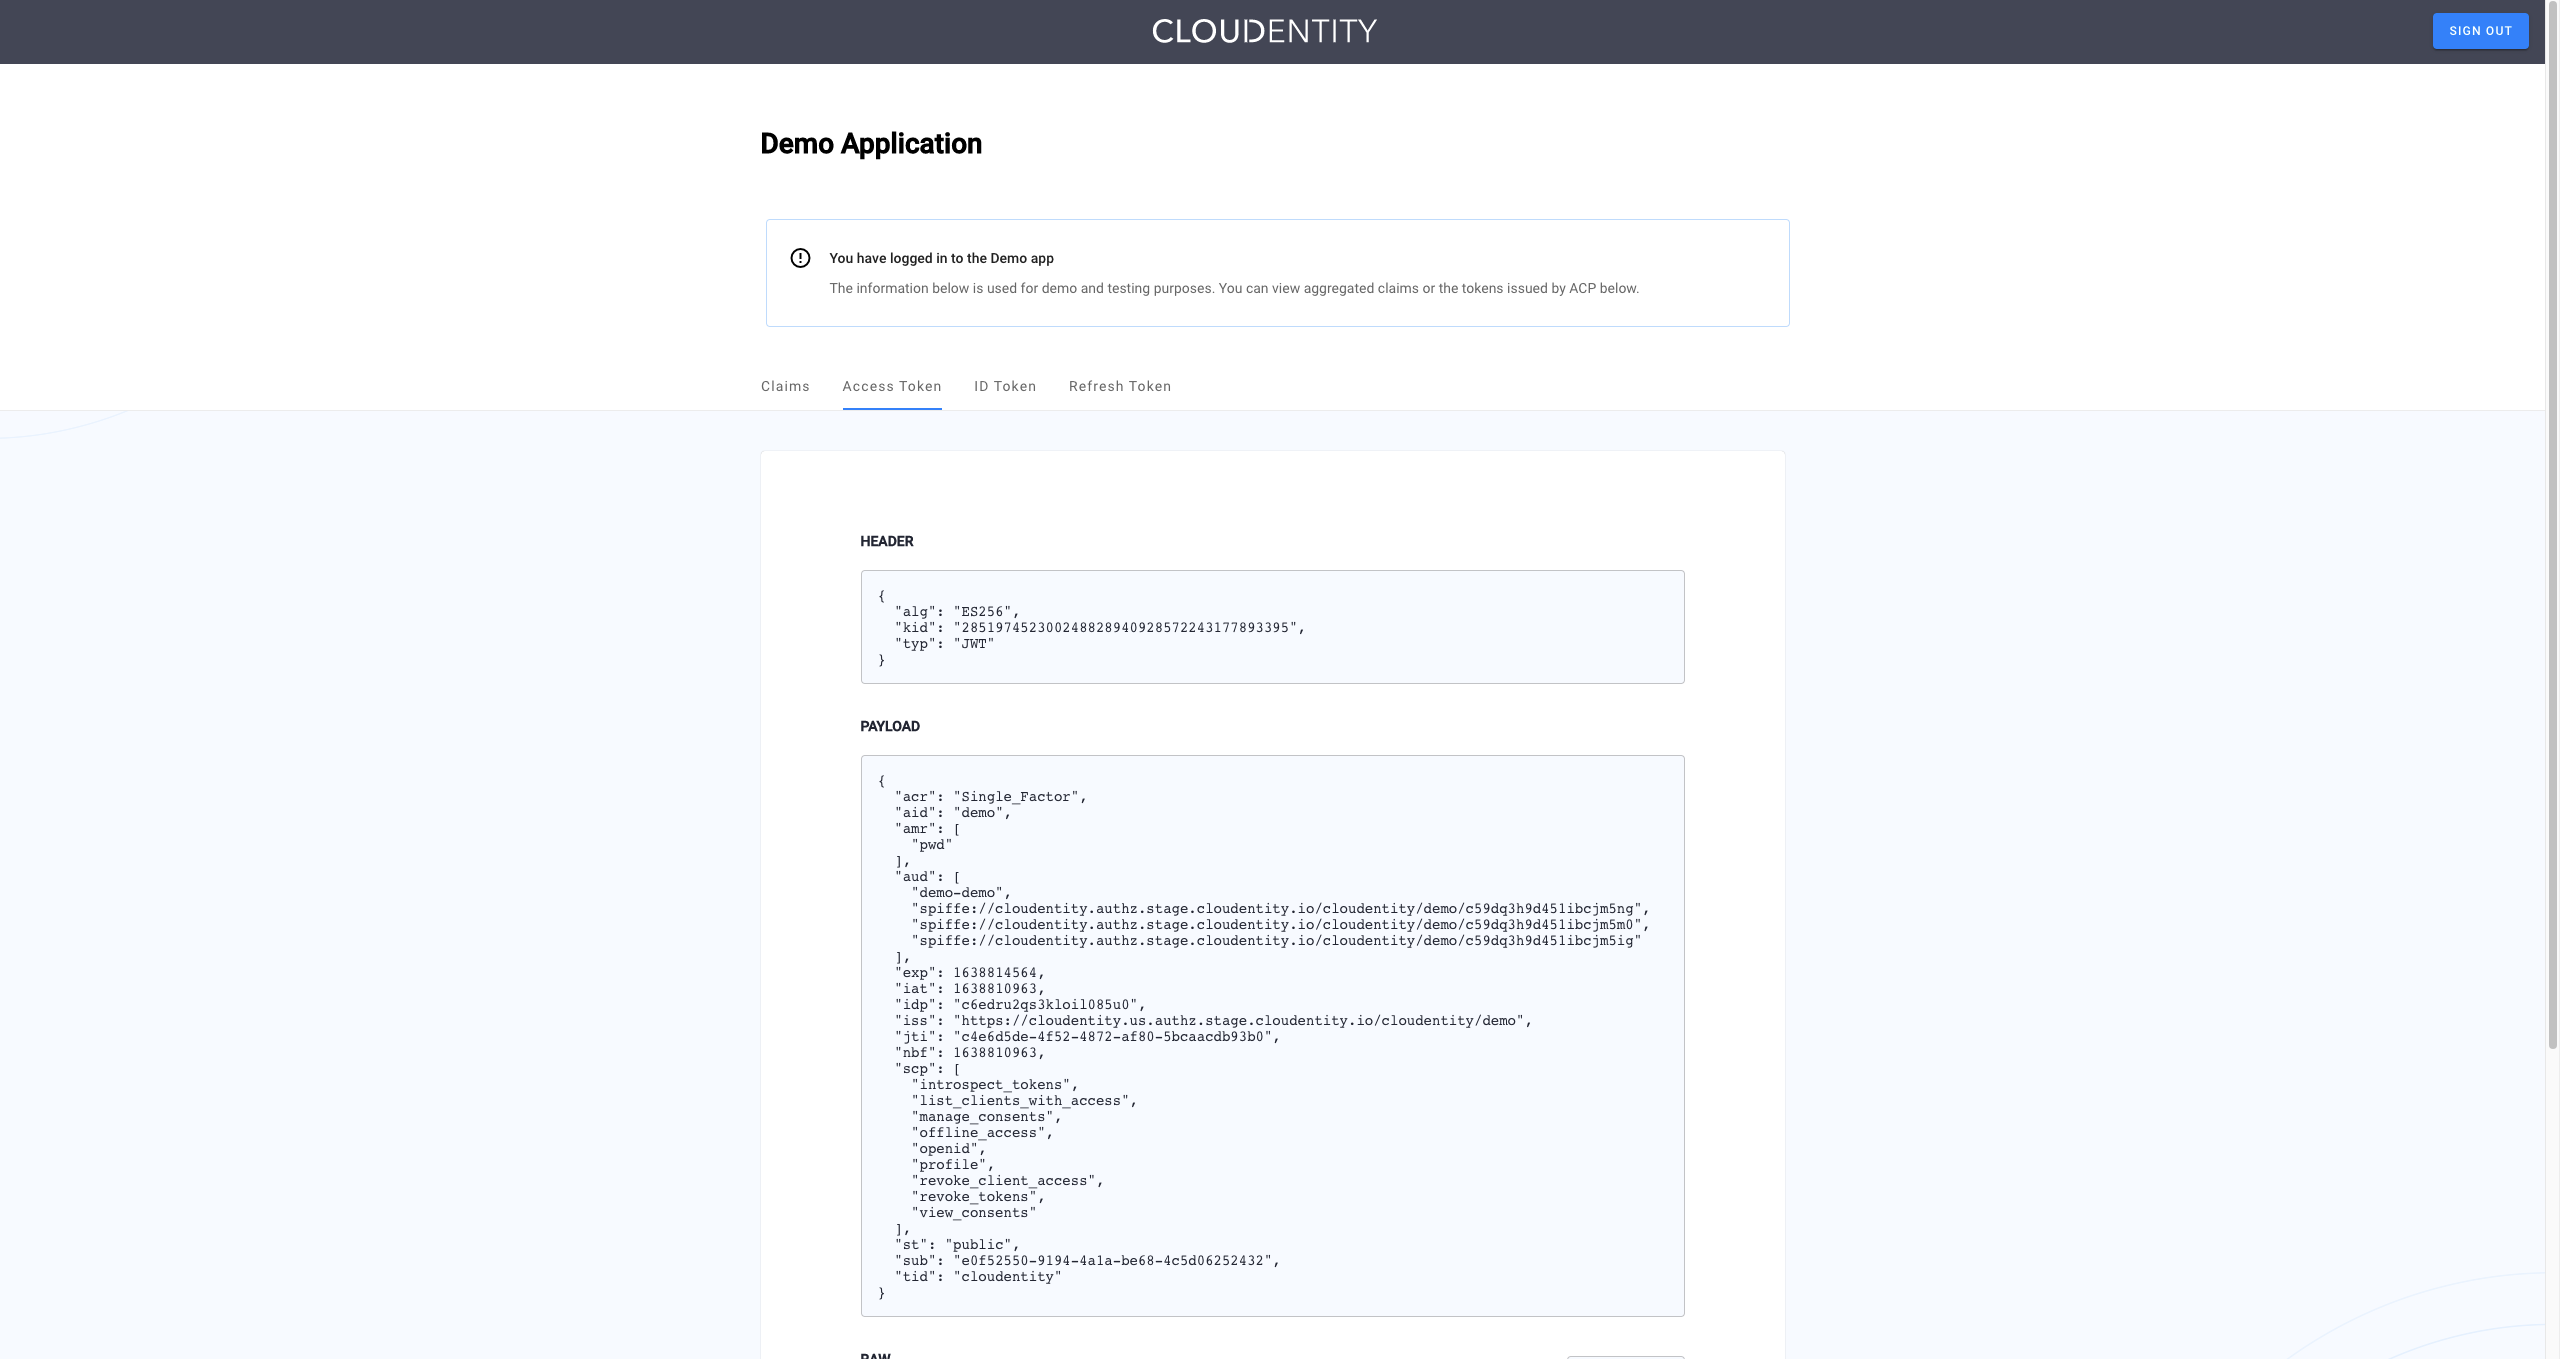
Cloudentity displays the consent page that lists data scopes to be shared with the application. When you proceed to the application (ALLOW ACCESS), the Access Token and the ID Token generated by Cloudentity for the demo application based on the end user authentication performed at Salesforce.