Prerequisites
-
You have an Amazon Web Services account with permissions that allow you to access AWS API Gateway, CloudFormation, and AWS Lambda configuration.
Context
You need those permissions as you will be working with your API Gateway and attach your Lambda Authorizer to your service and gateway.
-
REST APIs deployed behind the Amazon API Gateway service.
Deploying APIs
If you do not have any APIs deployed yet, you can go to your AWS account, search for Amazon API Gateway, and select Create API. Remember that it must be a REST API that you create. You can create a new API, clone an already existing API, or import API from Swagger or Open API 3 specification.
If you do not have any APIs at hand, you can create an Example Petstore API (by selecting the Example API option from the menu).
Remember that after creating an API, you must deploy it so that the Cloudentity can discover it later on in the process.
To learn more about developing REST APIs with AWS Gateway, see AWS Working with REST APIs documentation.
-
You have admin access to your Cloudentity tenant.
Create AWS GW Lambda Authorizer
-
In the workspace of your choice, go to Authorization » Gateways > CREATE GATEWAY.
-
Select Amazon API Gateway and provide a name for your Lambda Authorizer.
-
Optionally, enable the Create and bind services automatically check box.
When enabled, all services protected by your Lambda Authorizer instance are discovered and added to the Cloudentity service list automatically when the authorizer is connected to Cloudentity. Otherwise, you need to add them manually.
Multiple Lambda Authorizers and APIs
It is recommended to use only one Lambda Authorizer within the AWS console. If multiple authorizers are running at the same time, disable automatic binding for services. If it is enabled, there may be conflicts between different authorizers trying to discover and protect your APIs.
-
Select Next.
Result
AWS Gateway Lambda Authorizer is created and you are presented with the Quickstart menu.
Authorizer Deployment
Cloudentity AWS Lambda Authorizer is deployed on AWS Cloud Formation- an AWS service that enables cloud provisioning with infrastructure as code. For greater conveniance, Cloudentity provides users with a template used to create an AWS Cloud Formation stack. Such stack contains a couple of resources that together make it possible for the Cloudentity AWS Lambda Authorizer to work. After the deployment, the stack consists of:
-
LambdaFunction which is, in fact, the authorizer itself
-
LambdaExecutionRole to grant permissions to access AWS services and resources by the authorizer (its limited to the LambdaPolicy and ApiGWPolicy)
-
LambdaPolicy to provide the authorizer with neccessary permissions across the API gateway.
-
LambdaTrigger to invoke the authorizer in case there are no requests coming through the gateway. The trigger invokes the authorizer to enable it to fetch authorization policies from the Cloudentity platform.
A trigger in AWS is a service or resource that invokes your function. Most services invoke your functions directly with an event structure that is specific per service. While creating the stack, an EventBridge (CloudWatch Events) trigger is added to your Lambda function and a trigger that is responsible for the communication between the Gateway and the authorizer. This type of trigger helps you to respond to state changes in your AWS resources.
-
LambdaPermission to provide permissions for AWS Events to invoke the Cloudentity AWS Lambda Authorizer
-
ApiGWPolicy that defines the permissions across your API Gateway
Deploy Cloudentity AWS Lambda Authorizer
-
In the Quickstart tab, select Deploy Authorizer.
-
Sign into your AWS account.
Result
Once you sign in, you are taken to the AWS Cloud Formation where you can create your stack according to the template provided by Cloudentity.
-
Define the authorizer stack.
-
Provide a name for your stack in the Stack name field.
-
In the Base configuration panel, define the required settings for the authorizer.
The client identifier, client secret, and issuer URL are you authorizer client application credentials. In the Cloudentity platform, when you create an authorizer, a client application is created for your authorizer in the System workspace of your tenant. This client application is used to authenticate the authorizer’s requests to the Cloudentity platform to, for example, fetch authorization policies.
As you can see, the client identifier, issuer URL, and the authorizer version settings are already provided.
Provide the client secret for your authorizer. You can find it in the Settings tab for the Cloudentity AWS Lambda Authorizer.
-
In the Advanced configuration and Certificate configuration tabs, define optional configuration for your authorizer.
You can learn more about configuration and available settings for Cloudentity AWS Lambda Authorizer in the Configure Cloudentity AWS Lambda Authorizer section.
Authorizer Configuration
Configuration settings that are a part of the template you use to create your stack are treated as PRODUCTION READY configuration. All additional configuration is treated as configuration for development purposes.
When redeploying an authorizer, only the configuration from the template (stack configuration) is persisted. Any other configuration (using environment variables) is not persisted and has to be readded.
-
In the Capabilities panel, ackowledge that AWS CloudFormation might create IAM resources.
-
Select Create Stack.
Result
Creating a stack may take a moment. After you select Create Stack, you are taken to the CloudFormation Events view. There, you can see that the Stack has the
CREATE_IN_PROGRESS.
Once the stack is created, its status changes to
CREATE_COMPLETE. You can confirm it in the Events view or, for example, you can go to Lambda > Applications where you are able to select your Authorizer and verify its configuration.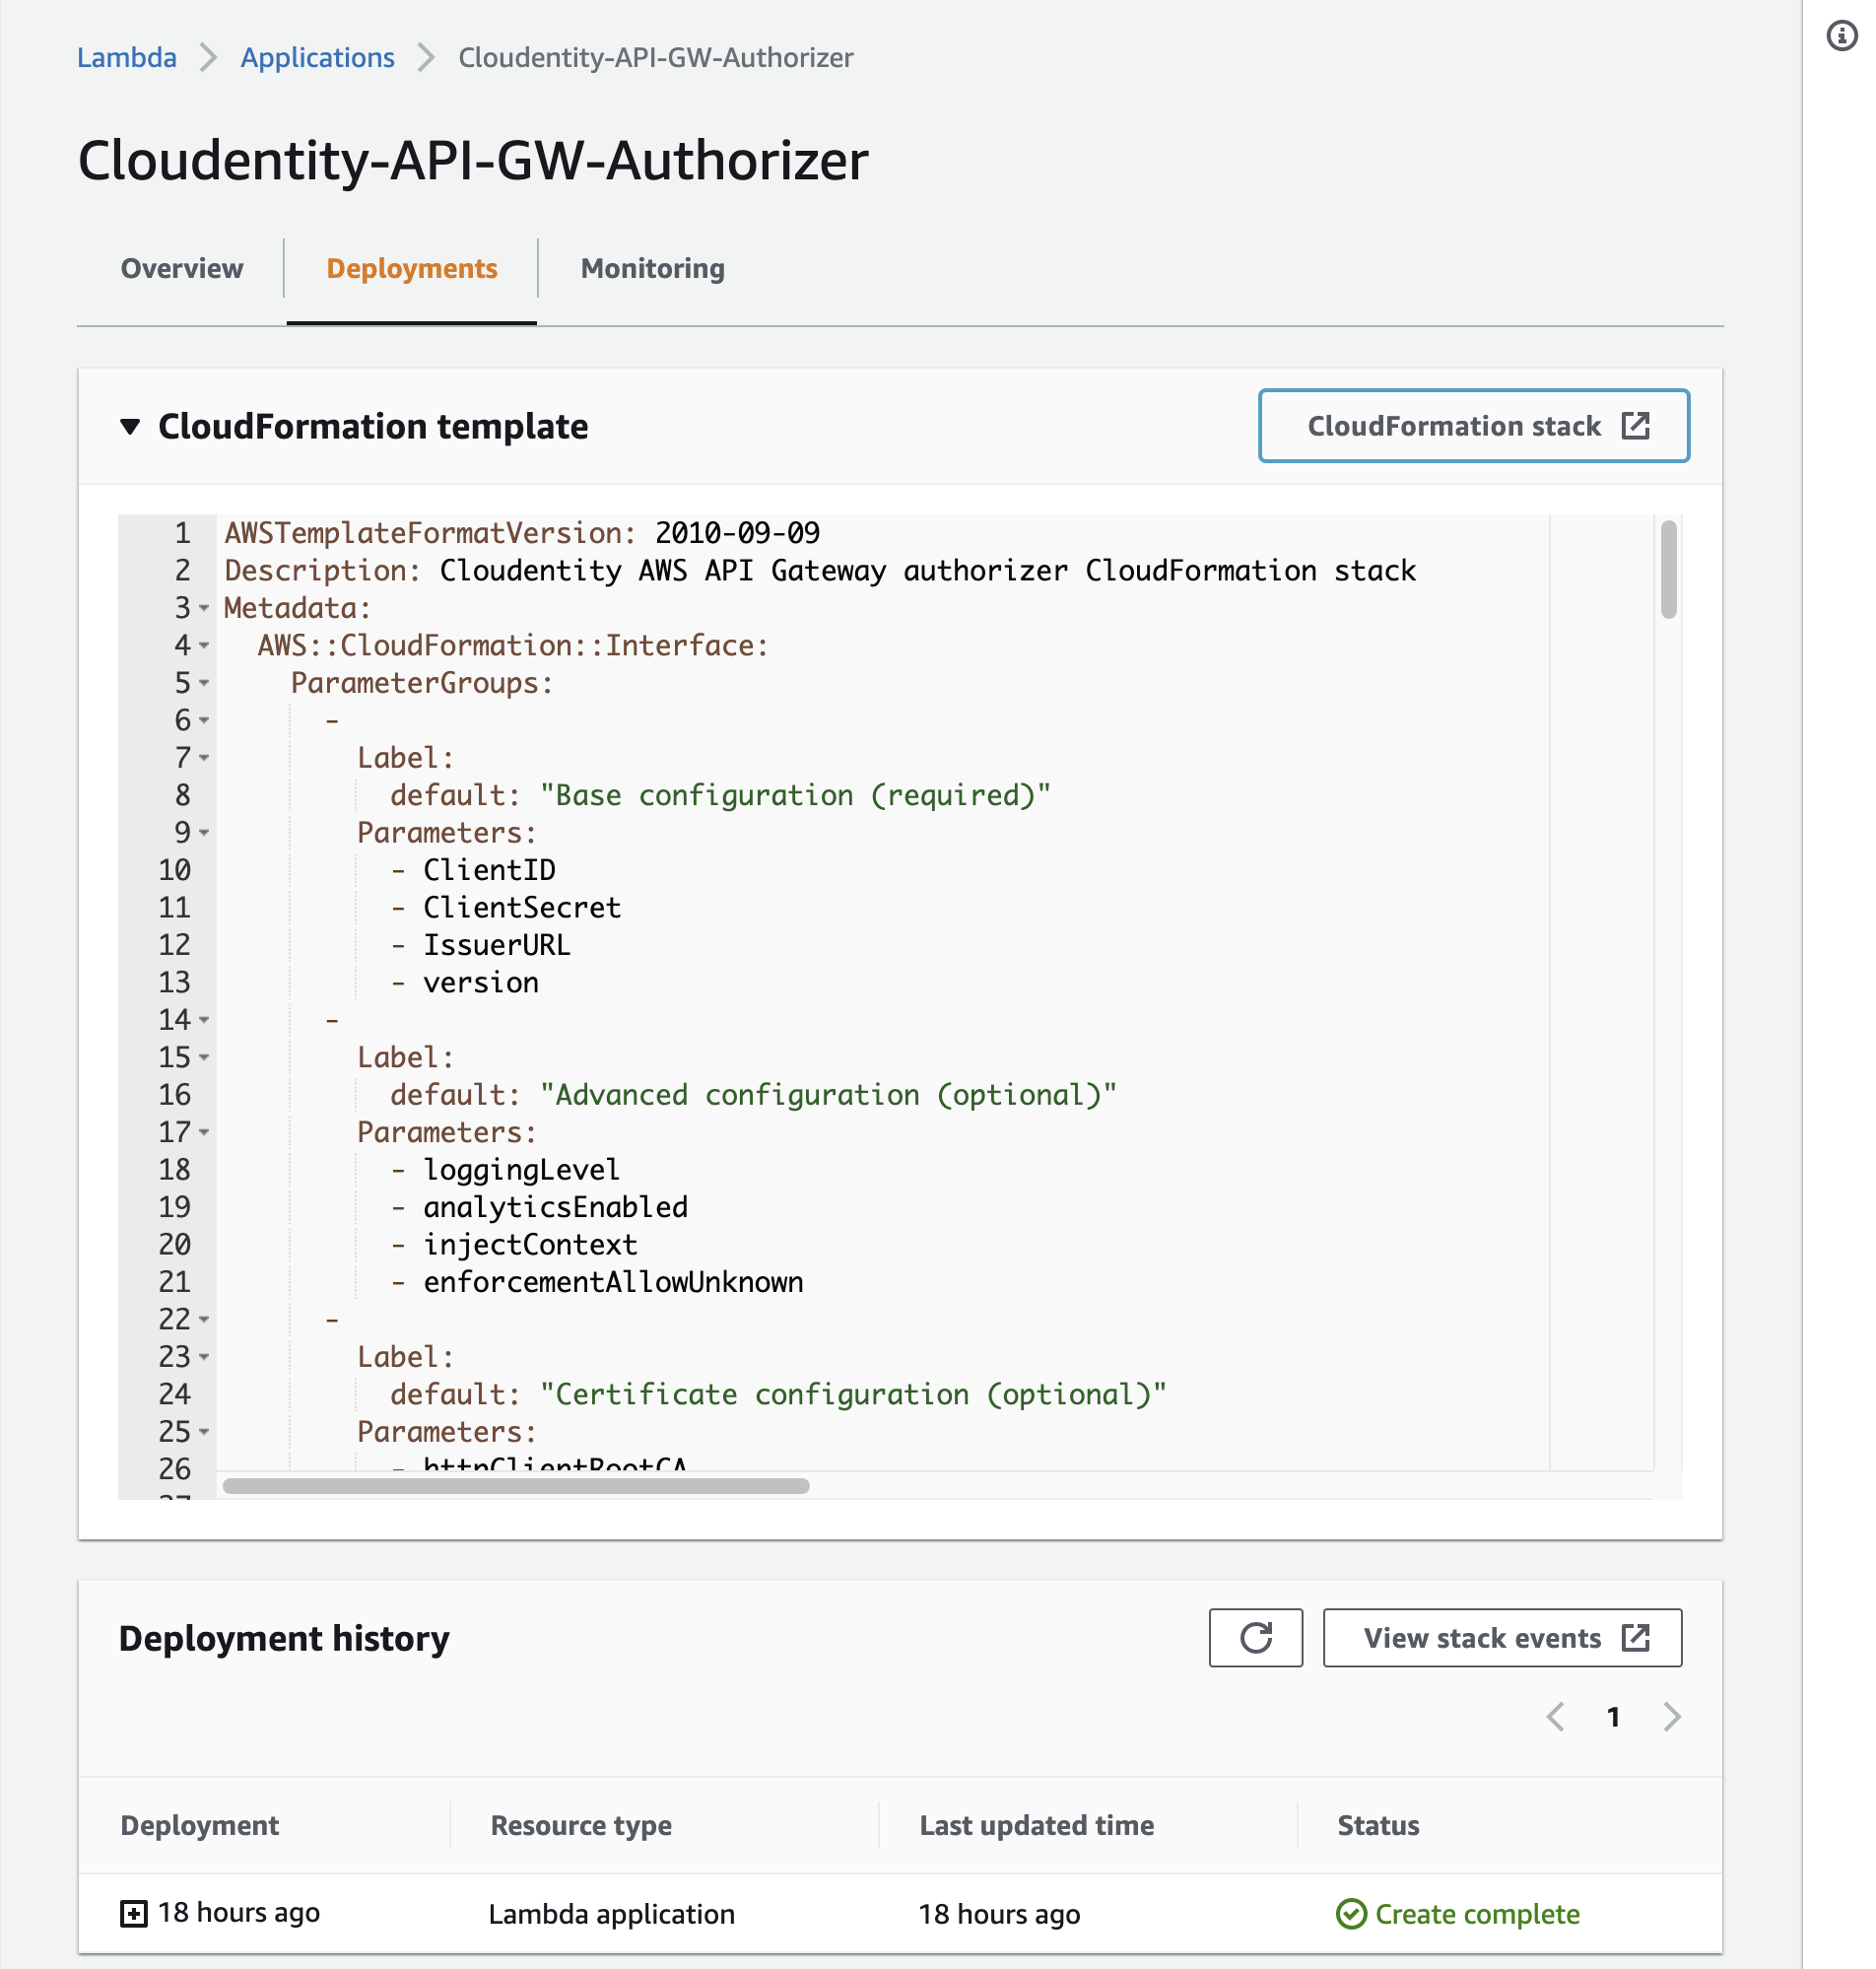
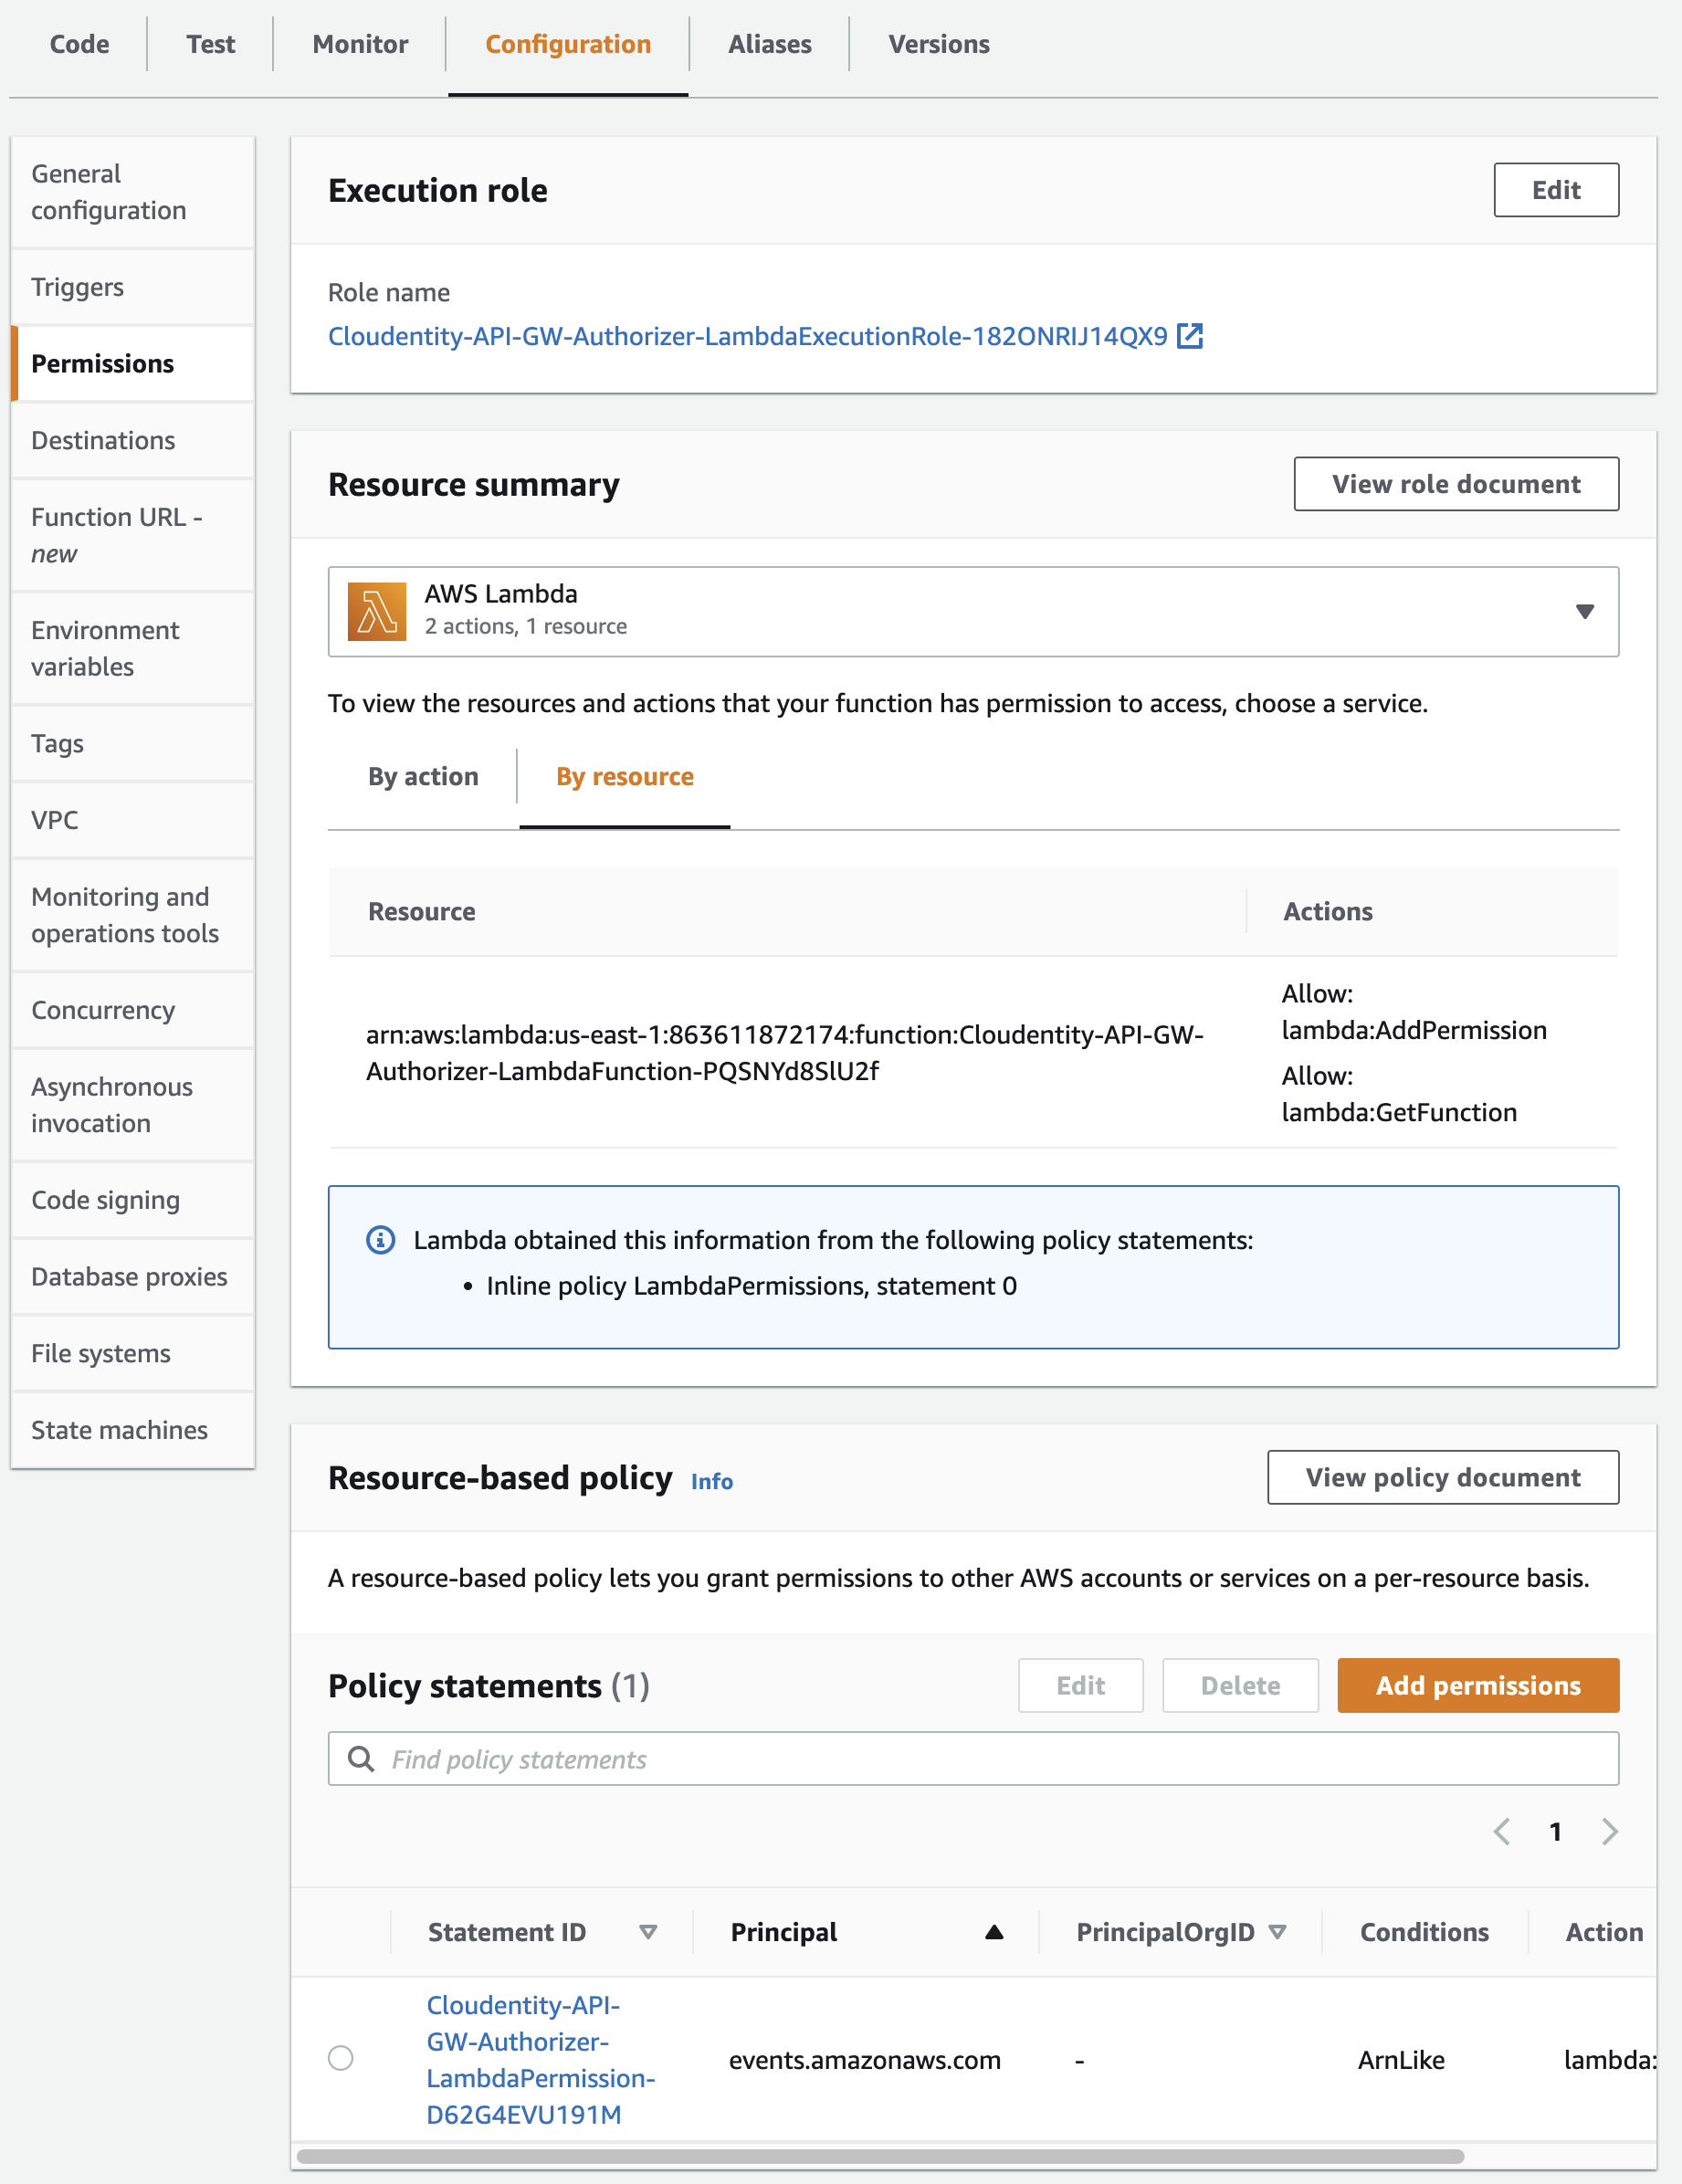
If you wish, you may review your authorizer permissions by going to Lambda and selecting the authorizer you deployed. Then, go to Configuration tab and select Permissions from the menu.
Cloudwatch Logs
You can review CloudWatch logs for the authorizer at any moment after the stack deployment. You can do it by going to CloudWatch > Logs > Log groups and searching for the authorizer’s identifier (you can get if from your Lambda Function overview).
At this point, in the logs you will see that when your authorizer is started, it throws the
failed to get gateway configurationerror. Do not worry, it happens because your authorizer is not yet connected to any gateway. -
In AWS API Gateway, redeploy your APIs.
Result
Cloudentity AWS Lambda Authorizer is added to your gateway. To confirm it:
-
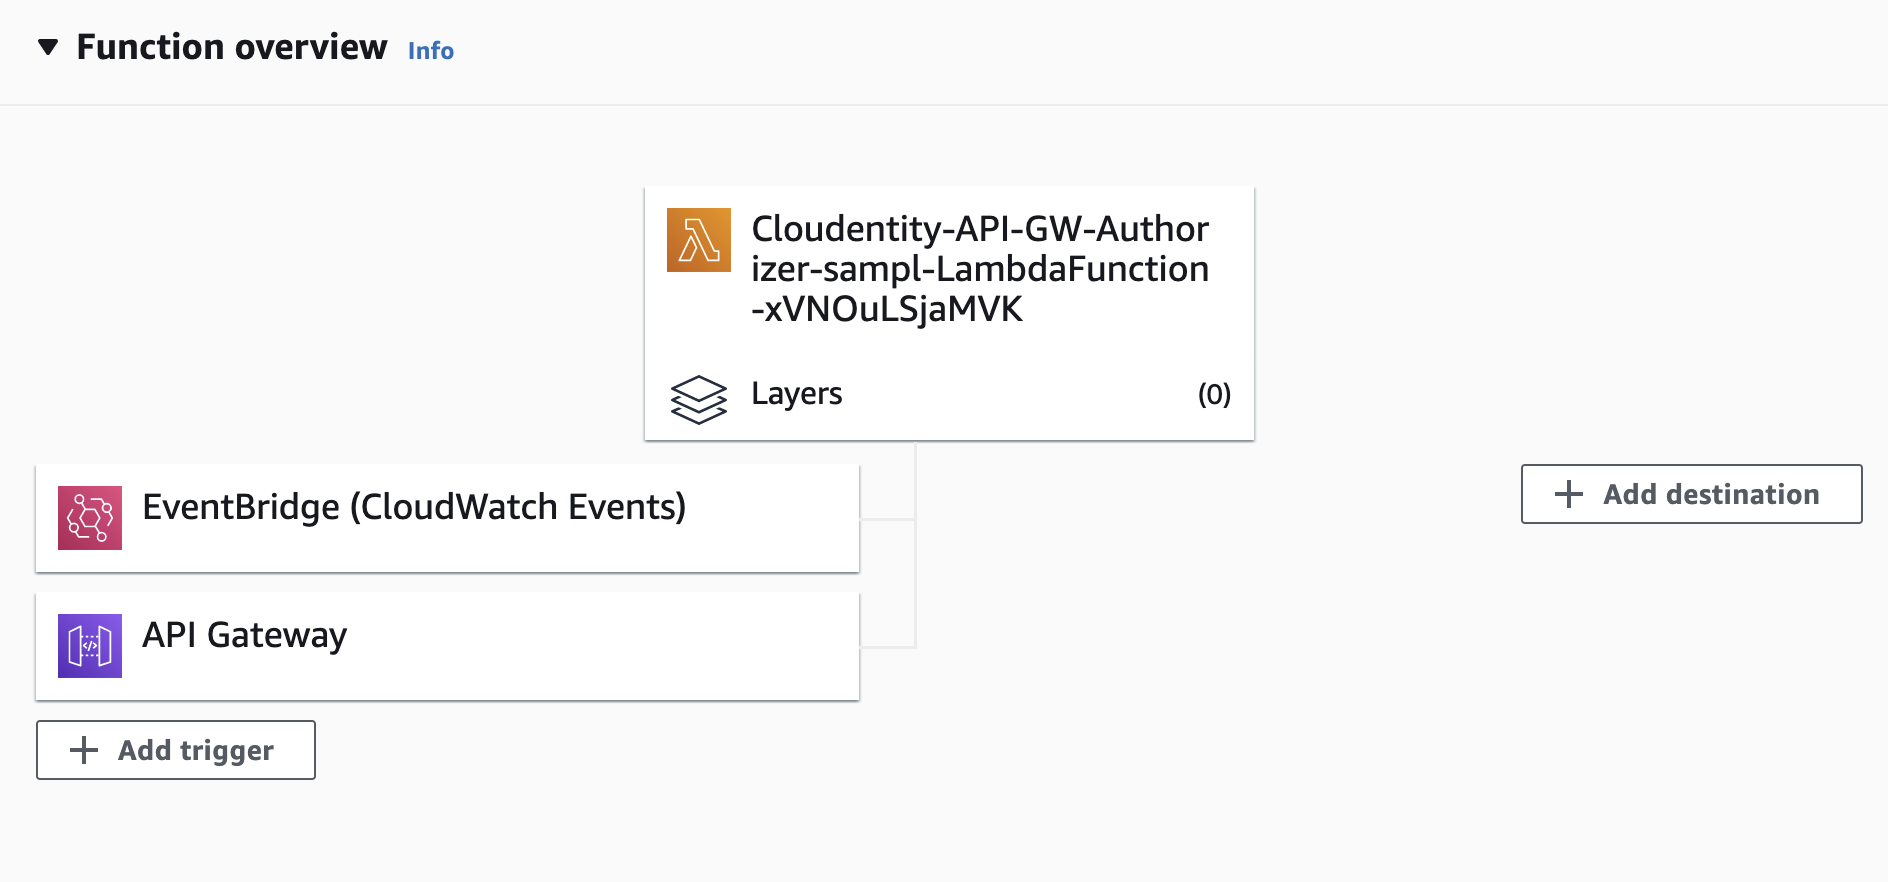
Check the Function Overview for your Lambda Function (authorizer)
You can see that the Gateway can now trigger the authorizer.
-
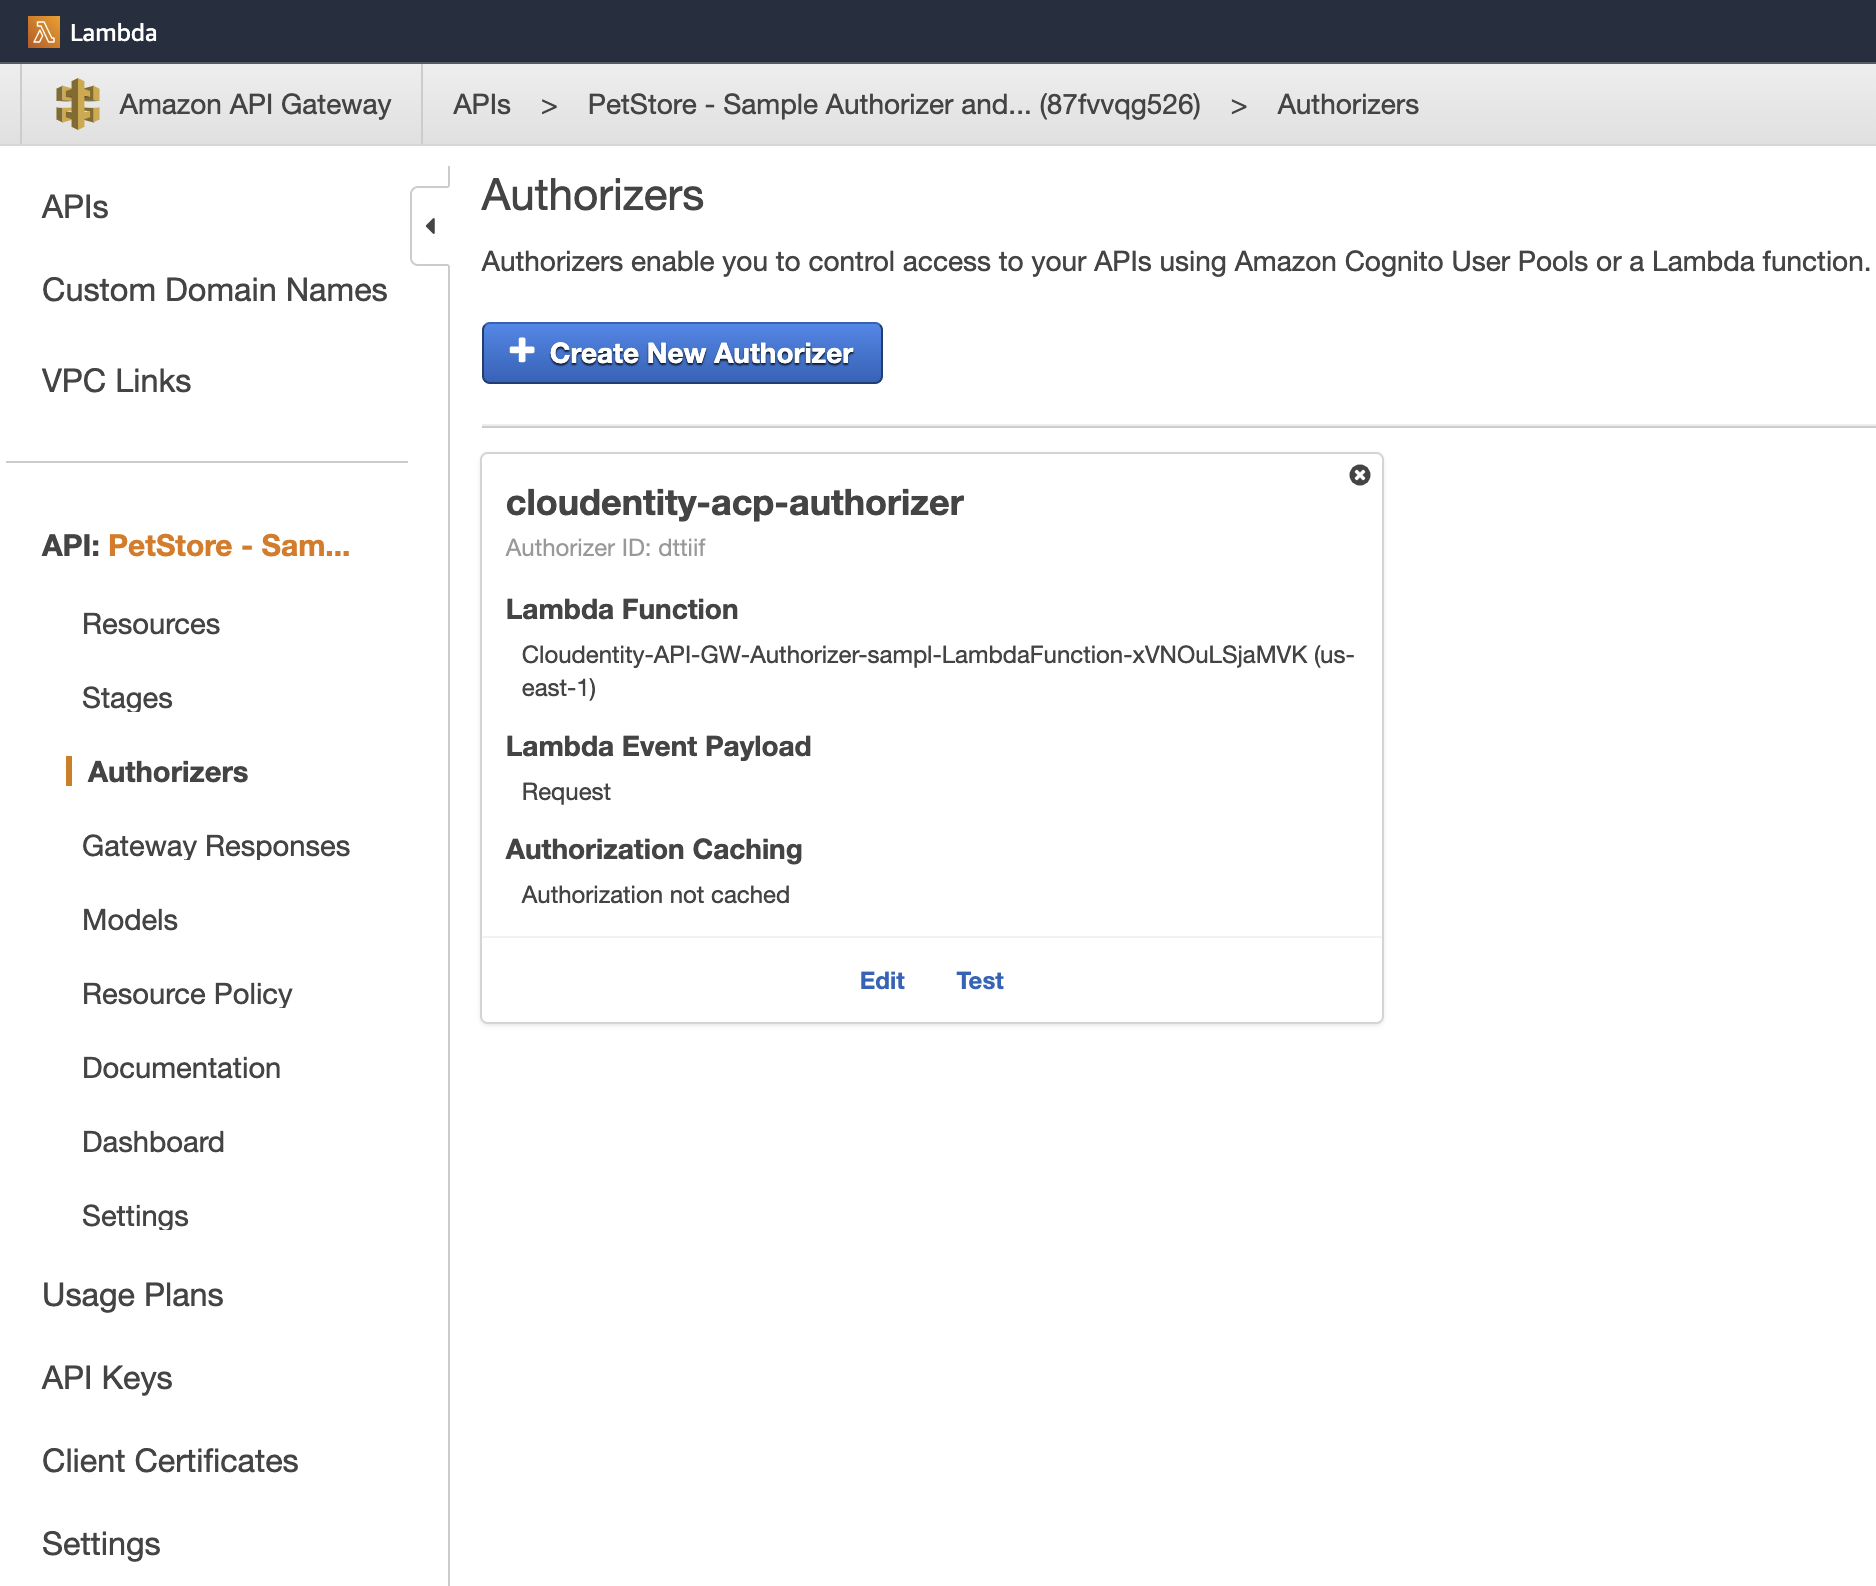
In AWS Gateway, check the Authorizers view for the APIs that you redeployed.
You can see that the gateway has an authorizer added and it can delegate access control to your Lambda Function.
If you enabled the Create and bind services automatically option when creating the AWS Lambda Authorizer in Cloudentity, your APIs are discovered and bound to your Authorizer. Confirm it by going to Enforcement > APIs in the workspace you had added the authorizer.
If you did not enable the Create and bind services automatically option, your APIs are discovered but they are not automatically binded to any service.
-
-
Connect APIs to Services
To connect additional APIs deployed on the AWS API Gateway, deploy each API that you wish to be protected by the authorizer. Once they are discovered by the authorizer:
-
If you enabled the Create and bind services automatically option when adding the authorizer, your APIs are automatically bound to a newly created service.
-
If you did not enable the Create and bind services automatically option when adding the authorizer, you need to connect your APIs to a service in the Cloudentity tenant to be able to protect them.
-
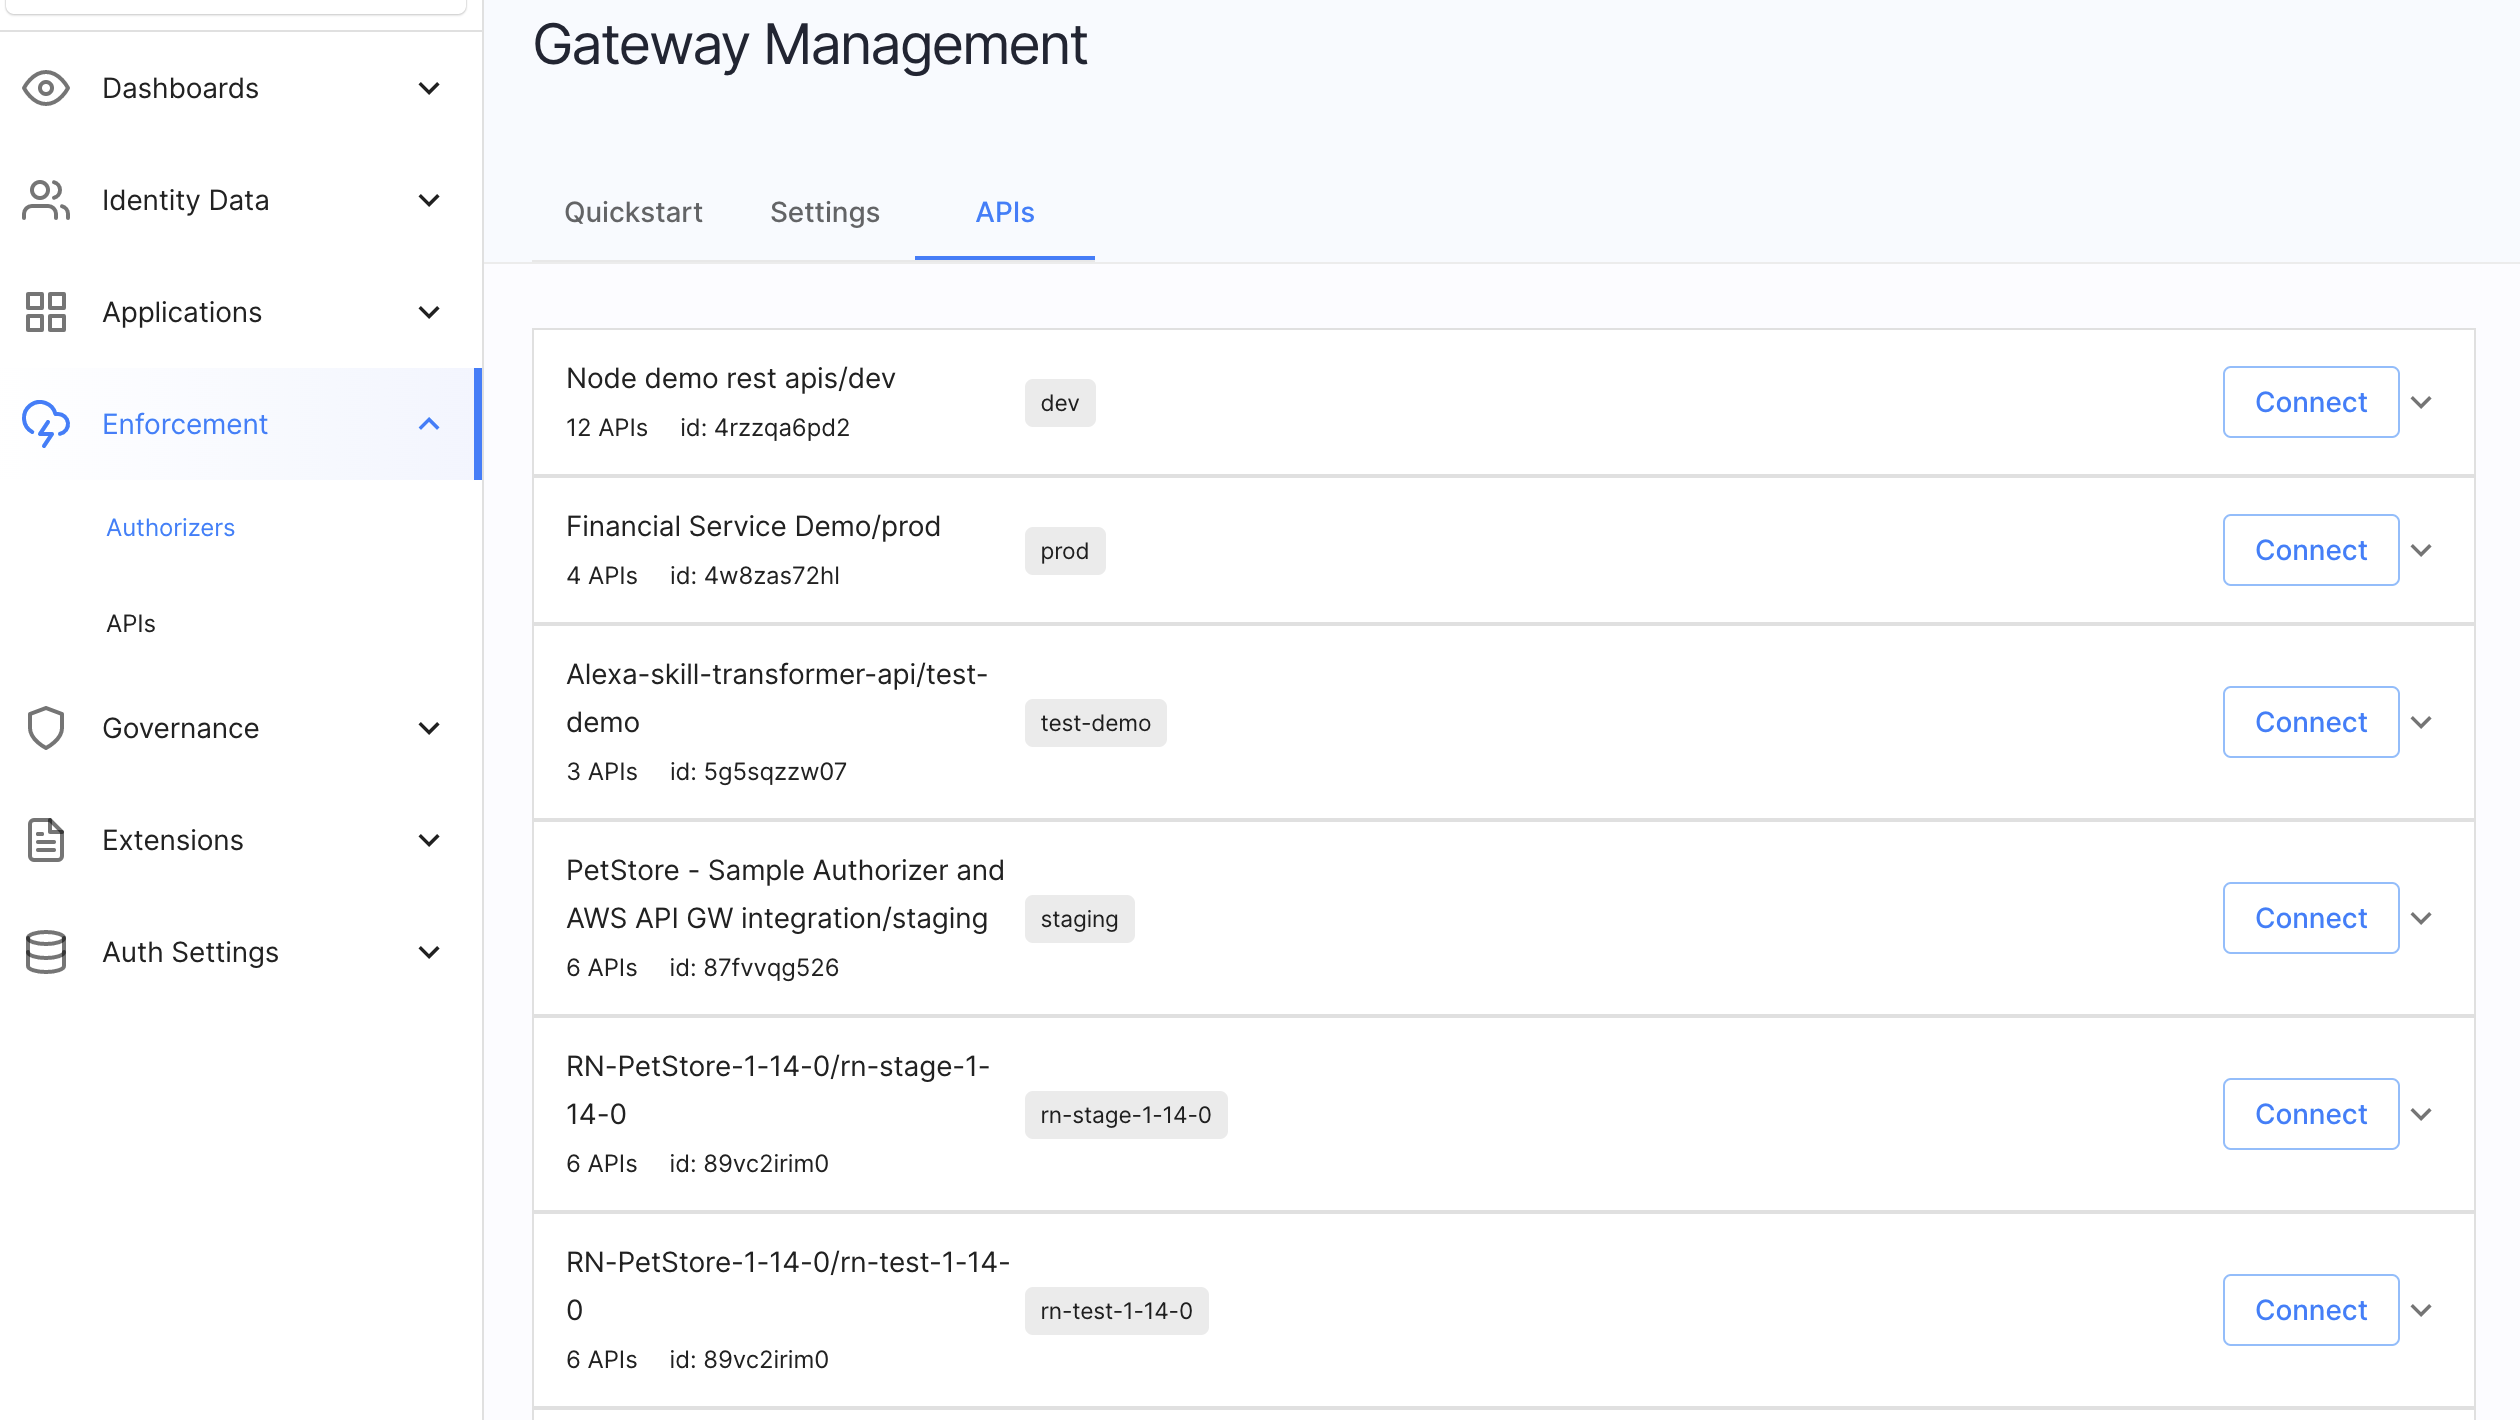
In the workspace where Cloudentity AWS Lambda Authorizer is added, go to Authorization » Gateways and select the authorizer.
-
Go to the APIs view.
-
Select Connect next to the API group you wish to bind to a service.
-
Now, you can:
-
Connect the API group to an already exisiting service.
-
Create a service and the API group will be bound to it.
-
Apply Sample Policy
-
In Cloudentity, create a policy or reuse one of the already existing ones.
Learn More
To learn more, see authorization policies documentation.
-
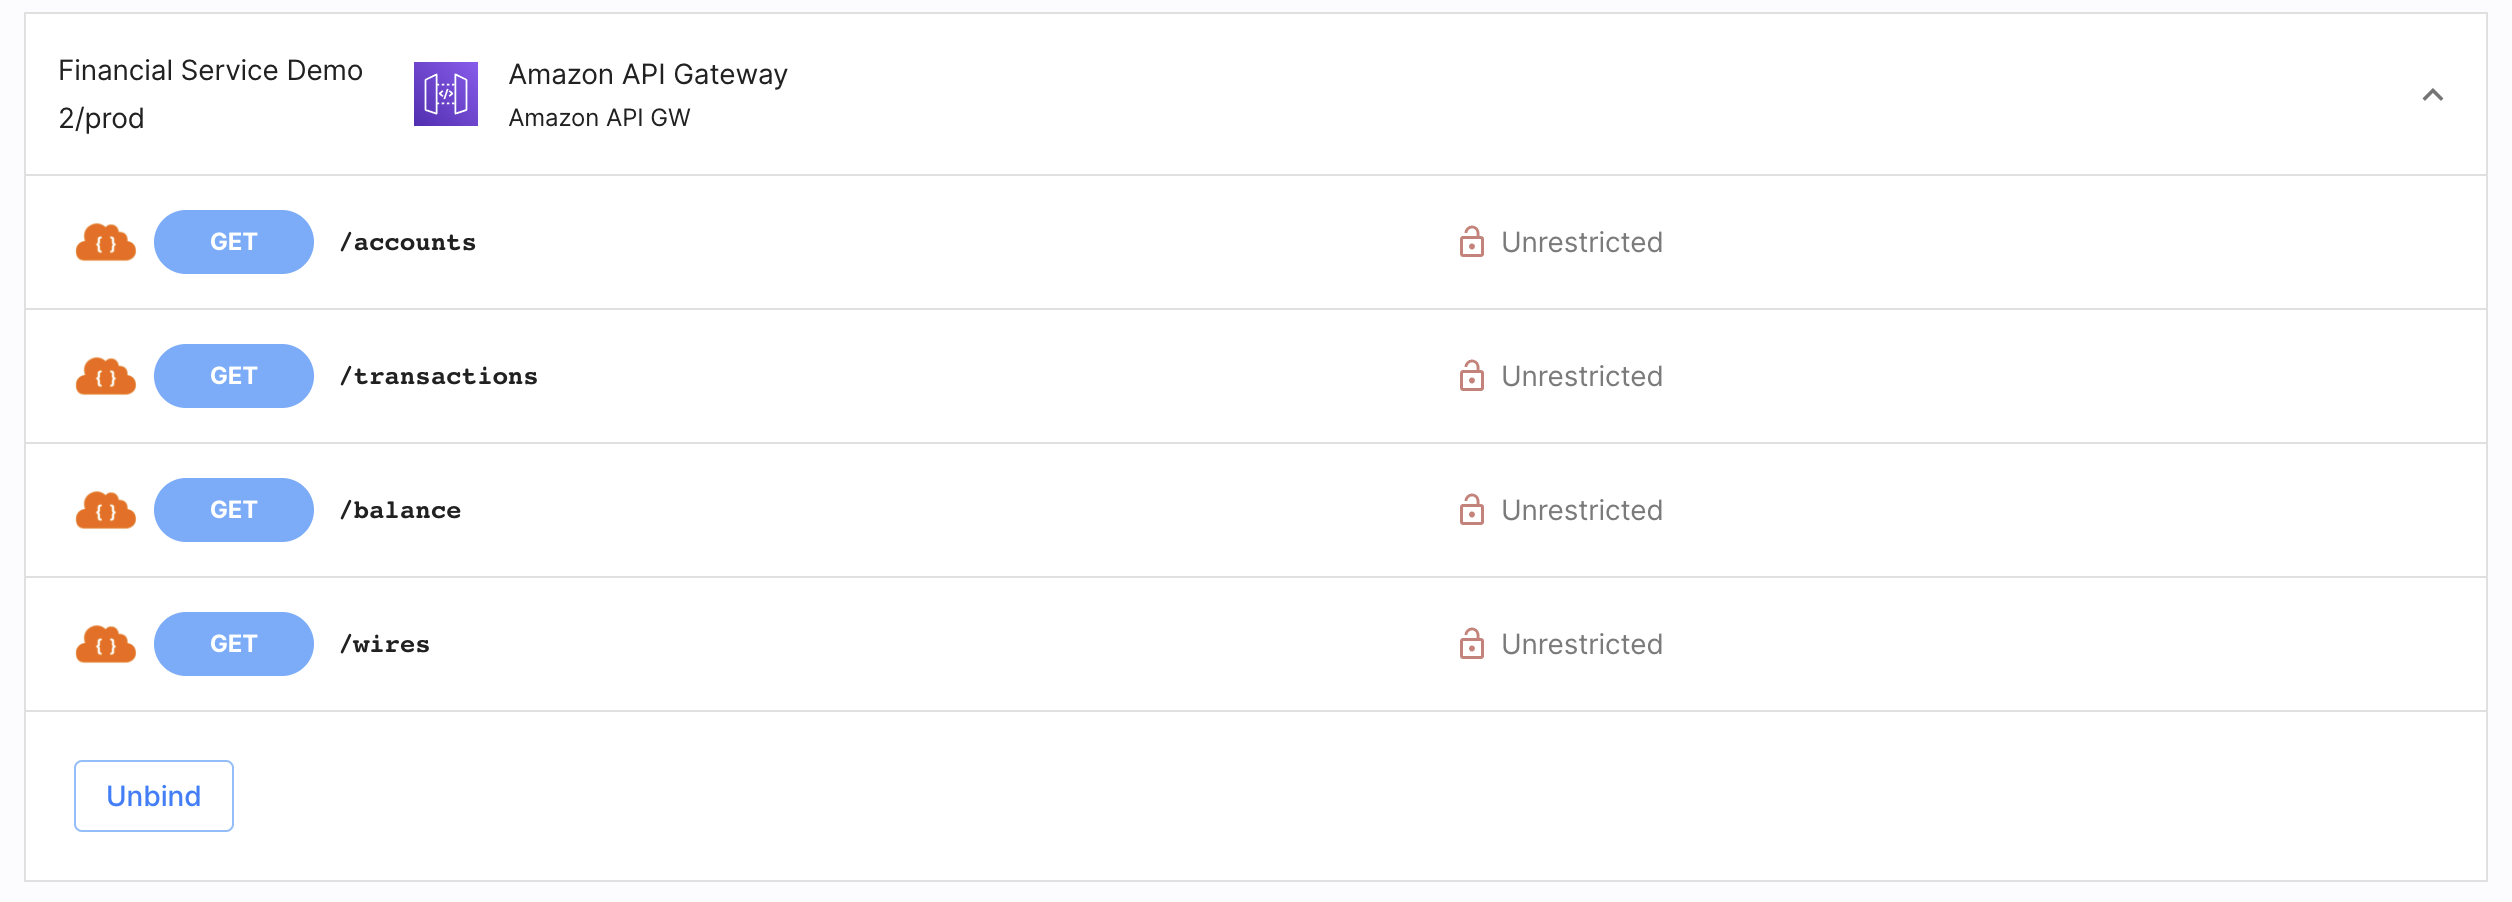
Select Enforcement > APIs from the left sidebar and go to the AUTHORIZATION tab.
-
Select a service protected by the Cloudentity AWS Lambda Authorizer and any API with authorization status Unrestricted.
-
In the Edit API popup window, select Policy from the dropdown list and click Update to proceed.
-
In AWS API Gateway, redeploy your APIs.
Result
The policy is assigned to the API in the Cloudentity platform and the gateway will invoke the authorizer every time this API is called.
Made changes? Assigned Policies? Redeploy Your APIs
Any time you make changes to the policies assignment in the Cloudentity platform, redeploy your APIs in the AWS API Gateway.
Confirm Enforcement
-
Go to your Amazon API Gateway dashboard and select the API secured with Cloudentity.
-
From the left sidebar, go to Stages and select the stage with your API.
-
Copy the invoke URL of the stage.
-
Execute the
curlcommand in the terminal of your computer.curl {invoke_url}/{api}The
{invoke_url}variable stands for the invoke URL that you copied from your APIs stage. Theapivariable points to the particular API you wish to request. For example, it may bepetsif you had deployed the example service from AWS API Gateway.Result
You receive an
HTTP 200status code. -
In Cloudentity, assign the Block API policy to the API of your choice.
-
Redeploy your API.
Tip
By default, Cloudentity AWS Lambda Authorizer fetches policy assignments from the Cloudentity platform at a one minute interval. If you did not change the settings, wait for a minute before performing the next step.
-
Execute the
curlcommand in the terminal of your computer.curl {invoke_url}/{api}The
{api}should point to the API you had protected with the Block API policy in the previous step.Result
Access to API is denied. The response may differ depending on the response configuration in AWS API Gateway.
Configure Cloudentity AWS Lambda Authorizer
Configuration of the Cloudentity AWS Lambda Authorizer is done using the AWS Stack template that you use to deploy the authorizer and using environment variables (only for the development designated settings). All settings that are a part of the Stack are treated as production ready. Settings added using environment variables are treated as configuration for development purposes and are dropped everytime the authorizer is redeployed.
Settings Provided as Environment Variables
You may notice that the configuration for the Cloudentity Lambda Authorizer is present in the Lambda Function Environment variables. For changing the production ready settings, Cloudentity recommends using the procedure described below. Because of the way the authorizer is developed, all settings available below as configuration reference are provided as environment variables.
If you wish to configure Cloudentity AWS Lambda Authorizer:
-
In AWS, go to CloudFormation.
-
Select the Stack with the authorizer.
-
From the Stack view, select Update.
You are presented with the Update stack view, where you can prepare the template for your stack.
-
Select Use current template.
-
Specify stack details (configuration for your authorizer) and select Next.
-
You can optionally configure stack options. You can also leave the default options. Select Next once you are finished.
-
Review the stack and select Update stack.
Result
You are taken to the Events view for the AWS Stack and you can see it now has the
UPDATE_IN_PROGRESSstatus.Once the update is finished, the status is changed to UPDATE_COMPLETED. Your changes to configuration are now live.
Configuring Settings for Development Purposes
Settings that are not a part of the Stack template can be configured using environment variables for Lambda Functions. It can be done only after the authorizer was deployed at least once (as it needs to be available within AWS).
In AWS, you can find the environment variables configuration in Lambda > Function Overview > Configuration > Environment variables.
Below you can find tables of all possible settings for the Cloudentity’s AWS Lambda Authorizer.
Required Configuration
| Setting | Type | Default | Description |
|---|---|---|---|
| ACP_ISSUER_URL | string | Defaults to the issuer URL for the workspace in which the authorizer is created | Your authorizer issuer URL |
| ACP_CLIENT_ID | string | Defaults to the client identifier of a client application that is created for your authorizer in the System workspace | Client identifier of your authorizer’s client application that is used for the purpose of authenticating your requests |
| ACP_CLIENT_SECRET | string | Defaults to the client secret of a client application that is created for your authorizer in the System workspace | Client secret of your authorizer’s client application that is used for the purpose of authenticating your requests |
Optional Configuration
| Setting | Type | Default | Description |
|---|---|---|---|
| LOGGING_LEVEL | string | info | Possible values from the most strict levels to the ones that give the most detailed information: error, warn, info, debug, trace. |
| ACP_RELOAD_INTERVAL | time.Duration | 5s | Represents the frequency of retrieving policies from Cloudentity by the authorizer. |
| ANALYTICS_ENABLED | bool | true | If true, turnes off the analytics for the Lambda Authorizer in Cloudentity’s Admin Panel Analytics. |
| AWS_INJECT_CONTEXT | bool | false | If set to true, it is possible to inject base64-encoded authentication context to the target service in order to, for example, provide the target service with information on logged in user. |
| ENFORCEMENT_ALLOW_UNKNOWN | bool | false | If set to false, the authorizer blocks every API request that does not match the provided criteria. |
| AWS_REGION | string | No default value | Sets the AWS region for your authorizer. |
| AWS_ACCESS_KEY_ID | string | No default value | Provides the credentials (access keys) for the authorizer to make programatic calls to AWS API. |
| AWS_SESSION_TOKEN | string | No default value | Provides the session token used as part of the credentials to authenticate your authorizer when it makes requests to AWS APIs. |
| AWS_LAMBDA_FUNCTION_NAME | string | No default value | Provides a name of the Lambda function in AWS that is used in your AWS for your authorizer. |
| AWS_AUTHORIZER_NAME | string | cloudentity-acp-authorizer | Name of your Cloudentity AWS Lambda Authorizer |
| HTTP_CLIENT_ROOT_CA | string | No default value | Root certificate for your authorizer’s client application. |
| HTTP_CLIENT_INSECURE_SKIP_VERIFY | bool | No default value | Disables certificate verification |
Get Authentication Context Data
If Cloudentity is set to provide opaque access tokens as a mean of authenticating client applications that make requests to services deployed behind the AWS API Gateway, it is impossible to retrieve any information on the user from the token itself. Because of that Cloudentity’s Lambda Authorizer can inject authentication context to additional Lambda Functions that retrieve the context passed from the authorizer.
In a traditional setup of AWS API Gateway and Cloudentity’s AWS Lambda Authorizer, request transformation, response transformation and status code setting is done in the API Gateway. If your API gateway integration is set to Lambda Function and uses Lambda Proxy integration, your Lambda Function receives the whole request (such as query parameters, request body, and variables) including the authentication context passed by the AWS Lambda Authorizer. Additionally, the response is sent from your custom Lambda Function.
Using Lambda functions instead of the traditional setup is easier to configure. Both the status code and the response messages are in your custom Lambda control. You can prototype rapidly as you do not need to set up your API Gateway. Additionally, you can retrieve the information on the users from the AWS Lambda Authorizer and use them according to your needs.
Below, you can find a simplified diagram of the Lambda Authorizer - API Gateway - Lambda Proxy integration.
When a client application makes a request to an API deployed behind the AWS API Gateway, the gateway invokes Cloudentity AWS Lambda Authorizer that is responsible for policy decisioning and enforcing access control. After the authorizer responds to the gateway and injects authentication context to the response, the gateway proxies the request to the Lambda Function that is responsible for providing the request response and status codes.
Prerequisites
-
You have an AWS console account with all required permissions to manage your Lambda Functions and API gateways.
-
APIs are deployed behind your AWS API Gateway.
-
You had set up access control enforcement for your APIs deployed behind the AWS API Gateway and use Cloudentity’s Lambda Authorizer as described in the above sections.
Retrieve Authentication Context from Lambda Authorizer
-
To start updating your authorizer, perform steps 1-4 from the Configure Cloudentity AWS Lambda Authorizer section.
-
When setting the Stack details, set the Inject context field to true.
AWS_INJECT_CONTEXT Variable
If the
AWS_INJECT_CONTEXTvariable is set to true, it is possible to inject base64-encoded authentication context to the target service in order to, for example, provide the target service with information on logged in user.To learn about Cloudentity AWS Lambda Authorizer configuration, see its configuration reference.
-
Prepare a Lambda Function that will serve as your Lambda Proxy integration.
Your custom Lambda Function should follow the guidelines present in the AWS Setting up Lambda custom integrations article. Adjust the event handler according to your needs. For example, you can provide your request responses and status codes.
Below, you can find a simple example of a
lambda_handlerthat responds with theHTTP 200status code and dumps a JSON response body. The body includes the base64-encoded authentication context that the Lambda Function receives from the Lambda Authorizer.import json def lambda_handler(event, context): print(json.dumps(event)) return {'statusCode': 200, 'body': json.dumps(event)} -
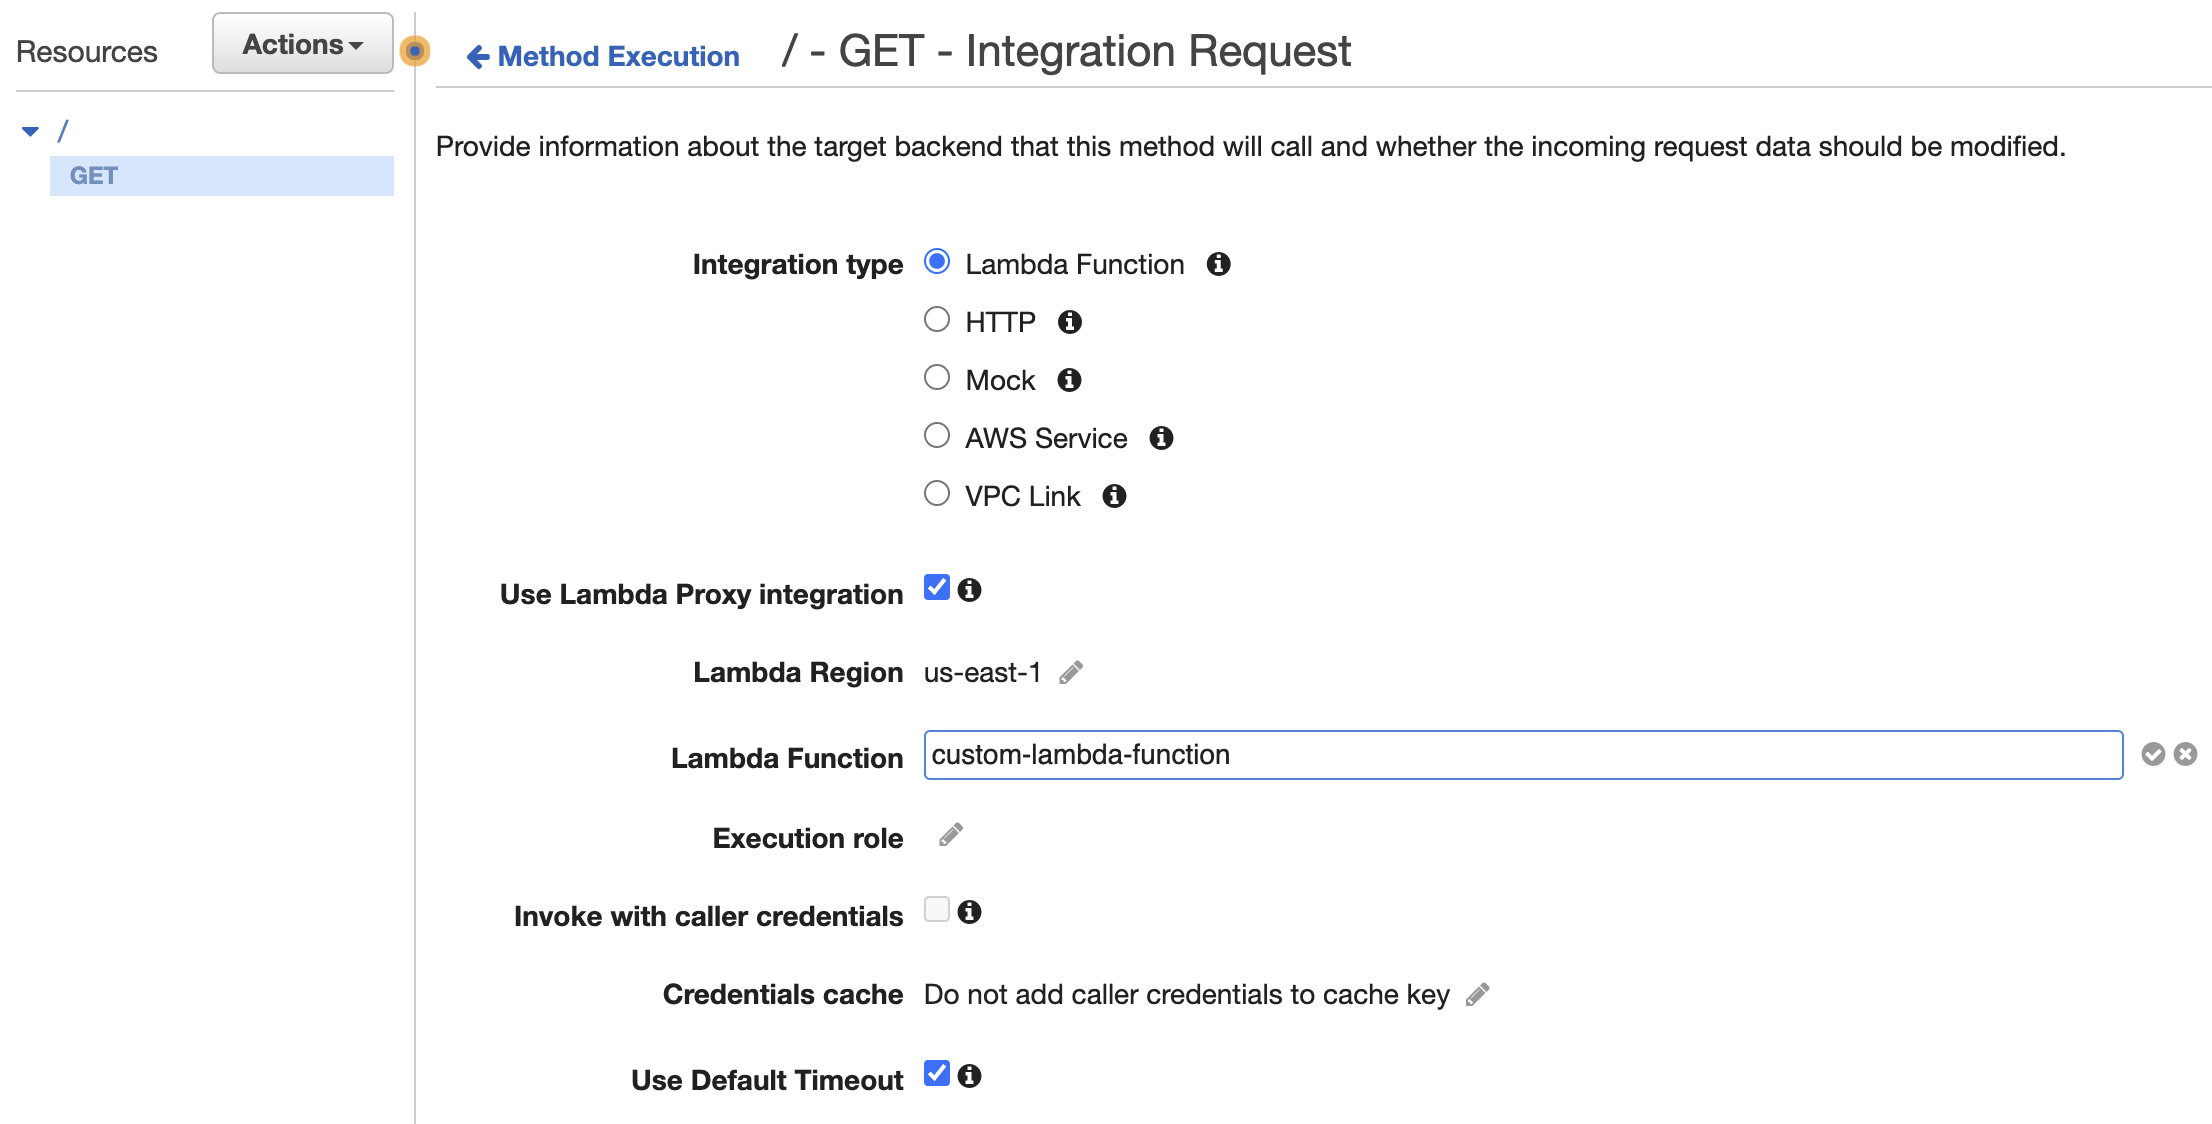
Go to your AWS API Gateway > Resources, choose a particular method and add an Integration Request.
-
Set the integration type to Lambda Function.
-
Enable the Use Lambda Proxy integration checkbox.
Lambda Proxy Integration
The request to your APIs will be proxied to your Lambda Function that you created in the second step with the request details available in the
eventobject of your handler function. -
Provide the identifier of your custom Lambda Function that you created in the second step as the value for the Lambda Function input field.
-
-
Redeploy your APIs in AWS.
-
Make a request to the API that you protect with the Cloudentity AWS Lambda Authorizer and that you had applied with a custom Lambda Function integration.
If you used the custom lambda_handler Lambda Function provided in the second step, you can see
that the request response contains the following response body in the JSON format:
Under the requestContext and authorizer objects, you can find the base-64 encoded authentication
context (authnCtx) that was passed firstly to your API Gateway and then proxied to your custom
Lambda Function.
For demonstration purposes, you can decode the authentication context using, for example, the BASE64 decoder and encoder or a different online tool. If you need to, for example, modify the context in your Lambda Function or extract information for any purpose, you can decode the authentication context in your Lambda Function. Below, you can find an example of decoded authentication context.