Kong Gateway Integration Using Kubernetes and Helm
To learn in details about Kong Gateway, Cloudentity Kong Plugin, Kong Authorizer, and how the integration works, get familiar with:
-
Kong Gateway and Kong Authorizer Overview: This section provides an introduction to the Kong Gateway and explains the role of the Kong Authorizer within the API ecosystem.
-
Adding External Authorization to Kong Gateway: A comprehensive diagram and detailed explanations of each component’s role in the integration pattern.
-
Cloudentity Kong Plugin: This documentation details what the Cloudentity Kong Plugin is and outlines how it functions within the Kong Gateway.
As part of this article, you will:
-
Either:
- Add Cloudentity Kong Plugin to an already existing Kong Gateway deployment on Kubernetes
or
- Deploy Kong Gateway from scratch including Cloudentity Kong Plugin
-
Expose Services and Routes on your Kong Gateway.
-
Create Kong Authorizer in Cloudentity and deploy it on Kubernetes.
-
Attach the Cloudentity Kong Plugin to your services.
-
Assign authorization policies to APIs to test if access control is enforced.
Additionally, you will find here information on how to:
-
Configure Cloudentity Kong Authorizer including How to Authenticate to Kong Admin API
-
Exchange External Access Tokens at Kong Authorizer Level Using OAuth Token Exchange
Prerequisites
-
Kubernetes version 1.19 or subsequent
-
Kubernetes cluster is set up.
Setting Up k8s Cluster
You can set up a Kubernetes cluster locally using kind.
Go version below 1.17
GO111MODULE="on" go get sigs.k8s.io/kind@v0.20.0 && kind create clusterGo version 1.17 or above
GO111MODULE="on" go install sigs.k8s.io/kind@v0.20.0 && kind create cluster
-
Helm version 3.0 or subsequent
-
Access to an Cloudentity SaaS tenant
How to Install Cloudentity Kong Plugin on Existing Kong Gateway Using Kubernetes and Helm
-
Add the following
acpplugin anddeploymentconfiguration to your Kong Gateway’svalues.yamlfile.initContainers: - name: plugin-setup image: kong:3.4 command: [ "sh", "-c", "cd /tmp && luarocks download kong-plugin-acp 1.2.0-1 && luarocks unpack kong-plugin-acp-* && mv kong-plugin-acp-*/lua/kong/plugins/acp/* /tmp/acp && ls -la /tmp/acp", ] volumeMounts: - name: "custom-kong-plugin-acp" mountPath: "/tmp/acp" userDefinedVolumes: - name: "custom-kong-plugin-acp" emptyDir: {} userDefinedVolumeMounts: - name: "custom-kong-plugin-acp" mountPath: "/usr/local/share/lua/5.1/kong/plugins/acp"Adjust the mountPath as needed to match your environment’s plugin directory.
-
Apply changes to the configuration using the
helm upgrade $release-name $chart-name -f $pathToValuesYamlFilecommand. See example below:helm upgrade kong kong/kong \ --values kong-values.yaml \ --namespace kong-system \ --timeout 5m \ --wait
How to Deploy Kong Gateway on K8s with Helm from Scratch Including Cloudentity Kong Plugin
In this section, we will install Kong Gateway on Kubernetes with Helm completely from scratch. We will include the Cloudentity Kong Plugin in our gateway deployment. To deploy the gateway, we will reference the official Kong Gateway documentation v.3.4 (latest as of 8th November 2023).
Keep in mind, based on whether you’re deploying the OSS or Enterprise version, some steps in the documentation may vary.
-
Go through the following steps of the setup described in Install with Kong Gateway Using Helm:
-
Configure Kubectl - not required if you are running a single local cluster.
-
-
Add the Kong Helm repository by executing:
helm repo add kong https://charts.konghq.com helm repo update -
Create a
values.yamlfile we will use to deploy Kong Gateway. For testing purposes, we recommend using the below setup.The below configuration is based on the values.yaml file defined in official Kong Gateway documentation v.3.4 (latest as of 8th November 2023). It includes the Cloudentity Kong Plugin installation.
If you wish to prepare any other configuration, remember to add Cloudentity Kong Plugin to the gateway as explained in the How to Install the Cloudentity Kong Plugin on an Existing Kong Gateway Using Kubernetes and Helm section.
admin: annotations: konghq.com/protocol: https enabled: true http: enabled: false ingress: annotations: konghq.com/https-redirect-status-code: "301" konghq.com/protocols: https konghq.com/strip-path: "true" nginx.ingress.kubernetes.io/app-root: / nginx.ingress.kubernetes.io/backend-protocol: HTTPS nginx.ingress.kubernetes.io/permanent-redirect-code: "301" enabled: true hostname: kong.127-0-0-1.nip.io path: /api tls: quickstart-kong-admin-cert tls: containerPort: 8444 enabled: true parameters: - http2 servicePort: 8444 type: ClusterIP affinity: podAntiAffinity: preferredDuringSchedulingIgnoredDuringExecution: - podAffinityTerm: labelSelector: matchExpressions: - key: app.kubernetes.io/instance operator: In values: - dataplane topologyKey: kubernetes.io/hostname weight: 100 certificates: enabled: true issuer: quickstart-kong-selfsigned-issuer cluster: enabled: true admin: enabled: true commonName: kong.127-0-0-1.nip.io portal: enabled: true commonName: developer.127-0-0-1.nip.io proxy: enabled: true commonName: 127-0-0-1.nip.io dnsNames: - '*.127-0-0-1.nip.io' cluster: enabled: true labels: konghq.com/service: cluster tls: containerPort: 8005 enabled: true servicePort: 8005 type: ClusterIP clustertelemetry: enabled: true tls: containerPort: 8006 enabled: true servicePort: 8006 type: ClusterIP deployment: kong: daemonset: false enabled: true initContainers: - name: plugin-setup image: kong:3.4 command: [ "sh", "-c", "cd /tmp && luarocks download kong-plugin-acp 1.2.0-1 && luarocks unpack kong-plugin-acp-* && mv kong-plugin-acp-*/lua/kong/plugins/acp/* /tmp/acp && ls -la /tmp/acp", ] volumeMounts: - name: "custom-kong-plugin-acp" mountPath: "/tmp/acp" userDefinedVolumes: - name: "custom-kong-plugin-acp" emptyDir: {} userDefinedVolumeMounts: - name: "custom-kong-plugin-acp" mountPath: "/usr/local/share/lua/5.1/kong/plugins/acp" enterprise: enabled: true license_secret: kong-enterprise-license portal: enabled: true rbac: admin_api_auth: basic-auth admin_gui_auth_conf_secret: kong-config-secret enabled: true session_conf_secret: kong-config-secret smtp: enabled: false vitals: enabled: true env: admin_access_log: /dev/stdout admin_gui_api_url: https://kong.127-0-0-1.nip.io/api admin_error_log: /dev/stdout admin_gui_access_log: /dev/stdout admin_gui_error_log: /dev/stdout admin_gui_host: kong.127-0-0-1.nip.io admin_gui_protocol: https admin_gui_url: https://kong.127-0-0-1.nip.io/ cluster_data_plane_purge_delay: 60 cluster_listen: 0.0.0.0:8005 cluster_telemetry_listen: 0.0.0.0:8006 database: postgres log_level: debug lua_package_path: /opt/?.lua;; nginx_worker_processes: "2" password: valueFrom: secretKeyRef: key: kong_admin_password name: kong-config-secret pg_database: kong pg_host: valueFrom: secretKeyRef: key: pg_host name: kong-config-secret pg_ssl: "off" pg_ssl_verify: "off" pg_user: kong plugins: bundled,openid-connect,acp portal: true portal_api_access_log: /dev/stdout portal_api_error_log: /dev/stdout portal_api_url: https://developer.127-0-0-1.nip.io/api portal_auth: basic-auth portal_cors_origins: '*' portal_gui_access_log: /dev/stdout portal_gui_error_log: /dev/stdout portal_gui_host: developer.127-0-0-1.nip.io portal_gui_protocol: https portal_gui_url: https://developer.127-0-0-1.nip.io/ portal_session_conf: valueFrom: secretKeyRef: key: portal_session_conf name: kong-config-secret prefix: /kong_prefix/ proxy_access_log: /dev/stdout proxy_error_log: /dev/stdout proxy_stream_access_log: /dev/stdout proxy_stream_error_log: /dev/stdout smtp_mock: "on" status_listen: 0.0.0.0:8100 trusted_ips: 0.0.0.0/0,::/0 vitals: true extraLabels: konghq.com/component: quickstart image: repository: kong/kong-gateway tag: "3.4" ingressController: enabled: true env: kong_admin_filter_tag: ingress_controller_default kong_admin_tls_skip_verify: true kong_admin_token: valueFrom: secretKeyRef: key: password name: kong-config-secret kong_admin_url: https://localhost:8444 kong_workspace: default publish_service: kong/quickstart-kong-proxy image: repository: docker.io/kong/kubernetes-ingress-controller tag: "2.10" ingressClass: default installCRDs: false manager: annotations: konghq.com/protocol: https enabled: true http: containerPort: 8002 enabled: false servicePort: 8002 ingress: annotations: konghq.com/https-redirect-status-code: "301" nginx.ingress.kubernetes.io/backend-protocol: HTTPS ingressClassName: kong enabled: true hostname: kong.127-0-0-1.nip.io path: / tls: quickstart-kong-admin-cert tls: containerPort: 8445 enabled: true parameters: - http2 servicePort: 8445 type: ClusterIP migrations: enabled: true postUpgrade: true preUpgrade: true namespace: kong podAnnotations: kuma.io/gateway: enabled portal: annotations: konghq.com/protocol: https enabled: true http: containerPort: 8003 enabled: false servicePort: 8003 ingress: annotations: konghq.com/https-redirect-status-code: "301" konghq.com/protocols: https konghq.com/strip-path: "false" ingressClassName: kong enabled: true hostname: developer.127-0-0-1.nip.io path: / tls: quickstart-kong-portal-cert tls: containerPort: 8446 enabled: true parameters: - http2 servicePort: 8446 type: ClusterIP portalapi: annotations: konghq.com/protocol: https enabled: true http: enabled: false ingress: annotations: konghq.com/https-redirect-status-code: "301" konghq.com/protocols: https konghq.com/strip-path: "true" nginx.ingress.kubernetes.io/app-root: / ingressClassName: kong enabled: true hostname: developer.127-0-0-1.nip.io path: /api tls: quickstart-kong-portal-cert tls: containerPort: 8447 enabled: true parameters: - http2 servicePort: 8447 type: ClusterIP postgresql: enabled: true auth: database: kong username: kong proxy: annotations: prometheus.io/port: "9542" prometheus.io/scrape: "true" enabled: true http: containerPort: 8080 enabled: true hostPort: 80 ingress: enabled: false labels: enable-metrics: true tls: containerPort: 8443 enabled: true hostPort: 443 type: LoadBalancer replicaCount: 1 secretVolumes: [] status: enabled: true http: containerPort: 8100 enabled: true tls: containerPort: 8543 enabled: false -
Install Kong Gateway by adjusting and executing the following command:
helm install quickstart kong/kong --namespace kong --values $path-to-your-values-yaml -
Wait for all pods to be in the Running and Completed states:
kubectl get po --namespace kong -w
Your Kong Gateway is up and running. However, you need to route your local traffic to your Kubernetes cluster.
In this article, we will employ Kubernetes Port-Forwarding to access services deployed in the cluster. This approach is suitable for our current context and allows us to interact with the services without the need to configure NodePorts or Ingress Controllers, which are beyond the scope of this article.
In separate terminal shells, forward the following ports:
kubectl port-forward -n kong svc/quickstart-kong-proxy 8000:80 # Forward Kong Proxy
kubectl port-forward -n kong svc/quickstart-kong-admin 8444:8444 # Forward Kong Admin API
kubectl port-forward -n kong svc/quickstart-kong-manager 8445:8445 # Forward Kong Manager
Note that depending on your license and setup, Kong Manager or Kong Admin APIs may be not fully accessible.
Expose Services and Routes on Kong Gateway
For most up-to-date information on how to expose services and routes on Kong Gateway, see official Kong documentation:
-
Managing Services and Managing Routes using Kong Admin APIs.
For the purpose of this article, we will quickly deploy a sample httpbin HTTP request and response service and expose it using Kong Gateway Admin APIs.
Deploying and Exposing Sample Service with Routes on Kong Gateway
-
Execute the following command in your terminal to deploy the httpbin service on your Kubernetes cluster:
kubectl apply -f - <<EOF apiVersion: v1 kind: ServiceAccount metadata: name: httpbin --- apiVersion: v1 kind: Service metadata: name: httpbin spec: selector: app: httpbin ports: - port: 80 name: http --- apiVersion: apps/v1 kind: Deployment metadata: name: httpbin labels: app: httpbin annotations: services.k8s.cloudentity.com/spec-url: "http://httpbin.org/spec.json" spec: replicas: 1 selector: matchLabels: app: httpbin template: metadata: labels: app: httpbin spec: serviceAccountName: httpbin containers: - name: httpbin image: "kennethreitz/httpbin" ports: - containerPort: 80 name: http EOF -
Forward the port of the deployed service using the below command:
kubectl port-forward -n default svc/httpbin 8888:80You can confirm everything works by executing:
curl http://localhost:8888/anything/anywhere -vYou should receive the
HTTP/1.1 200 OKresponse status. -
Call the Add Service Kong Admin API:
curl -i -X POST -k \ --url https://localhost:8444/services/ \ --data 'name=example-service' \ --data 'url=http://httpbin.default.svc:80' -
Call the Add Route Kong Admin API:
curl -i -X POST -k \ --url https://localhost:8444/services/example-service/routes \ --data 'paths[]=/anything' \ --data-urlencode 'methods[]=GET' \ --data-urlencode 'methods[]=PUT' \ --data-urlencode 'methods[]=POST' \ --data-urlencode 'methods[]=DELETE' \ --data 'name=anything' \ --data 'strip_path=false' -
Verify if the API can be successfully called through the Kong Gateway:
curl http://localhost:8000/anything/anywhere -vYou should receive the
HTTP/1.1 200 OKresponse status.
Your service is up and running. Now it is time to apply access control with Cloudentity.
Add External Authorization to APIs on Kong Gateway
Create Kong Authorizer in Cloudentity
-
In your Cloudentity tenant, go to the workspace of your choice.
-
Select Authorization » Gateways » CREATE GATEWAY » Kong.
-
Provide a name and a description for your Kong Authorizer.
-
Optionally, enable the Create and bind services automatically check box.
Tip
When enabled, all services protected by your Kong Authorizer instance are discovered and added to the Cloudentity service list automatically when the Kong authorizer is connected to Cloudentity. Otherwise, you need to add them manually.
Your Kong Authorizer is now set up and ready for deployment.
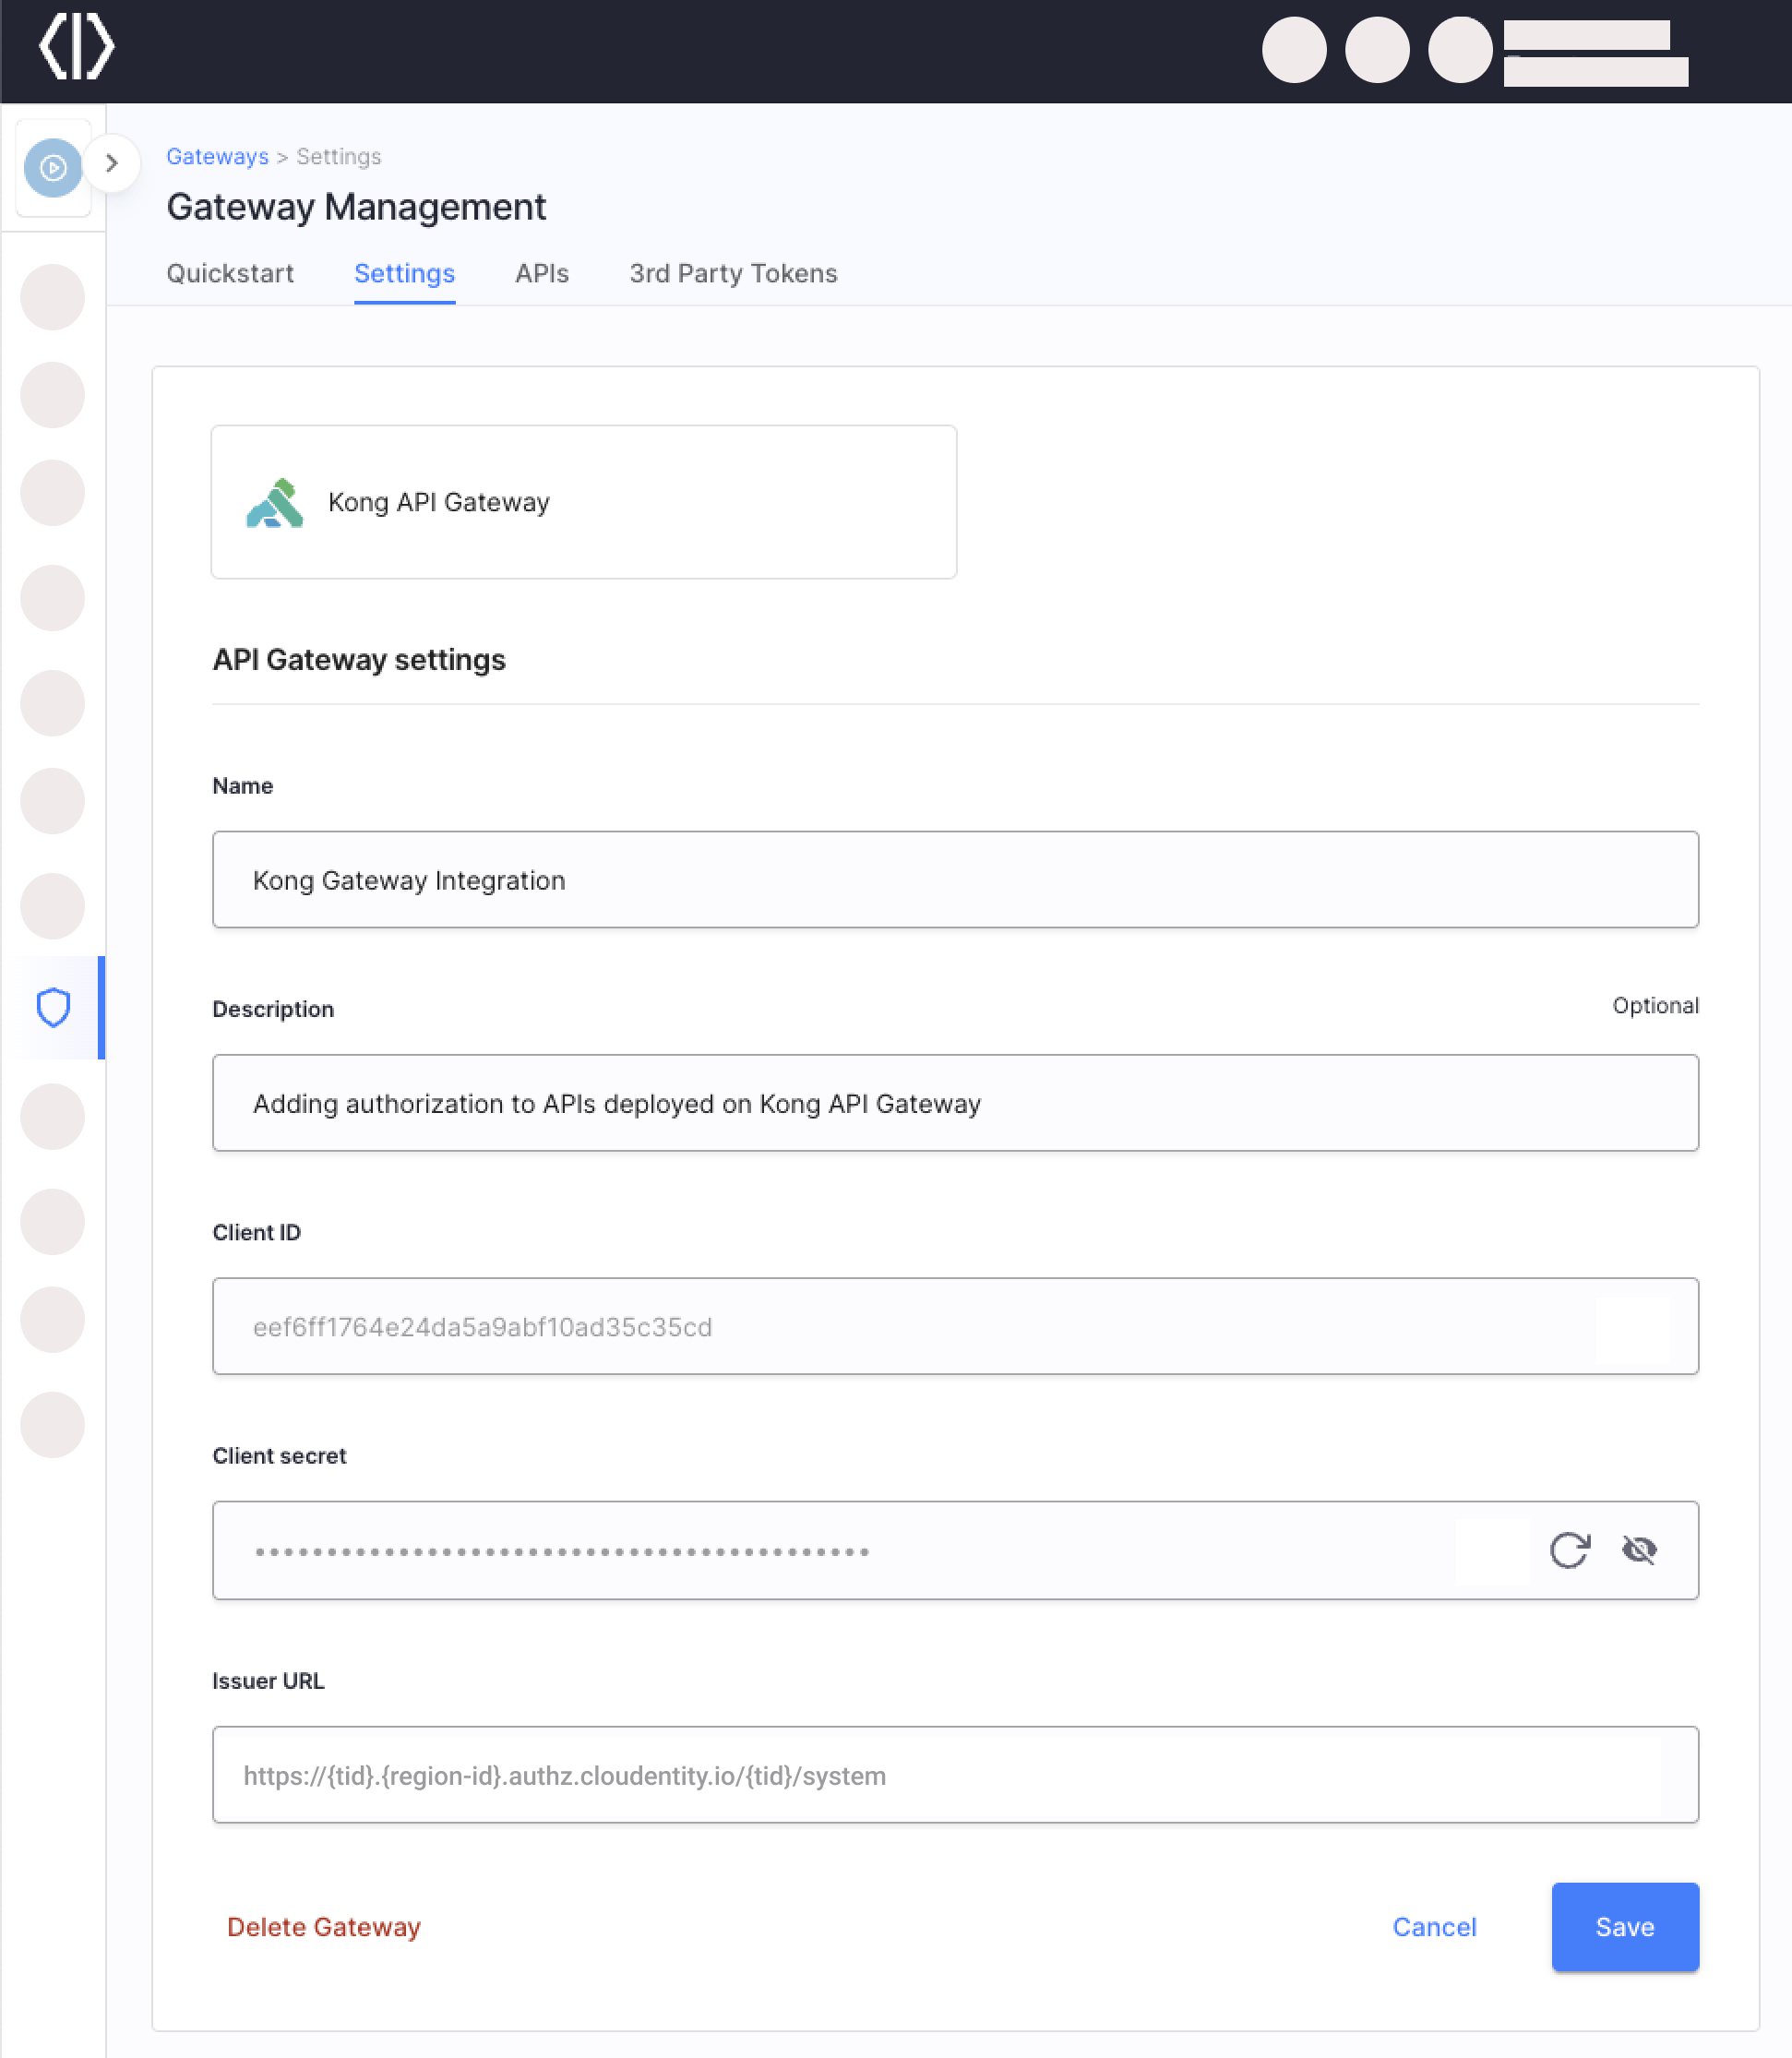
In the Settings tab, you’ll find essential credentials such as client ID, client secret, and issuer URL. These credentials are automatically generated by Cloudentity for the authorizer’s client application within the System workspace of your tenant. They are vital for authenticating with the Cloudentity authorization server, which is a necessary step for operations like retrieving policy definitions.
Deploy Kong Authorizer with Helm Charts
Cloudentity provides a dedicated Helm Chart for deploying the Kong Authorizer.
-
Run the command below to create a Kong Authorizer service with the following parameters:
-
Service name: `kong-authorizer``
-
Namespace:
cl-kong-authorizer -
${CLIENT_ID},${CLIENT_SECRET},${ISSUER_URL}- Authorizer Client ID, Client Secret, and Issuer URL which you can retrieve from Cloudentity having created the authorizer.The
issuerURLargument should point to the issuer URL of your Kong Authorizer client application created within the System workspace of your tenant. You can find the issuer URL in the Settings view for your authorizer.If you are using a vanity domain for your Cloudentity tenant and it is impossible to retrieve the tenant’s and server’s identifier from the URL, provide values for the
tenantIDandserverIDparameters in addition to issuerURL. -
$
{KONG_ADMIN_URL}- Kong Admin API URL. If you deployed Kong Gateway using the instructions from the How to Deploy Kong Gateway on K8s with Helm from Scratch Including Cloudentity Kong Plugin section, the URL ishttps://quickstart-kong-admin.kong.svc:8444
Example without vanity domains:
helm repo add acp https://charts.cloudentity.io && helm repo update
helm upgrade --install kong-authorizer acp/kong-authorizer \
  --set clientCredentials.clientID=${CLIENT_ID} \
  --set clientCredentials.clientSecret=${CLIENT_SECRET} \
  --set issuerURL=${ISSUER_URL} \
  --set kongAdminURL=${KONG_ADMIN_URL} \
  --namespace cl-kong-authorizer \
  --create-namespace
Example with vanity domains:
helm repo add acp https://charts.cloudentity.io && helm repo update helm upgrade --install kong-authorizer acp/kong-authorizer \ --set clientCredentials.clientID=${CLIENT_ID} \ --set clientCredentials.clientSecret=${CLIENT_SECRET} \ --set issuerURL=${VANITY_ISSUER_URL} \ --set tenantID=${TENANT_ID} \ --set serverID=${SERVER_ID} \ --namespace cl-kong-authorizer \ --create-namespace -
-
Wait for the Kong Authorizer pod to be in the running status:
kubectl get po --namespace cl-kong-authorizer -w
Your authorizer is up and running. If you enabled the Create and bind services automatically option, the authorizer discovers the APIs deployed on Kong Gateway, pushes them to Cloudentity platform, and automatically creates a Service.

Attach Cloudentity Kong Plugin to Service On Kong Gateway
To attach Cloudentity Kong Plugin to the service deployed on Kong Gateway, use the Add Plugin Kong Admin API or follow the instruction from the Attaching Cloudentity Kong Plugin to Service in DB-Less Kong if you are running Kong without a database.
Adjust the variables according to your deployment setup and execute the following curl:
curl -sSk -X POST {kong-admin-api-url}/services/{service-name}/plugins \
     --data 'name=acp' \
     --data 'config.api_group_id={api-group-id}' \
     --data 'config.auth_url={kong-authorizer-url}/authorize' \
     --data 'config.ssl_verify=false'
See example for the service we deployed in the Deploying and Exposing Sample Service with Routes on Kong Gateway section.
curl -sSk -X POST https://localhost:8444/services/example-service/plugins \
     --data 'name=acp' \
     --data 'config.api_group_id=example-service' \
     --data 'config.auth_url=https://kong-authorizer.cl-kong-authorizer.svc:9003/authorize' \
     --data 'config.ssl_verify=false'
In the curl example above:
-
We add
acpplugin to theexample-servicewe deployed in the Deploying and Exposing Sample Service with Routes on Kong Gateway section. -
We configure the
api_group_idasexample-service– same as the API’s underlying service in Cloudentity. If you did not enable the bind and create service option while creating the authorizer and connected APIs manually to a service, provide its name here. -
We define the authorizer’s
/authorizeendpoint for the plugin ashttps://kong-authorizer.cl-kong-authorizer.svc:9003/authorize. -
We disable certificate verification during API discovery using the
ssl_verifysetting.
You should get a response similar to the following:
Attaching Cloudentity Kong Plugin to Services in DB-Less Kong
To attach the Cloudentity Kong Plugin in a DB-less Kong Gateway setup, add plugins
declaration with the Cloudentity Kong Plugin configuration as part of the config
setting. See example:
dblessConfig:
  configMap: ""
  config: |
    _format_version: "1.1"
    plugins:
      - name: acp
        config:
          api_group_id: example-service
          auth_url: https://kong-authorizer.cl-kong-authorizer.svc:9003/authorize
          ssl_verify: false
    services:
      - name: example-service
        url: http://httpbin.default.svc:80
        routes:
          - name: anything
            paths:
              - "/anything"
            methods:
              - GET
              - POST
              - DELETE
              - PUT
            strip_path: false
Note the api_group_id being set to the same value as the service name.
Verify Access Control and Attached Cloudentity Kong Plugin
-
Again call the API deployed on Kong Gateway and discovered by the Kong Authorizer.
curl http://localhost:8000/anything/anywhere -vYou should receive the
HTTP/1.1 200 OKresponse. -
Verify the logs for the authorizer by executing:
kubectl logs --since=1h <kong-authorizer-pod-name> -n <kong-authorizer-namespace>Example:
kubectl logs --since=1h kong-authorizer-wg9lp -n cl-kong-authorizerYou should see the log similar to the below. It means that the authorizer was able to successfully validate the request and allowed access.
time="2023-11-09T09:59:22Z" level=info msg="request validated" failures="[]" group=example-service method=GET output="map[]" path=/anything/anywhere rule="Rule[method=GET, path=/anything.*, policyName=, injections=[]]" status=AUTHORIZED token_exchange="{false false }" -
In Cloudentity, go to Authorization » API Authorization.
-
Select Unrestricted (No Policy) next to one of the discovered APIs you called before.
-
Select the Block API policy to block all requests coming to your API.
The authorizer fetches the policy definitions on a configured interval. Depending on your configuration (default - 1 minute) it may take some time for the policy to be fetched by the authorizer.
-
Call the API again.
Example:
curl http://localhost:8000/anything/anywhere -vYou should get the
HTTP/1.1 403 Forbiddenresponse. -
Verify authorizer’s logs again:
kubectl logs --since=1h <kong-authorizer-pod-name> -n <kong-authorizer-namespace>Example:
kubectl logs --since=1h kong-authorizer-wg9lp -n cl-kong-authorizerYou should see the log similar to the below. It means that the authorizer blocked the request as defined by the Block API policy.
time="2023-11-09T10:16:31Z" level=info msg="request validated" failures="[validator:\"false\" message:\"false\" details:\"false\"]" group=example-service method=GET output="map[]" path=/anything/anywhere rule="Rule[method=GET, path=/anything.*, policyName=block_demo_api, injections=[]]" status=NOT_AUTHORIZED token_exchange="{false false }" -
Unassign the Block API policy from the API for cleanup.
Configure Kong Authorizer
-
Reference Kong Authorizer Configuration.
-
Add changes to your Kong Authorizer’s values.yaml file according to the Kong Authorizer values.yaml Reference.
For most up to date reference, use the
helm show values acp/kong-authorizercommand in your terminal.If possible, use top-level values.yaml settings. If a setting you wish to configure is not available top-level
-
Apply the changes to your deployment:
helm upgrade --install kong-authorizer acp/kong-authorizer \
  --namespace ${KONG_AUTHORIZER_NAMESPACE} \
  --values ${KONG_AUTHORIZER_CONFIG}
Example:
helm upgrade --install kong-authorizer acp/kong-authorizer \
  --namespace cl-kong-authorizer \
  --values values.yaml
Kong Authorizer Configuration Reference
 # acp
acp:
    reload_interval: 1m0s # reload interval
    reload_timeout: 30s # reload configuration timeout
    issuer_url: https://localhost:8443/sample/system # issuer url
    client_id: bqesdrc4m4co2s81mpu0 # client id
    client_secret: LH6mAb6PNljvjYMIF-A5RP2bElA5a5bnQah8sG0fsLA # client secret
    tenant_id: "" # tenant id
    server_id: "" # server id
# http client
http_client:
    timeout: 10s # http client timeout
    retry_wait_min: 0s # minimum time to wait between retries
    retry_wait_max: 0s # maximum time to wait between retries
    retry_max: 0 # maximum number of retries
    root_ca: "" # root ca that this client should trust (defaults to system root ca)
    insecure_skip_verify: false # disable cert verification
    disable_follow_redirects: false # disable follow redirects
    disable_retry: true # disable retry
# metrics
metrics:
    enabled: false # enable metrics endpoint
    port: 9000 # metrics endpoint port
# analytics
analytics:
    enabled: true # when enabled, events are sent to audit log
    # event format
    event_format:
        include_policy_output: false # when enabled, policy evaluation output is sent to audit log
    # sampling
    sampling:
        probability: 1 # Probability of an event to be published (0.0-1.0)
        batch_inverval: 1s # Max duration to wait for a batch to publish
        batch_limit: 100 # Max number of events in a batch
        limit: 5 # Max number of batches per second to be published
        timeout: 5s # Timeout for a single batch to send
        workers: 8 # Number of sending workers
# cache
cache:
    ttl: 10s # ttl
    max_size: 100 # max size
# logging config
logging:
    level: info # log level severity
# token echange config
token_exchange:
    enabled: false # enable token exchange
    # cache
    cache:
        ttl: 1m0s # ttl
        max_size: 1000 # max size
    # inject config (supported only for istio authorizer)
    inject:
        mode: "" # Defines what token should be sent to the target service when token is exchanged
        # headers config
        headers:
            exchanged_token: "" # Defines the name of the header that contains an exchanged token.
            original_token: "" # Defines the name of the header that contains an original token.
            strip_bearer: false # Allows to strip the bearer prefix in headers
# enforcement config
enforcement:
    allow_unknown: false # allow requests with no matching rule
# discovery config
discovery:
    enabled: true # when true, API discovery is enabled
    timeout: 10s # discovery process timeout
    interval: 30s # how often discovery is performed
# http server
http_server:
    port: 9003 # http port
    dangerous_disable_tls: false # diables TLS
    # certificate configuration
    certificate:
        password: "" # key passphrase
        cert_path: "" # path to the certificate PEM file
        key_path: "" # path to the key PEM file
        cert: "" # base64 encoded cert PEM
        key: "" # base64 encoded key PEM
        generated_key_type: ecdsa # type for generated key if cert and key are not provided (rsa or ecda)
    client_auth_type: 0 # client auth type
# kong
kong:
    admin_url: "" # kong admin url indicates the Kong Admin API
    admin_token: "" # kong admin token for RBAC authentication to Kong Admin API
    admin_username: "" # kong admin username for Basic Auth to Kong Admin API
    admin_password: "" # kong admin password for Basic Auth to Kong Admin API
    admin_client_id: "" # kong admin client ID for OAuth2 authentication to the Kong Admin API
    admin_client_secret: "" # kong admin client secret for OAuth2 authentication to the Kong Admin API
    admin_issuer_url: "" # kong admin issuer url for OAuth2 authentication to the Kong Admin API
    # http client used to access the Kong Admin API
    http_client:
        timeout: 0s # http client timeout
        retry_wait_min: 0s # minimum time to wait between retries
        retry_wait_max: 0s # maximum time to wait between retries
        retry_max: 0 # maximum number of retries
        root_ca: "" # root ca that this client should trust (defaults to system root ca)
        insecure_skip_verify: true # disable cert verification
        disable_follow_redirects: false # disable follow redirects
        disable_retry: false # disable retry
Kong Authorizer values.yaml Reference
For most up to date reference, use the helm show values acp/kong-authorizer command in your terminal.
 ## kong-authorizer image parameters
##
image:
  ## Image repository
  ##
  repository: docker.cloudentity.io/kong-authorizer

  ## Image pull policy
  ##
  pullPolicy: IfNotPresent

  ## Image tag (immutable tags are recommended, default is the chart appVersion)
  ##
  tag: ""

## Number of desired pod replicas if deployAsDaemonSet set to false.
##
replicaCount: 1

## Autoscaling parameters if deployAsDaemonSet set to false.
##
autoscaling:
  ## Enable autoscaling
  ##
  enabled: false

  ## Define mix replica count
  ##
  # minReplicas: 0

  ## Define max replica count
  ##
  # maxReplicas: 1

  ## The average CPU usage of a all pods in a deployment
  ##
  # targetCPUUtilizationPercentage: ""

  ## The average memory usage of a all pods in a deployment
  ##
  # targetMemoryUtilizationPercentage: ""

  ## Custom scaling behavior
  ##
  #  behavior: {}


## A map with annotations
##
podAnnotations: []

## kong-authorizer image registry secret names as an array
##
imagePullSecrets:
  - name: docker.cloudentity.io

## Pod security context
##
podSecurityContext:
  fsGroup: 1000
  runAsGroup: 1000
  runAsNonRoot: true
  runAsUser: 1000
  seccompProfile:
    type: RuntimeDefault

## Container security context
##
containerSecurityContext:
  readOnlyRootFilesystem: true
  allowPrivilegeEscalation: false
  capabilities:
    drop:
      - ALL
  seccompProfile:
    type: RuntimeDefault

## String to fully override kong-authorizer.fullname
##
# fullnameOverride: ""

## Service account to use by the kong-authorizer
##
serviceAccount:
  ## Specifies whether a service account should be created
  ##
  create: true
  ## Annotations to add to the service account
  ##
  annotations: {}
  ## The name of the service account to use.
  ## If not set and create is true, a name is generated using the fullname template
  ##
  name: ""

## Issuer URL of your tenant's ACP system workspace
##
## When using kong-authorizer in single-tenant mode, this should point
## to the system workspace of your tenant.
## i.e. "http://authz.cloudentity.io/yourtenant/system"
##
## If you're using multi-tenant kong-authorizer this should point
## to the `system` workspace of your `system` tenant.
## i.e. "http://yourdomain.com/system/system"
##
issuerURL: "https://acp.acp-system:8443/default/system"

## Vanity Domain
## If the issuerURL uses a vanity domain, you will need to specify the tenantID,
## and if the domain is per-server, then you must also specify the serverID.
##
tenantID: ""
serverID: ""

## Pod resources definition
resources: {}
  # requests:
  #   cpu: 10m
  #   memory: 48Mi
  # limits:
  #   cpu: 100m
  #   memory: 96Mi

## Credentials for your ACP kong-authorizer
##
##
clientCredentials:
  ## Default dummy values
  ## You can provide credentials generated by ACP for your kong gateway.
  ##
  clientID: "c7c7mgmvd3ibf6k124n0"
  clientSecret: "TuIEmSWHtU-0ftOO7445nccomqu71V4Wcv4SW3fzviM"

## kong-authorizer config file from secret
##
secretConfig:
  ## Specifies whether a kubernetes secret should be created.
  ## For production setup, please create the secret (ideally encrypted) manually
  ## parameter to integrate with kong-authorizer
  ##
  create: true

  ## The name of the client secret to use
  ## If not set and create is true, a name is generated using the fullname template
  ##
  # name: ""

## node selector for pod assignment
##
## nodeSelector: {}

## Affinity for pod assignment
##
affinity: {}
  # nodeAffinity:
  #   requiredDuringSchedulingIgnoredDuringExecution:
  #   nodeSelectorTerms:
  #     - matchExpressions:
  #         - key: authorizer
  #           operator: In
  #           values:
  #             - "true"

## Tolerations for pod assignment
##
tolerations: []
#- key: authorizer
#  value: "true"
#  effect: NoSchedule

## Kong-authorizer pod topology spread constraints
##
# topologySpreadConstraints: {}

## Logging configuration
##
logging:
  ## log level
  ##
  level: info

## Authorizer discovery configuration
##
discovery:
  ##  When true, API discovery is enabled
  ##
  enabled: true

## Enforcement configuration
##
enforcement:
  ## allow requests with no matching rule
  ##
  allowUnknown: false

## Kong configuration
##
kong:
  ## Admin portal URL
  admin_url: http://kong-kong-admin.kong-system:8001

service:
  ## kong-authorizer service type
  ##
  type: ClusterIP

  ## kong-authorizer service HTTP port
  ##
  port: 9003
  name: http
  # appProtocol: https

ingress:
  ## Enables the Ingress for kong-authorizer.
  ## This is only needed when Kong runs outside the cluster.
  ##
  enabled: false

  ## Ingress class name
  # className: nginx

  ## Ingress annotations
  ##
  # annotations:

  ## Ingress hostnames with paths
  ##
  hosts:
    - host: kong-authorizer.kong-authorizer
      paths:
        - path: /authorize

  ## Ingress TLS configuration
  ## Secrets must be manually created in the namespace
  tls: []
  #  - secretName: kong-authorizer-tls
  #    hosts:
  #      - kong.domain.com

## Token exchange settings
##
tokenExchange:
  ## Enable token exchange (temporary until acp 2.0 is released)
  ##
  enabled: false

  ## Token exchange inject settings
  inject:
    ## Inject mode, defines what token should be send to the target service
    ## One of: InjectOriginalToken, InjectExchangedToken, InjectBothTokens
    ##
    mode: "InjectExchangedToken"

    headers:
      ## Original token header name
      ##
      originalToken: ""

      ## Exchanged token header name
      ##
      exchangedToken: "Authorization"

      ## strip bearer token
      ##
      stripBearer: false

## ACP http client configuration
##
# httpClient:
#   ## Set the ca.crt to the CA certificate used by ACP.
#   ## If you're exposing ACP with your own custom (not publicly trusted) certificates, Kong Authorizer needs to trust them.
#   ##
#   rootCa: |
#     -----BEGIN CERTIFICATE-----
#     -----END CERTIFICATE-----

## Additional kong-authorizer ConfigMap entries
## The data should match kong-authorizer configuration options
## https://docs.authorization.cloudentity.com/guides/developer/protect/kong/authz_config_reference/
##
# extraConfig: {}
Authenticating Kong Authorizer Requests to Kong Admin API
While discovering services, Kong Authorizer may need to authenticate to Kong Gateway Admin APIs using one of the below methods depending on your gateway configuration.
- RBAC Authentication
To authenticate when the Kong Admin API is secured by RBAC,
supply the RBAC user token via the environment variable KONG_ADMIN_TOKEN, or the YAML field
kong.admin_token:
Licensed Enterprise users only
RBAC is only available for licensed Kong Gateway users. It’s not possible to enable RBAC on a free Kong Enterprise version or the Open Source version.
kong:
  admin_url: https://quickstart-kong-admin.kong.svc:8444
  admin_token: vajeOlkbsn0q0VD9qw9B3nHYOErgY7b8
- Basic Authentication
To authenticate when the Kong Admin API is secured by the Kong basic-auth plugin,
specify the environment variables KONG_ADMIN_USERNAME and KONG_ADMIN_PASSSWORD, or specify them
via the YAML configuration:
kong:
  admin_url: https://quickstart-kong-admin.kong.svc:8444
  admin_username: kong-admin
  admin_password: sesame
As a result, when the authorizer tries to access the Kong API without credentials, the request fails.
{
  "message": "Unauthorized"
}
- OAuth2 Authentication
To authenticate when the Kong Admin API is secured by the Kong oauth2 plugin,
specify the environment variables KONG_ADMIN_CLIENT_ID, KONG_ADMIN_CLIENT_SECRET, and KONG_ADMIN_ISSUER_URL,
or specify them via the YAML configuration:
kong:
  admin_url: https://quickstart-kong-admin.kong.svc:8444
  admin_client_id: kong-authorizer-id
  admin_client_secret: kong-authorizer-secret
  admin_issuer_url: https://kong:8443/admin-api
As a result, when the authorizer tries to access the Kong API without the access token, the request fails.
{
  "error": "invalid_request",
  "error_description": "The access token is missing"
}
Exchange External Tokens in Kong Authorizer
Cloudentity Kong Authorizer is capable of exchanging external access tokens to internal access tokens issued by Cloudentity. The token exchange takes place as defined in the OAuth Token Exchange Extension.
Prerequisites
-
You were able to successfully verify access control and attached Cloudentity Kong Plugin
Configure Mock External Token Service in Cloudentity
To simulate an external IDP, we will use a separate workspace as an external token service.
In a real world scenario, you would skip this step - instead, you would just add the Third Party Token Service as a trusted IDP in the workspace where the Kong Gateway and Authorizer are connected.
-
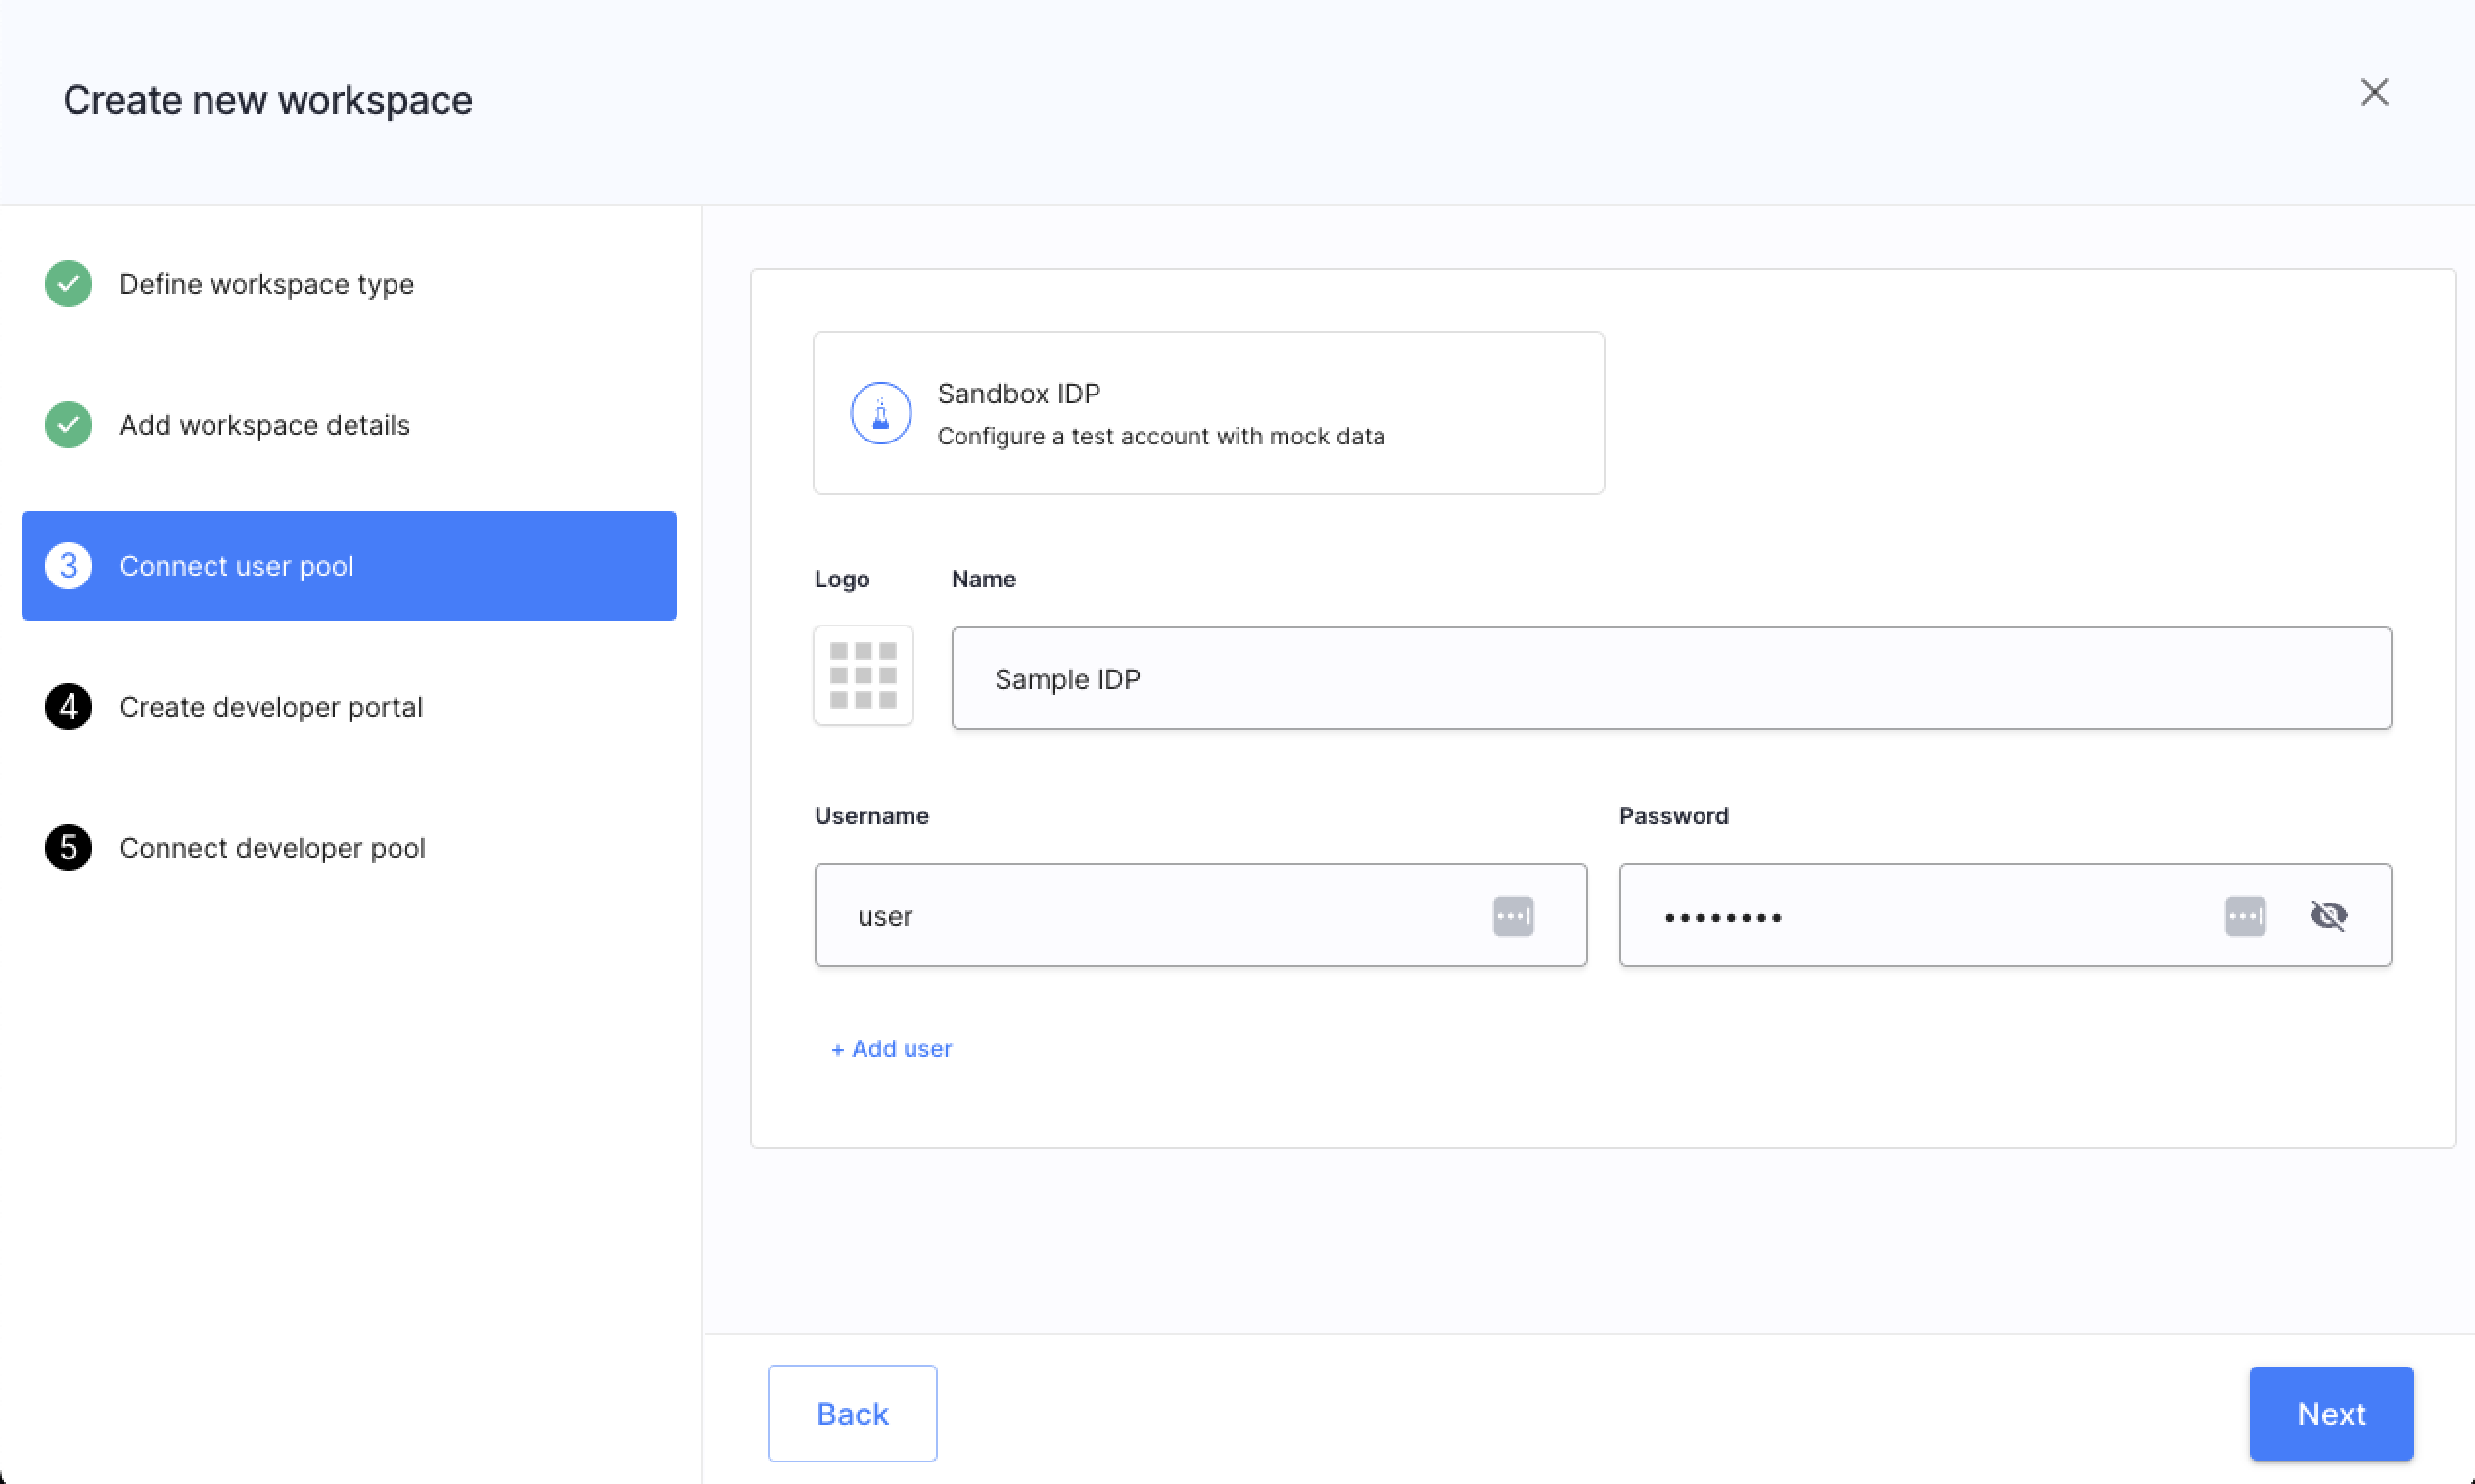
In your tenant, add a workspace with Demo Application enabled and Sandbox IDP connected and with mock user added to quickly get external access tokens.
You can use any of the available workspace types, but we recommend creating a Demo Environment to simplify the procedure. You may skip connecting developer portals and developer pools.
Enabling Demo App in Workspace Details Connecting Sandbox IDP 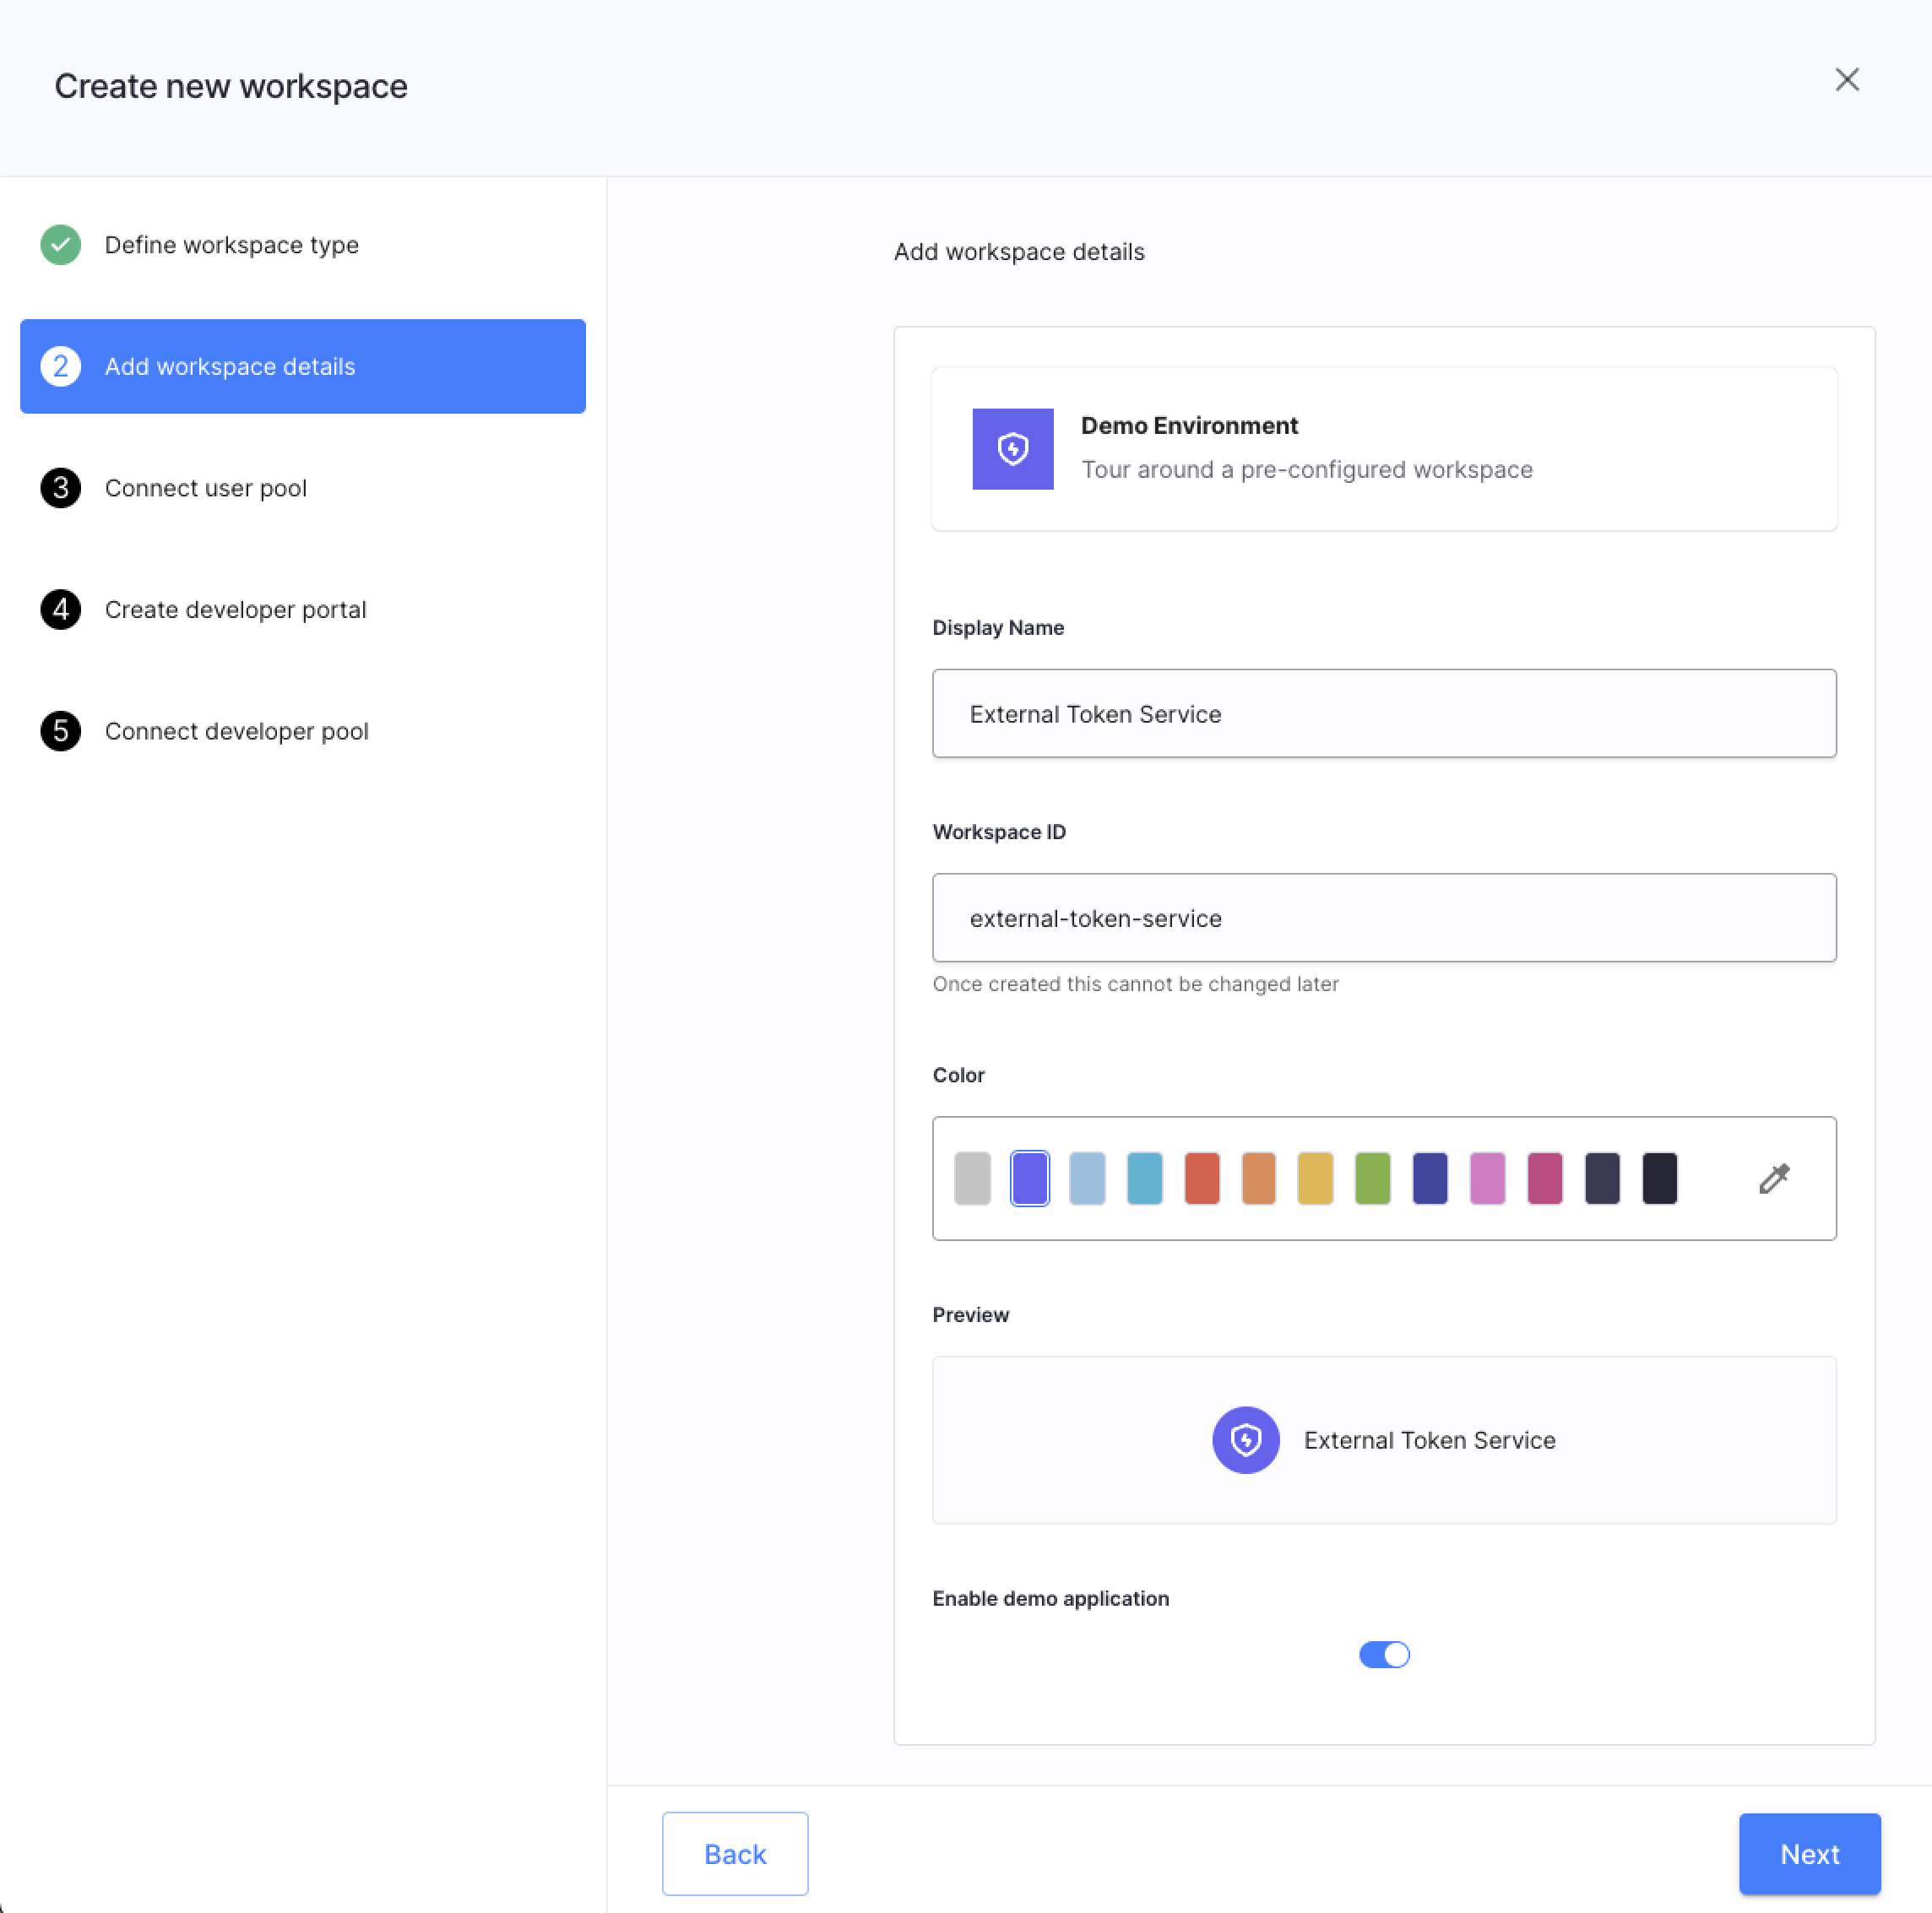
-
Navigate to Applications » Clients » Demo Portal and copy the following values:
-
Client ID
-
Client Secret
-
Issuer URL
You will need those values later on while connecting the external token service as OIDC-based IDP in the workspace with Kong Gateway and Kong Authorizer.
-
Enable Token Exchange for Kong Authorizer in Cloudentity
-
Navigate to the workspace where you connected the Kong Gateway and Kong Authorizer.
-
Select Authorization » Gateways » your Kong Authorizer » 3rd Party Tokens.
-
Select ENABLE, if the token exchange is not yet enabled for the underlying OAuth authorization server in your workspace.
-
Enable the Enable exchange of third party tokens to Cloudentity access tokens option.
Add and Configure Trusted IDP - External Token Service
In this section, we will connect the external token service as IDP (token service). We will use the generic OIDC IDP template, to connect our mock external token service. In real world, you would connect any OIDC-based IDP.
-
Select Authentication » Providers » CREATE CONNECTION and expand the Third Party Providers dropdown.
-
Select OpenID Connect and proceed.
-
Add the client ID, client secret, and issuer URL of your external token service. Use name of your choice.
For testing, use the credentials of the Demo Portal application you copied in the Configure Mock External Token Service in Cloudentity section.
-
Save.
-
In the Configuration tab for this IDP, expand the Token Exchange dropdown, enable the checkbox, and save.
-
Select Authorization » Gateways » your Kong Authorizer » 3rd Party Tokens.
You can see that the token exchange is enabled for the configured Identity Provider. Here, you can control which IDPs are trusted for this authorizer.
Configure Kong Authorizer for Token Exchange
For detailed information about Kong Authorizer configuration, see the Configure Kong Authorizer section.
Token exchange in Kong Authorizer is controlled by the following settings in Kong Authorizer values.yaml file:
## Token exchange settings
##
tokenExchange:
  ## Enable token exchange (temporary until acp 2.0 is released)
  ##
  enabled: false

  ## Token exchange inject settings
  inject:
    ## Inject mode, defines what token should be send to the target service
    ## One of: InjectOriginalToken, InjectExchangedToken, InjectBothTokens
    ##
    mode: "InjectExchangedToken"

    headers:
      ## Original token header name
      ##
      originalToken: ""

      ## Exchanged token header name
      ##
      exchangedToken: "Authorization"

      ## strip bearer token
      ##
      stripBearer: false
As you can see, you can configure which tokens are used when accessing the APIs:
-
the original external token (
mode:InjectOriginalToken) -
the exchanged token coming from Cloudentity (
mode:InjectExchangedToken) -
Both tokens (
mode:InjectBothTokens) – in such case, you need to configure theheaders.originalTokenand theheaders.exchangedTokensettings to define the headers used to injecting tokens.
-
Prepare the values.yaml file for your Kong Authorizer configuration.
Example:
clientCredentials:
  clientID: "{client-id}"
  clientSecret: "{client-secret}"
issuerURL: "{issuer-URL}"
kong:
  admin_url: "https://quickstart-kong-admin.kong.svc:8444"
tokenExchange:
  enabled: true
  inject:
    ## Inject mode, defines what token should be send to the target service
    ## One of: InjectOriginalToken, InjectExchangedToken, InjectBothTokens
    ##
    mode: "InjectBothTokens"

    headers:
      ## Original token header name
      ##
      originalToken: "EXT-Token-Service"

      ## Exchanged token header name
      ##
      exchangedToken: "Authorization"

      ## strip bearer token
      ##
      stripBearer: false
As you can see, we will use the exchanged access token to authenticate the client app, but we will also include the original token from the external token service as a value of the
EXT-Token-Serviceheader.If you need to learn more about the credentials like client ID, secret, or issuer URL, see the Create Kong Authorizer in Cloudentity section.
-
Apply the changes to your deployed Kong Authorizer:
Example:
helm upgrade --install kong-authorizer acp/kong-authorizer \ --namespace cl-kong-authorizer \ --values values.yaml -
Wait for the Kong Authorizer’s pod to be in the running status:
kubectl get po --namespace cl-kong-authorizer -w
Your Kong Authorizer is now capable of exchanging access tokens.
Verify Exchanging Tokens in Kong Authorizer
If you followed this article, so far we did not check for access tokens when applying access control in Kong Authorizer. We need to create an authorization policy, apply it to one of our discovered APIs, and check if external tokens are exchanged correctly.
-
Select Authorization » Policies » + CREATE POLICY.
-
Set the policy type to API request, language to REGO, and a name of your choice.
-
Use the following REGO policy code and save the policy:
package acp.authz

default allow = false

allow {
  input.authn_ctx.aid == "{your-workspace-id}"
}
Remember to change the
your-workspace-idvariable to the value of your workspace identifier (the one with Kong Authorizer). -
Select Authorization » API Authorization and apply the newly created policy to one of the discovered Kong Gateway APIs.
-
Call the protected APIs to check if the authorizer blocks the request without any token provided.
curl http://localhost:8000/anything/anywhere -vYou should receive the
HTTP/1.1 403 Forbiddenresponse.Check Kong Authorizer logs by adjusting and executing the below command
kubectl logs --since=1h <kong-authorizer-pod-name> -n <kong-authorizer-namespace>You should see that the access request was denied because of the missing authorization header:
time="2023-11-09T13:18:22Z" level=info msg="request validated" failures="[validator:\"cross-context\" message:\"missing authorization header\" details:\"failed to get data from authnCtx provider: missing authorization header\"]" group=example-service method=GET output ││ ="map[]" path=/anything/anywhere rule="Rule[method=GET, path=/anything.*, policyName=demo-check-workspace-id, injections=[]]" status=NOT_AUTHORIZED token_exchange="{true false }" -
Navigate to the workspace you created to mock an external token service.
-
Select Overview and launch Demo Portal in the Client Applications tab.

-
Login to the application using the mock user you’ve added as part of the Configure Mock External Token Service in Cloudentity section (step #1).
-
Consent to data sharing.
-
Go to the Access Token tab, copy the raw token, and export it in your terminal:
export AT={your-raw-token}
- Call the protected API once again including the access token as the value of the
Authorization: Bearer ${access-token}header.
curl http://localhost:8000/anything/anywhere -v \
  -H "Authorization: Bearer $AT"
You should get the HTTP/1.1 200 OK response with output similar to the following:
 HTTP/1.1 200 OK
< Content-Type: application/json
< Content-Length: 2720
< Connection: keep-alive
< Server: gunicorn/19.9.0
< Date: Thu, 09 Nov 2023 13:45:18 GMT
< Access-Control-Allow-Origin: *
< Access-Control-Allow-Credentials: true
< X-Kong-Upstream-Latency: 2
< X-Kong-Proxy-Latency: 527
< Via: kong/3.4.1.1-enterprise-edition
<
{
  "args": {},
  "data": "",
  "files": {},
  "form": {},
  "headers": {
    "Accept": "*/*",
    "Authorization": "Bearer eyJhbGciOiJFUzI1NiIsImtpZCI6IjI0ODkwMDYxNzU2NDcyNjQ2Mzk5NjY1NDgzMzM0ODk1NjQ4ODA0MSIsInR5cCI6IkpXVCJ9.eyJhY3IiOiIwIiwiYWlkIjoiZGVtbyIsImFtciI6WyJwd2QiXSwiYXVkIjpbImI0OWY5NTFlOWU5NDQ2YWI4MGM2YzVlOTBiNTEyYzRkIiwic3BpZmZlOi8vYWNtZS1vcmcuZXUuYXV0aHouY2xvdWRlbnRpdHkuaW8vYWNtZS1vcmcvZGVtby9kZW1vLXByb2ZpbGUiXSwiZXhwIjoxNjk5NTQxMTE3LCJpYXQiOjE2OTk1Mzc1MTcsImlkcCI6IjE5NzA4MjlkNmQxNDQ1YTA5Yzg4MjZkZjM2NTM3ZTY1IiwiaXNzIjoiaHR0cHM6Ly9hY21lLW9yZy5ldS5hdXRoei5jbG91ZGVudGl0eS5pby9hY21lLW9yZy9kZW1vIiwianRpIjoiZjFmZTU2MGYtZDJiNS00NGQ0LWE4ZjktZTJiZTJmNWExZjU5IiwibmJmIjoxNjk5NTM3NTE3LCJzY3AiOlsiZW1haWwiLCJwcm9maWxlIl0sInN0IjoicHVibGljIiwic3ViIjoiM2Q0ODNmYmE1MzgxZWM2NDIwOTAwMjYzMTU3OWJiZjRhNjA3MDgxYzk3YTE4ZmM2YzJmZjdlNDVkYTkyMzRlYiIsInRpZCI6ImFjbWUtb3JnIn0.Ax6gI9b6j5_SSWV_FzQ5B4snqjb6OCy2BwRTYVbLEYZkRzpmWPTf5DOYaosbCwRyQd1Yt0KG5W9oXV4LnuAkyg",
    "Connection": "keep-alive",
    "Ext-Token-Service": "Bearer eyJhbGciOiJFUzI1NiIsImtpZCI6IjE5NjcyODQwNDE1NzI3MjgwMjcxNjY3NTA1MjQ3NjIyOTgyOTg1MyIsInR5cCI6IkpXVCJ9.eyJhY3IiOiIxIiwiYWlkIjoiZXh0ZXJuYWwtdG9rZW4tc2VydmljZSIsImFtciI6WyJwd2QiXSwiYXVkIjpbImV4dGVybmFsLXRva2VuLXNlcnZpY2UtZGVtbyIsInNwaWZmZTovL2FjbWUtb3JnLmV1LmF1dGh6LmNsb3VkZW50aXR5LmlvL2FjbWUtb3JnL2V4dGVybmFsLXRva2VuLXNlcnZpY2UvZXh0ZXJuYWwtdG9rZW4tc2VydmljZS1wcm9maWxlIiwic3BpZmZlOi8vYWNtZS1vcmcuZXUuYXV0aHouY2xvdWRlbnRpdHkuaW8vYWNtZS1vcmcvZXh0ZXJuYWwtdG9rZW4tc2VydmljZS9leHRlcm5hbC10b2tlbi1zZXJ2aWNlLW9hdXRoMiIsInNwaWZmZTovL2FjbWUtb3JnLmV1LmF1dGh6LmNsb3VkZW50aXR5LmlvL2FjbWUtb3JnL2V4dGVybmFsLXRva2VuLXNlcnZpY2UvZXh0ZXJuYWwtdG9rZW4tc2VydmljZS11c2VyLXByaXZhY3ktY29uc2VudCJdLCJleHAiOjE2OTk1NDAyNzksImlhdCI6MTY5OTUzNjY3OSwiaWRwIjoiYWM1MjYwMTVkYjYwNDYwN2I0MzA2Nzk1YzdmYzViYjYiLCJpc3MiOiJodHRwczovL2FjbWUtb3JnLmV1LmF1dGh6LmNsb3VkZW50aXR5LmlvL2FjbWUtb3JnL2V4dGVybmFsLXRva2VuLXNlcnZpY2UiLCJqdGkiOiIxNGJiZjcyYy03NzUyLTQ4YWItYjk3Mi0zNzE5YjlkODYzMzIiLCJuYmYiOjE2OTk1MzY2NzksInNjcCI6WyJlbWFpbCIsImludHJvc3BlY3RfdG9rZW5zIiwibGlzdF9jbGllbnRzX3dpdGhfYWNjZXNzIiwibWFuYWdlX2NvbnNlbnRzIiwib2ZmbGluZV9hY2Nlc3MiLCJvcGVuaWQiLCJwcm9maWxlIiwicmV2b2tlX2NsaWVudF9hY2Nlc3MiLCJyZXZva2VfdG9rZW5zIiwidmlld19jb25zZW50cyJdLCJzdCI6InB1YmxpYyIsInN1YiI6IjVjMTg5NjVmNjVmOWI2YTFlNDFlZDI0YWUwOGZlZDk2OTU2MTE2MTVhMzBmNTZhZDlkYjRjNmUxZDg2NDA2NjgiLCJ0aWQiOiJhY21lLW9yZyJ9.DcAVK__Uw_DluVBEX59Y_GQvfox13HqkJQZZ1qvXY4g-ENyA8JptwzZLUAuH49Ad7683SYcKSb8z2E8E7s7ong",
    "Host": "httpbin.default.svc",
    "User-Agent": "curl/7.77.0",
    "X-Forwarded-Host": "localhost",
    "X-Forwarded-Path": "/anything/anywhere"
  },
  "json": null,
  "method": "GET",
  "origin": "127.0.0.1",
  "url": "http://localhost/anything/anywhere"
}
* Connection #0 to host localhost left intact
As you can see both tokens – the original from the external token service (Ext-Token-Service) and
the exchanged token from Cloudentity – are included in the response.
Check Kong Authorizer logs by adjusting and executing the below command
kubectl logs --since=1h <kong-authorizer-pod-name> -n <kong-authorizer-namespace>
You should see the log message similar to the below:
time="2023-11-09T13:45:17Z" level=info msg="request validated" failures="[]" group=example-service method=GET output="map[]" path=/anything/anywhere rule="Rule[method=GET, path=/anything.*, policyName=demo-check-workspace-id, injections=[]]" status=AUTHORIZED token_exchange="{true true }"
You can see that the tokens were indeed exchanged in the authorizer and the Check Workspace ID was passed even though the original token was minted by a different workspace (the exchanged token was used with a correct workspace ID).
Caching Exchanged Tokens
Cloudentity Kong Authorizer caches exchanged access tokens for a defined time period.
To adjust the amount of tokens cached and how long they stay cached, configure
the cache.ttl and cache.max_size settings for your authorizer:
token_exchange:
    enabled: true # enable token exchange
    # cache
    cache:
        ttl: 1m0s # ttl
        max_size: 1000 # max size
When the cache’s max size is reached, the least recently used token is revoked.
When ready, pass the configuration as part of the extraConfig section for your authorizer
deployment values.yaml file and redeploy the authorizer. See example:
extraConfig:
  token_exchange:
    cache:
        ttl: 1m0s # ttl
        max_size: 1000 # max size