About Enriching Token Claims
With Extensions, Cloudentity enables developers to enrich claims for ID and access tokens issued by the platform. Developers can prepare JavaScript Extensions to modify the token claims before it is minted. Token claims can be enriched, for example, to:
-
Include data (such as user permissions) from an external system
-
Overwrite static attributes
-
Populate the token with risk information from external services
-
Populate token with fine-grained permissions for the user that resides in an external service
-
Populate token with business-related information about the user from external services.
Learn more
You can learn more about Cloudentity Extensions and enriching token claims by reading the Extending Cloudentity Capabilities.
Available Inputs
When creating Extension scripts that enrich claims for security tokens minted by the Cloudentity platform, developers have access to the following input objects within the script execution context:
-
client- to have access to client application dataClient schema:
-
grant_type- to get the information about the authorization grant type that was requested by the client applicationExample values:
client_credentials,token-exchange,urn:openid:params:grant-type:cibaFor more information on available grant types, see Cloudentity Grant Types articles
-
granted_scopes- to have data about the scopes that are already granted to the client applicationSample input:
-
authorize_request- to have session data about the authorization request that concluded the call to the token endpoint. The developers have access to the original URL of the call to the authorize endpoint, and to the query parameters of this call.Sample input:
-
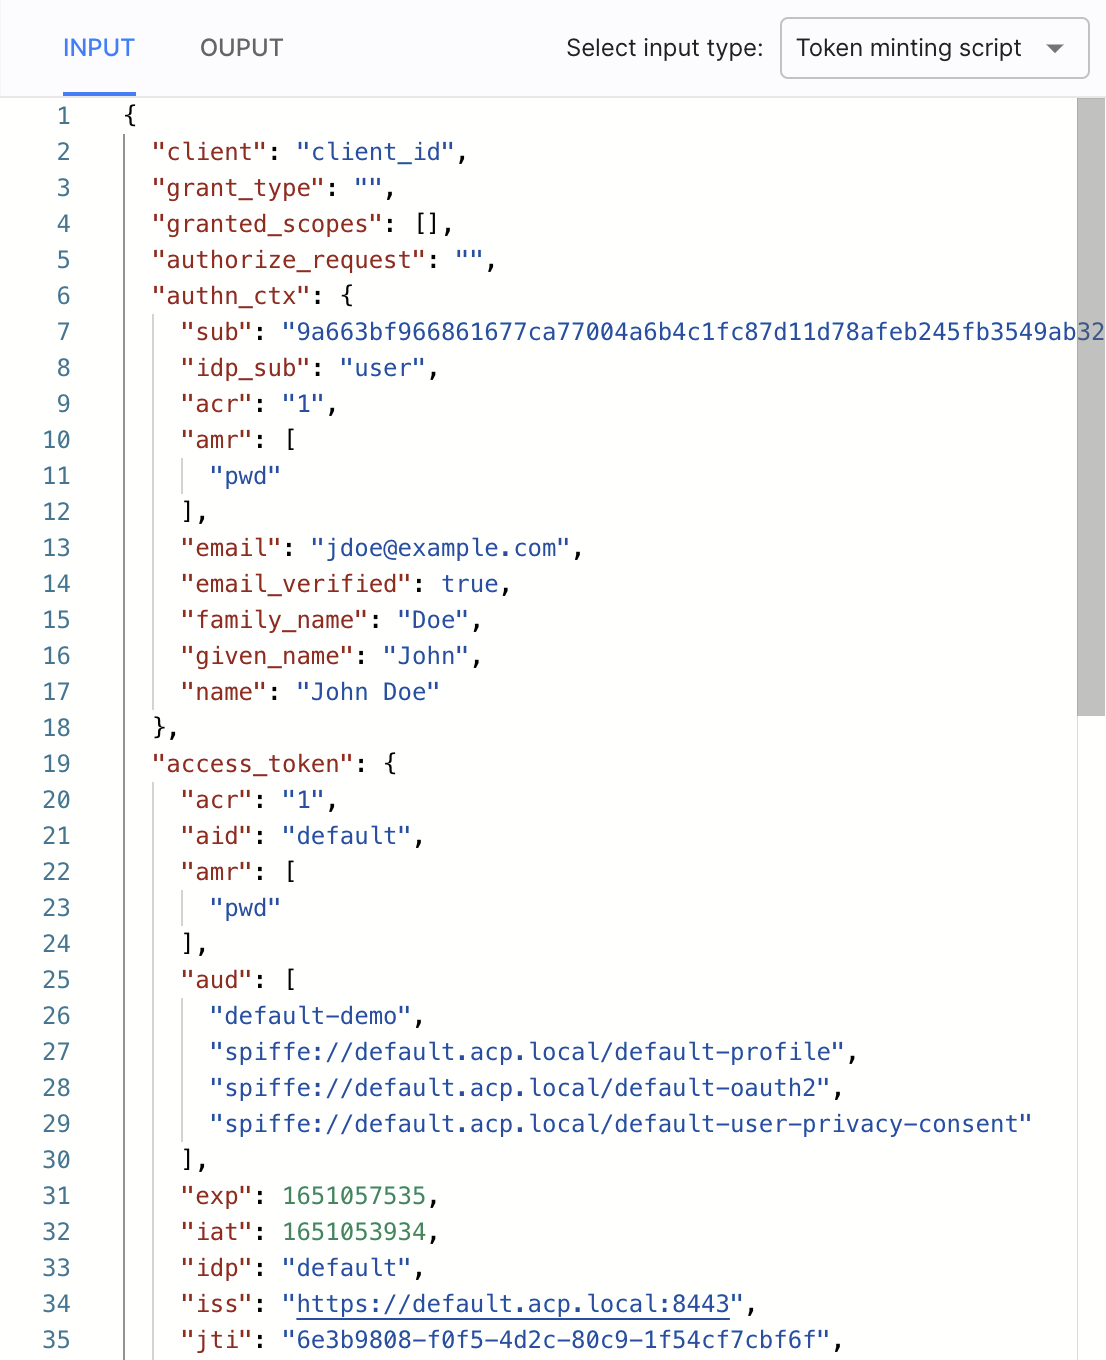
authn_ctx- to have information about the authentication contextSample input:
You can also find an example usage of the
access_tokeninput object in the Sample Script section. -
id_token- to be able to enrich claims within the minted identity tokenSample input:
You can also find an example usage of the
access_tokeninput object in the Sample Script section.
Tip
You can see the available inputs examples in the Extensions editor:
Available Output
Extensions modifying claims within different security tokens can produce the following output:
-
access_token- to show the result of enriching claims within an access token -
id_token- to show the result of enriching claims within an ID token
Example output
{
"id_token": {
   "role": "manager"
  }
}
{
"access_token": {
   "permissions": [
      "delete_user",
      "block_user",
      "accept_payrise_request"
   ]
  }
}
Tip
Extensions scripts do not override the entire content of an access token/ID token. The scripts update only those parts of a token that are explicitly defined in the Extension.
With Extensions that enrich token claims, you do not need to add any new attributes to your authentication context as the Extension is able to inject them dynamically.
Enrich Token Claims
-
When creating the Extension, use available inputs, outputs, and dependencies.
Creating Extensions
For instructions on how to create Cloudentity Extensions, test using test mode, and to learn what are recommended best practices when working with Extensions, see the Creating and Testing Extensions How-to article.
To check how Extensions enriching claims work and look, see the Sample Script section.
-
Assign the Extension:
-
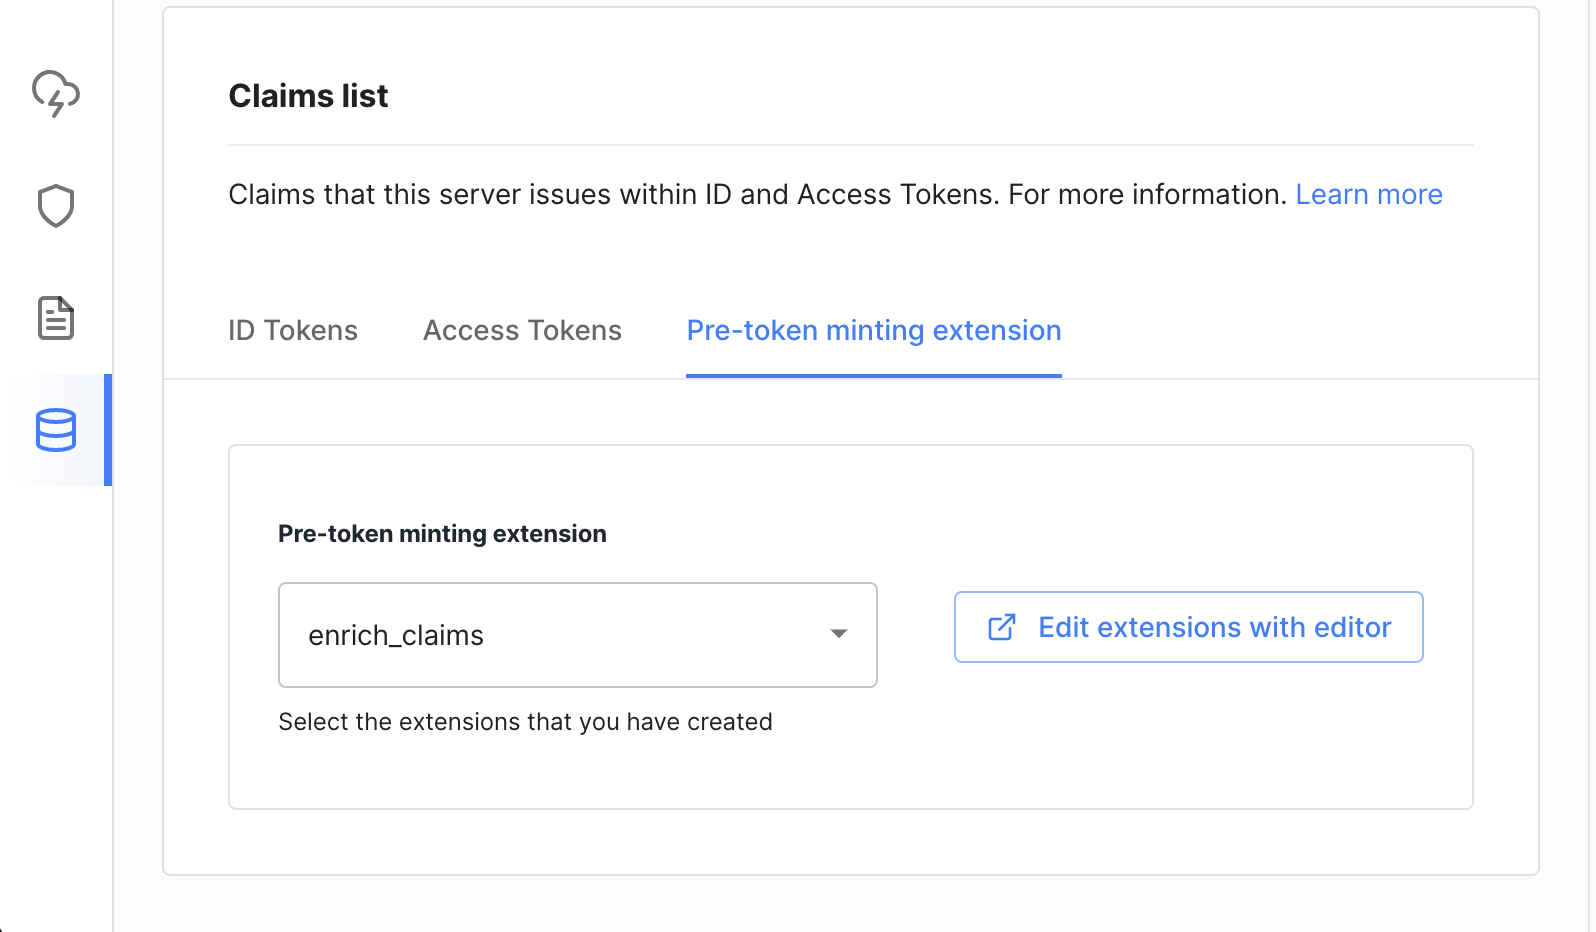
At the authorization server level in OAuth » Tokens & Claims » Claims » Claims list » Pre-token minting extension.
When the extension is attached at the authorization server level all client applications registered within the workspace are affected – the token claims are enriched for all of them using the assigned extension.
-
At the client application level in Applications » Clients » OAuth » Custom claims and token enrichment » Pre-token minting extension.
Extensions attached at the client level affect only the client they are assigned to and are executed after Extensions at the server level (if there are any).

-
-
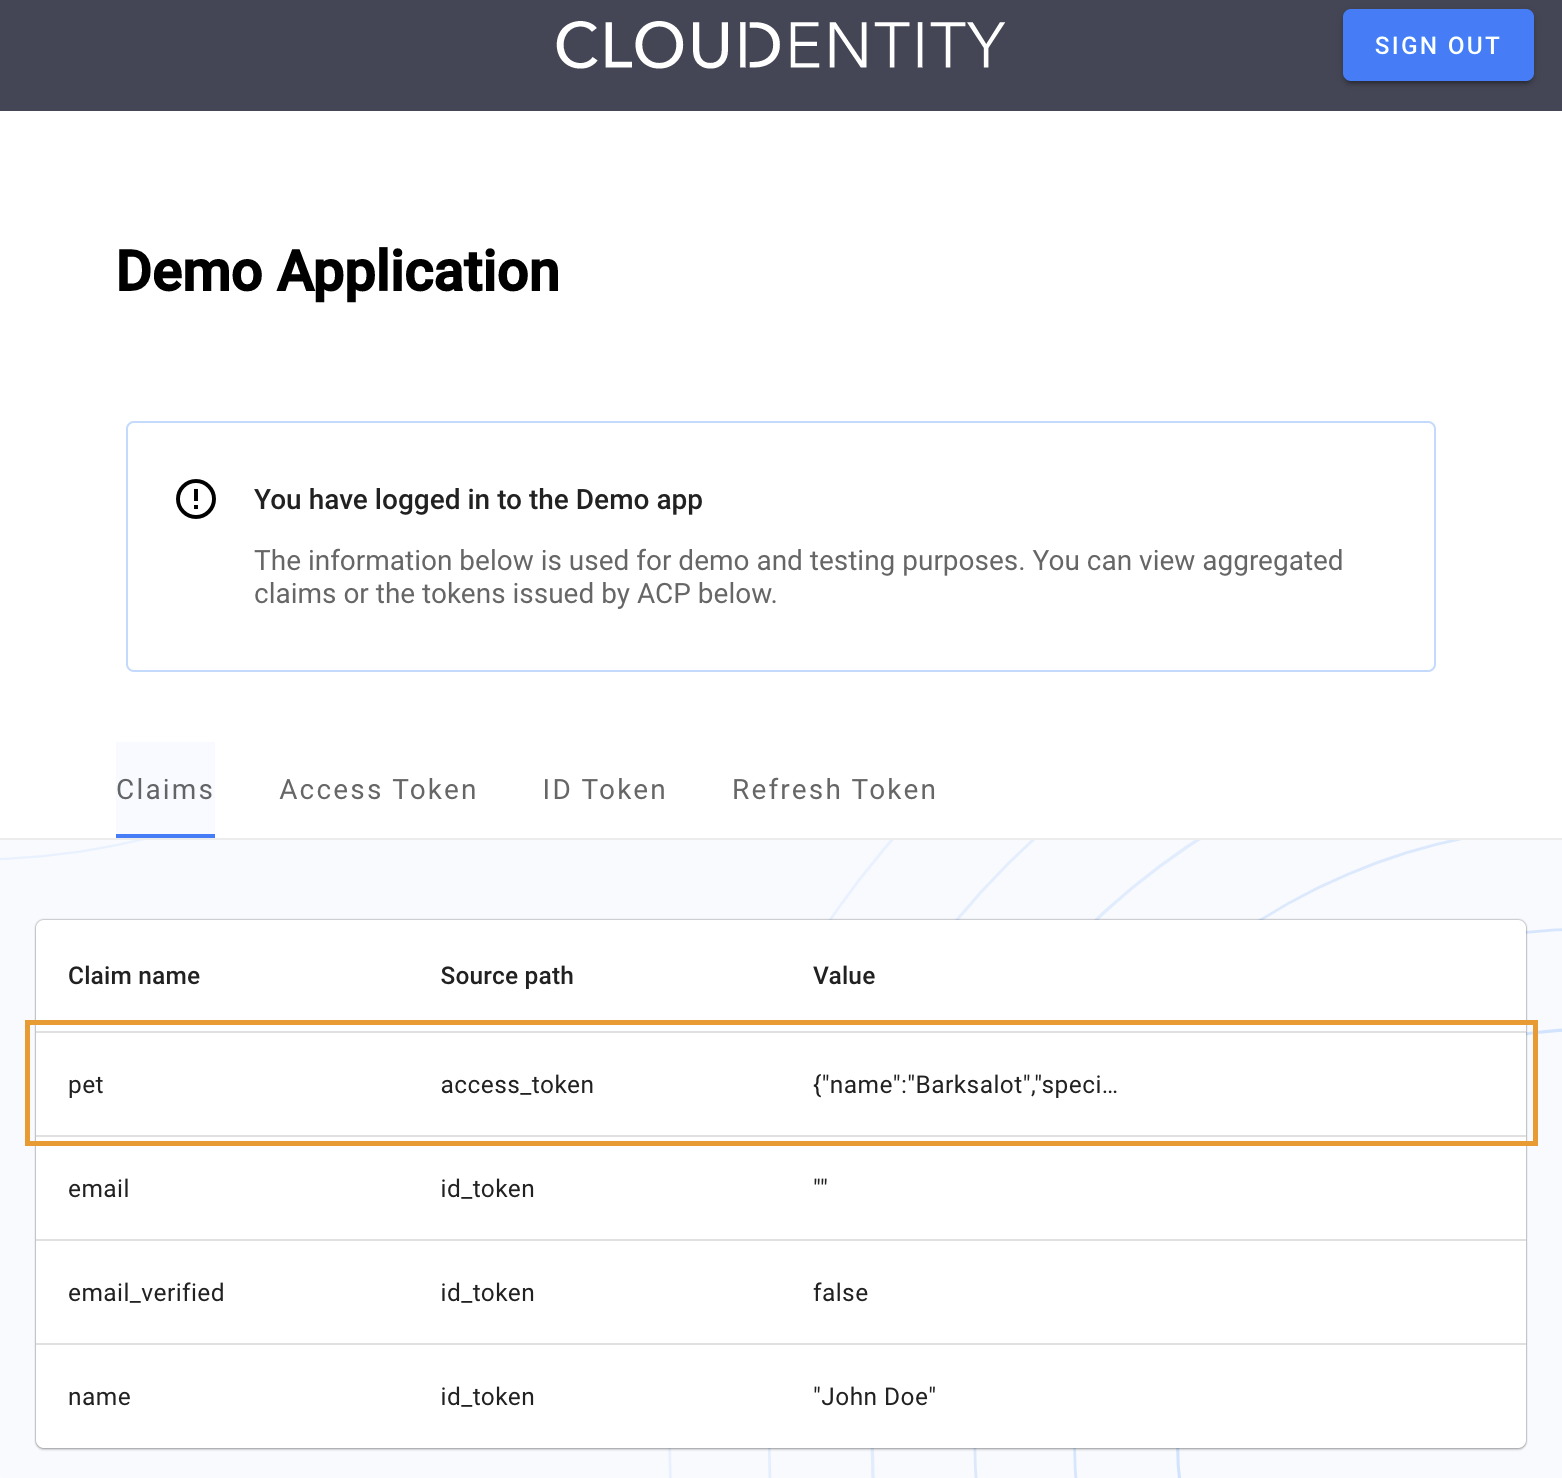
Verify enriched claims using Sandbox IDP and Demo Application/API
Sample Script
module.exports = async function(context) {
      const request = require('request-promise-native');

      try {
        const response = await request({
          method: 'GET',
          json: true,
          uri: 'https://raw.githubusercontent.com/LearnWebCode/json-example/master/pet-of-the-day.json'
        });

        const pet_name = response.name;
        const pet_species = response.species;

        return {
          id_token: {
            pet: {
              name: pet_name,
              species: pet_species
            }
          }
        };
      }catch(e) {
        console.error(e);
        return {  pet: null };
      }
}
In the Extension above, a request is made to fetch the pet of the day and enrich an ID token with the
pet claim. If you wish, you can replace the id_token input parameter to access_token to enrich
an access token. You can also enrich both tokens at the same time as shown below:
return {
   id_token: {
   pet: {
      name: pet_name,
      species: pet_species
   }
   }
   access_token: {
   pet: {
      name: pet_name,
      species: pet_species
   }
   }
};
Verify Enriched Claims Using Sandbox IDP and Demo Application/API
If you wish to confirm enriched claims for your security tokens, you can use Cloudentity Sandbox IDP and Demo Application if it is enabled for the workspace you are working on. If it is not, you can use Cloudentity APIs and a token decoder like jwt.io.
-
Set up Sandbox IDP if is not available within the workspace you are working within.
-
If the workspace has the Demo Application available, authenticate as the user you have set up within the Sandbox IDP.
Accessing Demo Application
You can access the Demo Application in three ways:
-
In the WORKSPACE MANAGER by clicking the dropdown for the workspace and selecting Demo application.
-
Within the workspace overview (Dashboards > Overview) Connected portals right-hand panel.
-
By visiting the
https://{tid}.authz.cloudentity.io/{tid}/{wid}/demoURL with your tenant identifier set for the{tid}variable and the workspace identifier set for the{wid}variable.
-
-
Depending on whether you enriched claims for an access token or id token (or both), investigate the claims for the token.
Your enriched claims should be visible as the part of the Claims tab as shown below:
-
If your workspace does not have a Demo Application available, you can get your token using any other client application and calling the Cloudentity OAuth 2.0 Token endpoint. Once you have the token, decode it using the jwt.io service to view the claims.
Response Type
Remember that if you wish to get a particular token (for example, only an ID token), you need to configure the Response Types setting in your client application OAuth configuration (Applications » Clients » OAuth).