

Role-Based Access Control - What It Is
Role-Based Access Control (RBAC), also known as role-based security, is a mechanism used for restricting system access. It relies on setting permissions and privileges and containing them as a set within a user role. Such a role defines the scope of resources the user may access.
An organization needs to assign a role-based access control role to every employee, partner, or customer they have since the role determines which permissions the system grants to the users. For example, a typical pattern would involve roles like an administrator, a manager, and a user, all with different permissions. An administrator user in such a scenario would have the widest set of permissions. They could, for example, administer the organization’s B2B2C platform, create, edit, delete users, and more. The role of a manager could have similar permissions but could not have access to the platform configuration. The user role, in this scenario, would have the least permissions.

Cloudentity Identity Pools and Identity Schemas
Cloudentity Identity Pools allow for the persistent storage of user data within Cloudentity’s platform, thus providing an extra option in addition to the Bring Your Own Identity (BYOID) approach. Having added an Identity Pool to your tenant, you can connect it as an Identity Provider to specific workspaces so that the end-users can, for example, register in the Identity Pool first, log in to Cloudentity, or access software that has the Identity Pools set as the identity source.
Identity Pools utilize a very powerful and flexible concept of configurable Identity Schema that enables the validation of user data being processed within Identity Pools. All Identity Pools have a schema assigned for user payload and user metadata.
Identity Schema is represented with a JSON schema which
determines how the payload and
metadata objects, conveying user data, must be structured in the Identity
APIs. We have two types of Identity Schemas:
-
Payload schema - used to define and validate the
payloadstructure of user-related requests (for example, the presence of user’s first name and last name) -
Metadata schema - used to define and validate the
metadatastructure of user-related requests. Metadata is read-only for the user themselves but can be modified by admin users. Parameters marked ashidden: truein the schema are hidden from users calling the Self Get User Profile endpoint.
Cloudentity can utilize even complex schemas based on the requirements. You could, for example, add a sample metadata schema to Identity Pools configuration that would look like the following:
Let’s analyze the above schema. You can see that the user metadata consists of three different
metadata properties: given_name that stores the user’s given name (required for all users),
permissions, and role that defines the role of the user.
Yes, you are correct. You can define user roles in Cloudentity Identity Pools.
Connect the Dots
If you read the preceding sections carefully, maybe you have already connected the dots. When using Identity Pools as an identity source for your users, you can define and store role-related information about the users. Besides providing you with Identity Pools, Cloudentity is a powerful authorization platform that allows you to protect your applications, services, and APIs.
Cloudentity authorization platform makes it easy to define authorization policies for Role-Based Access Control. You can do it either using Cloudentity policies and their visual editor or define authorization policies using REGO language.
We already know the theory, let’s get to practice! As part of this blog series, you will:
-
Create and configure Cloudentity Identity Pools.
As part of our configuration steps, you will configure Identity Pools so that after the user authenticates, you will include the roles of the user (from the user’s metadata) in the access token minted by the Cloudentity platform and issued for your client application. We will do it by defining a mapping between the metadata roles field, and roles attribute in authentication context configured for the Cloudentity workspace.
-
Configure workspace authentication context.
To be able to include information about the user in an access token, you will add a new attribute to the authentication context of your workspace and map the user role (from the user metadata) to the newly created attribute.
-
Build an authorization policy in Cloudentity platform to check if particular role is assigned to the user.
This step is covered in the second part of the blog series
-
Confirm that your Role-Based Access Control policy works!
We will use demo API and check if the request to the service is served. Then, we will revoke the role using the Cloudentity Admin Portal and check if the request is now denied with the
HTTP 403 Access Unauthorizedstatus.This step is covered in the second part of the blog series.
At the end of this article, in the Video section, you can find a video that goes through all the steps that we are performing through this article.
Create and Configure Identity Pools
To define and store your users with Cloudentity, you need first to connect an Identity Pool IDP to your Cloudentity workspace and configure Identity Pools for your tenant. If you already have a tenant with Identity Pools connected and users added, and it is possible to use it for testing, you should totally reuse it!
Prerequisites
-
Admin access to a Cloudentity tenant.

If you have not already done so, sign up for a free Cloudentity SaaS account.
You can then activate the tenant and take the self-guided tour to familiarize yourself with the platform or proceed further with the blog post. -
Workspace created with Demo Application enabled.
If you need to learn what Cloudentity workspaces are, check out our glossary.
During the workspace creation, you can just go through the first two steps: Defining the workspace type and Adding workspace details. Then, just select X button in the upper right corner to drop from the workspace creation wizard. We will handle the rest of the steps in the Connect Identity Pool to Workspace section.
For testing purposes, we recommend creating a separate workspace. We will be configuring access token claims, defining a custom authentication context attributes, and then mapping them to access token claims. Having a separate workspace for testing before you go through all the steps on your go-to environment is always a good idea. If you already have such a workspace for testing purposes, feel free to reuse it!
Tip
If you already have a tenant with Identity Pools defined for testing purposes, you can reuse it and connect your pool to the Identity Pool IDP during the workspace creation as shown below.
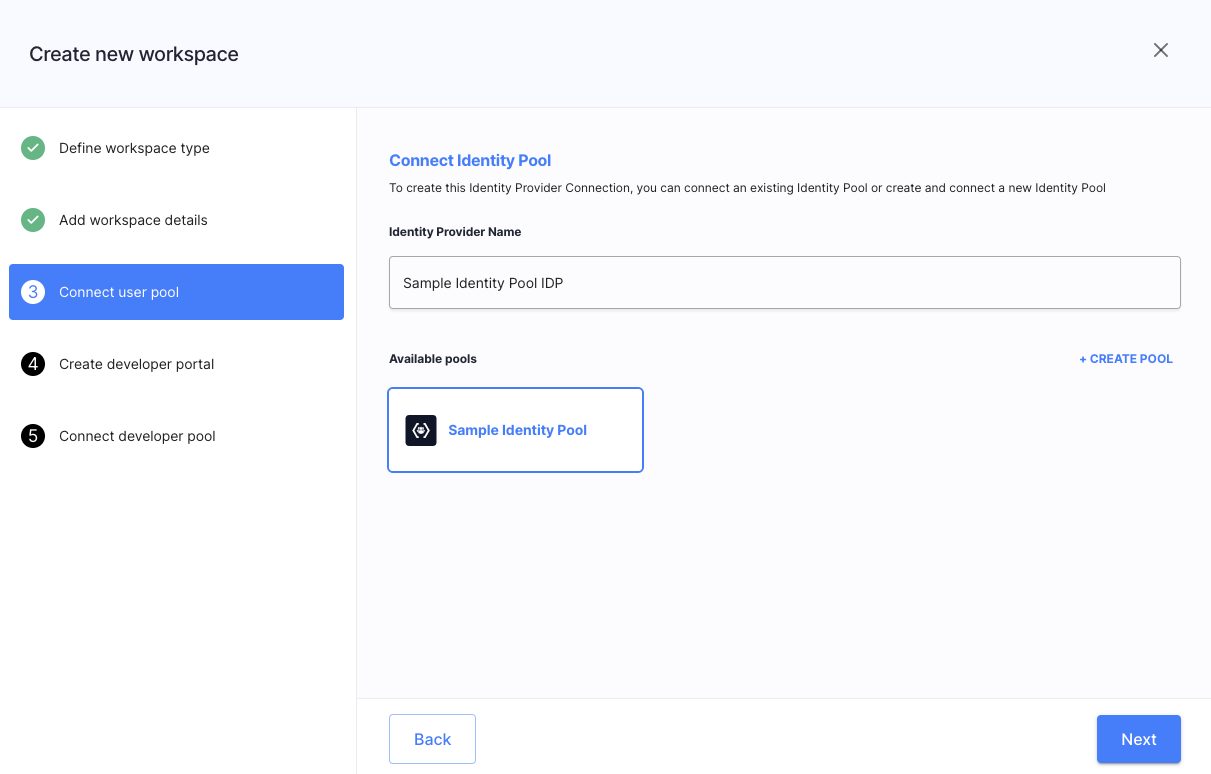
Connect Identity Pool to Workspace
-
In your tenant configuration, create an Identity Pool.
Do not worry about its configuration and schema as we will configure them later on.
Tip
For the future, keep in mind that as IDP is specific for a workspace, Identity Pools are defined at the tenant level, so the removal of neither the IDP nor the workspace removes the Identity Pool.
-
Once you have your Identity Pool created, you can connect an Identity Pool IDP to your workspace.
Configure Identity Pools on Tenant Level
Once you have created your pools and connected an IDP to the workspace, it’s time to configure the Identity Pool so that we can store user roles inside the user entry.
In Identity Pools, there are two types of fields available for you to store user data: the payload and the metadata. The payload field is adjustable for users. Therefore, you should use the it to store information that the user can view and modify such as their name, age, address, and more.
The metadata field, which is of our biggest concern in this blog series is read-only for users.
If you wish, you can also make it impossible for the user to view a specified parameter by adding
the hidden flag set to true in the parameter configuration. In the metadata field you would
store the information that the user cannot modify themselves since the access control would
make no sense in a situation where the user could modify their role. Ready? Let’s add the
role parameter to users metadata schema.
As described in the Configure Identity Schemas section of the Configuring Identity Pools article, add the following JSON schema to a new metadata schema:
{
  "properties": {
    "groups": {
      "description": "User Groups",
      "type": "array",
      "items": {
        "type": "string"
      }
    },
    "roles": {
      "description": "User Roles",
      "type": "array",
      "items": {
        "type": "string"
      }
    }
  },
  "description": "Metadata with User Groups and Roles",
  "type": "object"
}
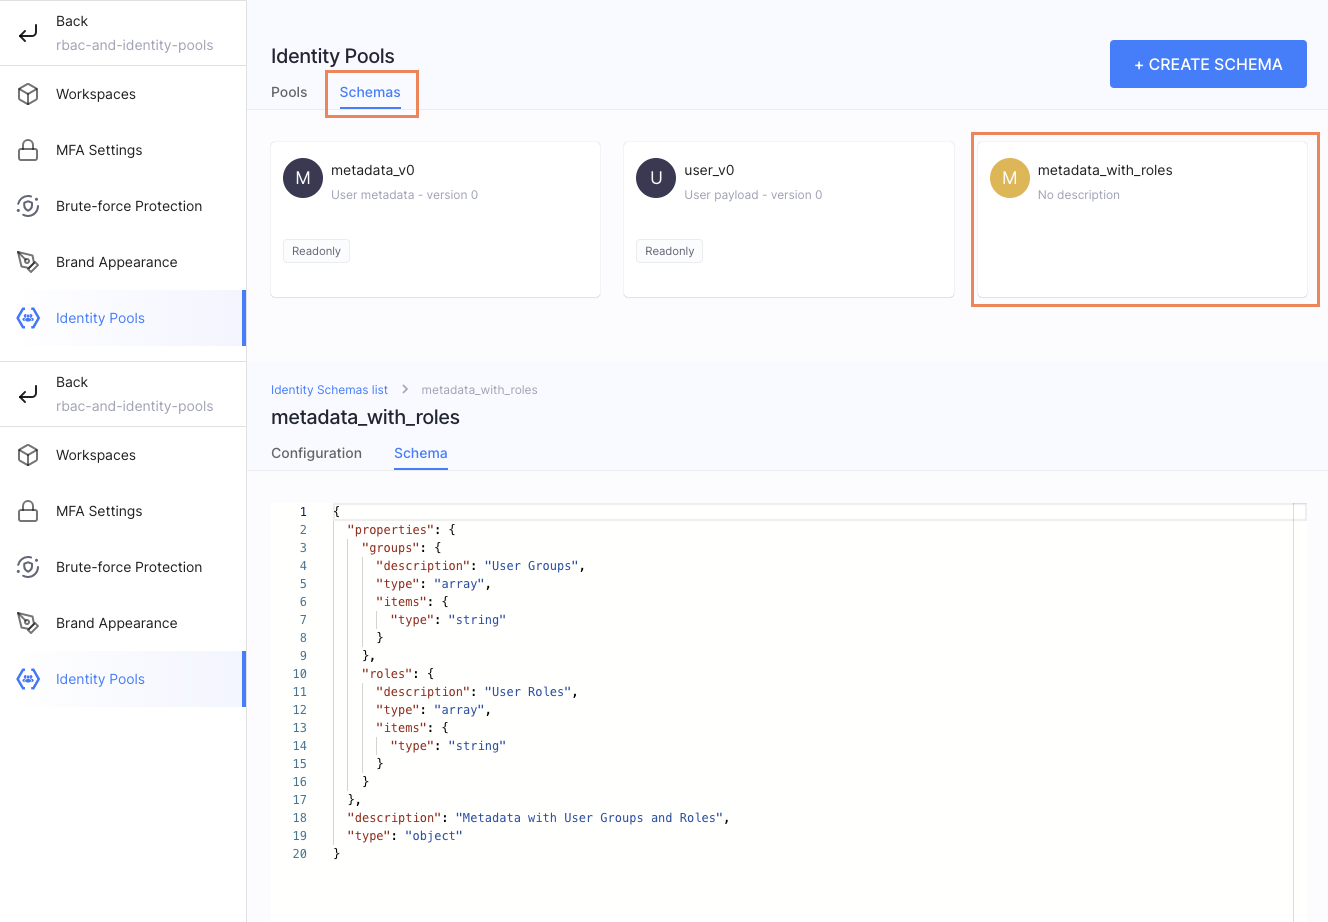
As you can see, as part of our metadata schema we are adding two additional user attributes:
-
groupswhich is an array of user groups stored as strings. -
roleswhich is an array of user roles stored as strings.
Depending on your need, you can choose which parameter you want to use later on.
Remember
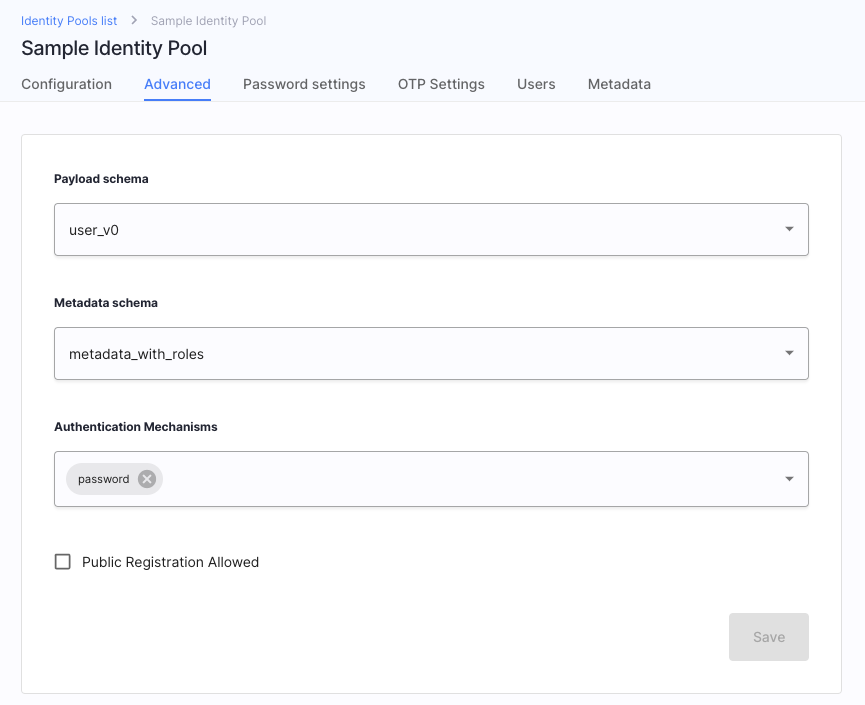
Do not forget about setting the Metadata schema to the schema you had created above. You can do it in the Advanced tab of the Identity Pool configuration.
Create User
Once we have our Identity Pools, Identity Schema, and IDP configured, we can proceed to add users to our pool. For the purpose of this article creating one user is enough, but feel free to create more, or reuse existing users.
-
Select your pool and its Users tab in your tenant configuration for Identity Pools.
-
Select ADD USER.
-
Provide details for your users.
Please, note that the
rolesare not marked as required in the metadata schema. This is why you do not need to provide them yet.Tip
You can select the Set credentials options while adding the user for the purpose of this article. This way, you will be able to provide the password and skip the account activation step.
-
Select your user and their Metadata tab.
You can see that the Metadata schema contains the parameters you’ve set in the previous section.
-
Add an
adminrole to your user.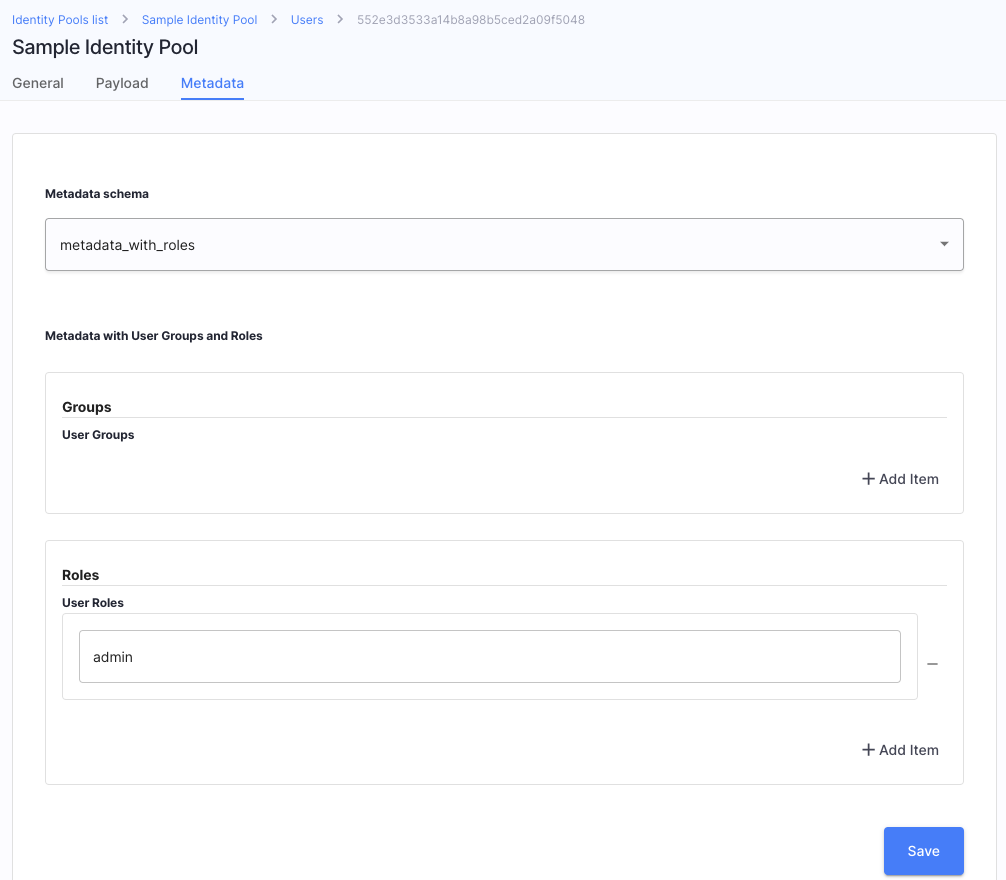
Good job! We’re almost done with configuring our Identity Pools and IDPs!
Configure Authentication Context and Add Claim to Tokens
In our RBAC scenario, access to resources will be determined by the presence and value of the user role. Because of that, we need to:
-
Configure the authentication context.
In access control, the authentication context allows you to control access to data on more granular level. Cloudentity authentication context allows you to standardize user data incoming from IDPs acting on behalf of the users. Since different IDPs pass authentication data differently this data needs to be mapped into a Cloudentity-standardized schema that can be used in various scenarios. If you need to learn more about the authN context, get familiar with the Setting Up Authentication Context article.
We will be adding the
rolesauthentication context attribute. -
Add claim to access tokens.
When a client application receives an access token, it contains various information about the authenticated client, and more. In other words, token claims represent pieces of information asserted about the token subject.
Once the application tries to access resources protected by Cloudentity and its authorizers, the authorization engine evaluates the token and checks if all requirements of the token (and the request, of course) defined within the authorization policy are met.
Since we want to use RBAC, we need to include information about the user role in our token so that it is possible to evaluate it and decide whether to grant or deny the access request.
Let’s put the knowledge into practice:
-
Add the following roles attribute to the authentication context schema.
-
With a name set to
rolesor a name of your choice -
With the data type set to List of strings
-
With the description set to User roles
-
-
Add a roles claim to access token.
-
Set the Claim name to
rolesor other name (that you will need to remember later on when creating access policies). -
Set the Source type to AuthN Context.
-
Set the Source path to User roles.
Tip
The value of the source path field may differ if you provided a different description when adding the
rolesattribute to the authN context. -
Map User Roles from User Metadata to AuthN Context Attribute
In this section, you will create an attribute in your IDP configuration for the user roles and map this Identity Pool IDP attribute to an attribute within the workspace authentication context.
-
Navigate to Authentication » Providers » Your Identity Pool IDP » Attributes.
-
-
Set Source of your attribute to Custom
-
Set variable name to
user.metadata.roles -
Set display name to a name of your choice, for example,
Roles -
Set Data Type to List of strings
-
-
Select the Mappings tab, and add the following mapping:
-
Set the Source name to the display name you provided in the second step above.
-
Set the Target name to User roles (or a different name that you had provided in the second step of the Configure Authentication Context and Add Claim to Tokens section).
-
Verify Contents of Minted Access Tokens
To verify the contents of minted access tokens we will use the Cloudentity Demo
Application (Portal). The application allos you to view different claims added
to tokens, and view payloads of tokens and their raw representation. At this point, we want to
investigate the token payload’s contents to check if the roles claim is present with the
value set to admin.
-
Within your workspace, navigate to Dashboards and select Demo Portal (in the Client Applications menu in the upper right corner).
-
Authenticate with the Demo Application using the user you created in the Create User section.
-
Provide data-sharing consent.
In the Claims tab, you should see the roles claim with Source path set to access_token
and with the value of admin (or different if you provided a different role for the user).
Additionally, you can investigate the payload of your access token in the Access Token tab of
the Demo Application or you can use a raw access token if you want to jump straight away to calling
deployed APIs.
Summary
In this blog post, you prepared your tenant so that we can implement Role-Based Access Control.
We used Cloudentity Identity Pools, Identity Schema, and Identity Pool IDP to define
and store users with roles set. We mapped the IDP’s roles attribute to the roles authN context
attribute to standardize the context coming from the IDP, and, then, we mapped the authN context
attribute to a claim within an access token. Right now, we have everything set up and we can proceed
to the second part of the blog series. We will set up an authorization policy that checks the
contents of the token for the presence of the roles claim, checks its value, and, depending on the
result, allows or denies access to resources.