Overview
In this tutorial, we will build an Android application using authorization code grant type with PKCE to obtain an access token and an ID token. We will then display the payload segment for the ID token upon successful authorization.
Creating an Android application that utilizes OAuth 2.0 for obtaining an access token requires a few extra steps to ensure that the authorization code that is presented to the authorization server has been issued to the requesting android application. OAuth 2.0 provides a framework for obtaining authorization to access a protected resource on behalf of the resource owner. When creating an Android application, it is important to note that these applications must be treated as untrusted/public client application that cannot securely store their own credentials for talking to other systems. OAuth PKCE flow was specially designed to overcome above vulnerability to eliminate client secret storage for public/untrusted client applications. Fortunately, we can employ Proof Key for Code Exchange (PKCE) to ensure that the application requesting an access token using an authorization code is the same application that was issued that authorization code. Additionally, we will follow best practices as described in OAUTH for Native Apps which describes best practices for building untrusted OAuth 2.0 clients, for example, by not using embedded webviews but instead using secure browsers provided by the Android SDK.
Reference repo

Check out the below github repo for complete source code of the reference application in this tutorial
Android application project
Prerequisites
Prepare Cloudentity Workspace
-
In Cloudentity platform, create a new client application of
Mobile/Desktopapplication type and set the grant type to authorization code. -
For the client application you created, set the token endpoint authentication method to None.

-
Set the redirect URI.
The redirect URI should include your custom URL scheme and the reverse DNS string for your domain and application name to ensure uniqueness.
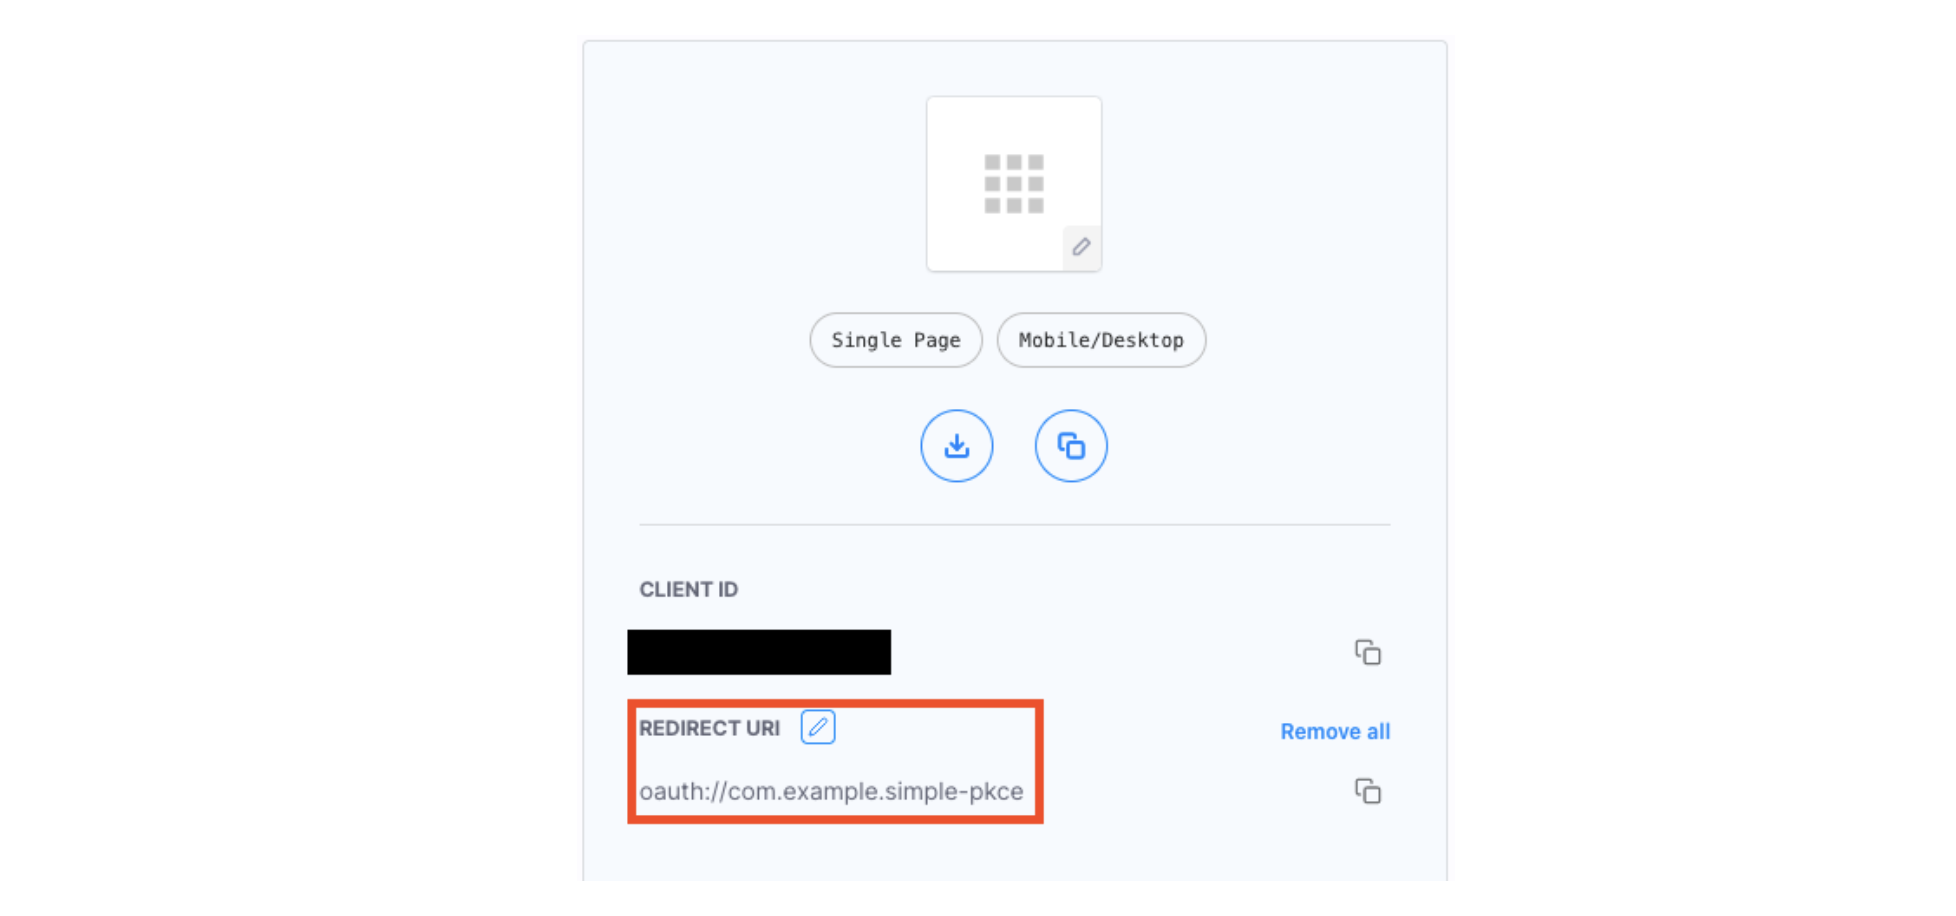
Tip: In the Android application, the redirect_uri will be set to ‘oauth://simple-pkce.example.com’ in Config.kt. Therefore, in your client application set the redirect URI to ‘oauth://simple-pkce.example.com’ as shown above. In a production-ready application, choose an appropriate scheme and a reverse DNS string for the redirect URI. More information on how Android can receive a redirect can be found here.
Building the Android Application
We will be using AndroidStudio for the IDE and this tutorial assumes that the IDE is AndroidStudio. The code for the application we are building is available here.
Open AndroidStudio and create a new project with an Empty Activity. The tutorial assumes the name of the app is sample-android-oauth-authorization-app but feel free to name the project whatever you like and ensure that the language is set to Kotlin and the Minimum SDK is set to API 26: Android 8.0 (Oreo) or higher.
LoginActivity
The default project will contain a single Activity named MainActivity. Rename this to LoginActivity.
Under res->layout locate the activity_main resource and rename it to activity_login. Open activity_login and add a Button with an ID of signInButton using either the Code editor or the Design editor. Set the text to Login.
Add a TextView and give the TextView the ID welcomeMessageTextView. Set the default text to Welcome!. The resulting activity_login.xml should look as follows:
<?xml version="1.0" encoding="utf-8"?>
<androidx.constraintlayout.widget.ConstraintLayout xmlns:android="http://schemas.android.com/apk/res/android"
    xmlns:app="http://schemas.android.com/apk/res-auto"
    xmlns:tools="http://schemas.android.com/tools"
    android:layout_width="match_parent"
    android:layout_height="match_parent"
    tools:context=".LoginActivity">

    <TextView
        android:id="@+id/welcomeMessageTextView"
        android:visibility="visible"
        android:layout_width="wrap_content"
        android:layout_height="wrap_content"
        android:text="Welcome!"
        app:layout_constraintBottom_toBottomOf="parent"
        app:layout_constraintLeft_toLeftOf="parent"
        app:layout_constraintRight_toRightOf="parent"
        app:layout_constraintTop_toTopOf="parent" />

    <Button
        android:id="@+id/signInButton"
        android:layout_width="wrap_content"
        android:layout_height="wrap_content"
        android:layout_marginTop="16dp"
        android:text="Login"
        app:layout_constraintEnd_toEndOf="parent"
        app:layout_constraintStart_toStartOf="parent"
        app:layout_constraintTop_toBottomOf="@+id/welcomeMessageTextView" />

</androidx.constraintlayout.widget.ConstraintLayout>
In LoginActivity we need to set a click listener on the button. When the user taps Login the click listener will make use of CustomTabs which will open a secure browser and direct the user to Cloudentity authorization server to request authorization for this mobile app to access the users protected resources. As with any OAuth 2.0 server we need to add parameters to the request to specify the scopes the app requires, the response type, a redirect URI and, since we are using PKCE, we must provide a code challenge. Replace the default onCreate method with the following code snippet:
Note: AndroidStudio will indicate some errors that we will fix shortly.
override fun onCreate(savedInstanceState: Bundle?) {
        super.onCreate(savedInstanceState)
        setContentView(R.layout.activity_login)

        findViewById<Button>(R.id.signInButton).setOnClickListener {
            fun String.utf8(): String = URLEncoder.encode(this, "UTF-8")

            val authParams = mapOf("client_id" to CLIENT_ID,
                "redirect_uri" to REDIRECT_URI,
                "response_type" to "code",
                "scope" to "email openid profile",
                "code_challenge" to PKCEUtil.getCodeChallenge(), // Set the code challenge
                "code_challenge_method" to "S256"
            ).map {(k,v) -> "${(k.utf8())}=${v.utf8()}"}.joinToString("&")

            // Initiate the OAuth 2.0 flow using CustomTabs<url>.
            CustomTabsIntent.Builder().build().launchUrl(this, Uri.parse("${Config.AUTHORIZE_ENDPOINT}?$authParams"))
        }
}
Now lets address the errors we are seeing. First, we need to add some configuration constants which are used in the above code snippet for calling the /authorize endpoint. While we are at it lets add the configuration constants which will be used in the remainder of the tutorial. Create a kotlin file called Config and add the following:
object Config {
    const val AUTHORIZE_ENDPOINT = "<authorize endpoint>"
    const val TOKEN_ENDPOINT = "<token endpoint>"
    const val CLIENT_ID = "<your client ID>"
    const val REDIRECT_URI = "oauth://android-pkce.example.com"
    const val GRANT_TYPE = "authorization_code"
}
Add your client ID and endpoints for your client application in your Cloudentity tenant workspace.
Tip: You can find your
/authorizeand/tokenendpoints in your Cloudentity authorizer server underAuth Settings > OAuththen locate theOIDC Discovery/Well-Known. Go to the well-known endpoint and you will see the endpoints.
Note: You can use the redirect URI from the snippet to stay consistent with the tutorial or you can change this if desired. If changed, ensure that Cloudentity authorization server uses the same redirect URI.
The constants are now defined and authParams requires a code challenge. Create a new kotlin file called PKCEUtil and add the following:
object PKCEUtil {
    private var verifier = ""

    fun getCodeVerifier(): String {
        return verifier
    }

    fun getCodeChallenge(): String {
        verifier = generateCodeVerifier()
        return generateCodeChallenge(verifier)
    }

    @Throws(UnsupportedEncodingException::class)
    private fun generateCodeVerifier(): String {
        val secureRandom = SecureRandom()
        val codeVerifier = ByteArray(32)
        secureRandom.nextBytes(codeVerifier)
        return Base64.getUrlEncoder().withoutPadding().encodeToString(codeVerifier)
    }

    @Throws(UnsupportedEncodingException::class, NoSuchAlgorithmException::class)
    private fun generateCodeChallenge(codeVerifier: String): String {
        val bytes = codeVerifier.toByteArray(charset("US-ASCII"))
        val messageDigest: MessageDigest = MessageDigest.getInstance("SHA-256")
        messageDigest.update(bytes, 0, bytes.size)
        val digest: ByteArray = messageDigest.digest()
        return Base64.getUrlEncoder().withoutPadding().encodeToString(digest)
    }
}
When using PKCE we need to generate a code verifier and a code challenge which is what the PKCEUtil object is enables us to do. When calling the /authorize endpoint we provide the code challenge that is generated from the code verifier. Later we will use the code verifier when calling the /token endpoint.
The last error we have is the CustomTabsIntent. We need to add implementation 'androidx.browser:browser:1.4.0' to build.gradle. Additionally, we will be using Gson and okhttp3 libraries. So lets add them all at once. In your dependencies add the following:
implementation 'androidx.core:core-ktx:1.8.0'
implementation 'androidx.appcompat:appcompat:1.4.2'
implementation 'androidx.constraintlayout:constraintlayout:2.1.4'
implementation 'androidx.browser:browser:1.4.0'
implementation 'com.squareup.okhttp3:okhttp:4.9.3'
implementation 'com.squareup.retrofit2:converter-gson:2.9.0'
Once you have added the dependencies and gradle sync is finished running you should now be able to import the dependencies in LoginActivity and there should be no more errors.
The onCreate method is now complete. Once the user taps Login they will be redirected to Cloudentity authorization server where they will be authenticated and can accept or reject the requested consents. Once the user accepts the consents they will be redirected back to the Android app. The android app must set the redirect in the manifest so that Android knows which application to notify of the callback. Addtionally, while we are in the manifest we need to enable the INTERNET permission.
First, in the manifest set the permission for internet usage as shown:
<uses-permission android:name="android.permission.INTERNET" />
Then add the intent-filter so the app can be notified of the callback:
<intent-filter>
    <action android:name="android.intent.action.VIEW" />

    <category android:name="android.intent.category.DEFAULT" />
    <category android:name="android.intent.category.BROWSABLE" />

    <data
        android:scheme="oauth"
        android:host="android-pkce.example.com" />
</intent-filter>
Note: We have used a redirect scheme directly. It is better to use the App Links Assistant in AndroidStudio. Since we are using PKCE we are protected from a rogue app getting the authorization code but the App Links Assistant goes a step further and uses private keys. For the simplicity and space of the tutorial we have not done this but encourage you to explore this further.
<activity
     android:name=".LoginActivity"
     android:exported="true"
     android:launchMode="singleTop">
The manifest should now look like as follows:
<?xml version="1.0" encoding="utf-8"?>
<manifest xmlns:android="http://schemas.android.com/apk/res/android"
    package="com.example.authorize">

    <uses-permission android:name="android.permission.INTERNET" />

    <application
        android:allowBackup="true"
        android:icon="@mipmap/ic_launcher"
        android:label="@string/app_name"
        android:roundIcon="@mipmap/ic_launcher_round"
        android:supportsRtl="true"
        android:theme="@style/Theme.Authorize">
        <activity
            android:name=".TokenActivity"
            android:exported="false" />
        <activity
            android:name=".LoginActivity"
            android:exported="true"
            android:launchMode="singleTop">
            <intent-filter>
                <action android:name="android.intent.action.MAIN" />
                <category android:name="android.intent.category.LAUNCHER" />
            </intent-filter>
            <intent-filter>
                <action android:name="android.intent.action.VIEW" />

                <category android:name="android.intent.category.DEFAULT" />
                <category android:name="android.intent.category.BROWSABLE" />

                <data
                    android:scheme="oauth"
                    android:host="android-pkce.example.com" />
            </intent-filter>
        </activity>
    </application>

</manifest>
Note: The package name might be different depending on how you named the application.
The Android app can now be notified of the callback. This will happen through an Intent. In LoginActivity add the following to handle the intent:
override fun onNewIntent(intent: Intent?) {
        super.onNewIntent(intent)
        if (intent != null) {
            val callbackURI = Uri.parse(intent.toString())
            handleCallback(callbackURI)
        }
}

private fun handleCallback(uri: Uri) {
        val code = uri.getQueryParameter("code")
        if (code?.isEmpty() == false) {
            getToken(code)
        }
}
Once the application receives the callback via onNewIntent, we get the callback URI and then call handleCallback where we verify that the query parameter code is present and if it is present we then call getToken which will be added next. We should check for an error at this point but to keep the tutorial simple we will ignore it.
Now that we have obtained an authorization code we can call the /token endpoint as shown:
Note: This will cause errors due to missing code. We will fix these shortly.
    private fun getToken(code: String) {
        val client = OkHttpClient()
        /* Previously we sent the code challenge. Now we send the code verifier used
           to generate the code challenge.
        */

        // Get the form body passing in the code verifier.
        val formBody: RequestBody = FormBody.Builder()
            .add("client_id", CLIENT_ID)
            .add("redirect_uri", REDIRECT_URI)
            .add("grant_type", GRANT_TYPE)
            .add("code_verifier", PKCEUtil.getCodeVerifier()) // Send the code verifier
            .add("code", code)
            .build()

        // Build the request ensuring the content type is set to `application/x-www-form-urlencoded`
        // and the form body
        val request = Request.Builder()
            .url(TOKEN_ENDPOINT)
            .post(formBody)
            .addHeader("Content-Type", "application/x-www-form-urlencoded")
            .build()

        // Perform the token request on a background thread.
        Thread {
            val response = client.newCall(request).execute()
            if (response.body != null) {
                val gson = Gson()
                // Marshal the response from the token endpoint.
                val tokenResponse = gson.fromJson(response.body?.string(), TokenResponse::class.java)
                // Split the ID Token to get attempt to get the payload.
                val segments = tokenResponse.idToken?.split(".")?.toTypedArray()

                // Create an intent for starting the `TokenActivity`.
                val intent = Intent(this, TokenActivity::class.java)
                // Verify the ID Token has the correct number of segments.
                if (segments.size == 3) {
                    // Extract the payload from ID Token segments and include in the intent.
                    val idToken = JWTUtil.getJsonFromSegment(segments[1])
                    intent.putExtra(getString(R.string.payload), idToken)
                } else {
                    // Invalid number of segments so ignore the token as it is invalid.
                    intent.putExtra(getString(R.string.payload), "Invalid Payload")
                }

                startActivity(intent)
            }

        }.start()
    }
First, we create the request body. We need to use the code verifier which was used to generate the code challenge. We then perform the token request from a background thread so we don’t tie up the UI. We are expecting a token response so we need to create a data class that Gson can marshal the JSON from the response into. So lets do that now.
Create a new Kotlin file called TokenResponse and add the following code:
data class TokenResponse(
    @SerializedName("access_token")
    val accessToken: String,
    @SerializedName("expires_in")
    val expiresIn: Long,
    @SerializedName("id_token")
    val idToken: String,
    @SerializedName("refresh_token")
    val refreshToken: String,
    @SerializedName("scope")
    val scope: String,
    @SerializedName("token_type")
    val tokenType: String
)
Once we receive a token, or an error, we want to display it. If we receive an Access Token and an ID Token we want to parse the payload of the ID token and display it.
Add a new Kotlin file called JWTUtil and add the following to the file:
object JWTUtil {
    // Gets the JSON from a token segment.
    fun getJsonFromSegment(segment: String): String {
        val json = JsonParser().parse(decodeJWTPart(segment))
        val gson = GsonBuilder().setPrettyPrinting().create()
        return gson.toJson(json)
    }

    // Decodes the JWT segment to JSON object then return as string
    private fun decodeJWTPart(segment: String) : String {
        val cleanedBase64 = segment.replace("-", "+").replace("_", "/")
        val decodedBytes: ByteArray = Base64.getDecoder().decode(cleanedBase64)
        return String(decodedBytes)
    }
}
In LoginActivity there should be only one remaining error. The R.string.payload resource isn’t defined. In AndroidStudio hover over R.string.payload and choose Create string value resource from the popup. Give the resource any value you prefer and select OK. This string resource is used in TokenActivity, which will be created next, to access the intent payload which LoginActiivty sends to TokenActivity after performing the token request.
LoginActivity should no longer show errors. Next lets create the TokenActivity for displaying the result of the token request.
TokenActivity
Create a new Activity called TokenActivity and add the following:
Note: This will generate errors until we add the Activity layout next.
class TokenActivity : AppCompatActivity() {
    override fun onCreate(savedInstanceState: Bundle?) {
        super.onCreate(savedInstanceState)
        setContentView(R.layout.activity_token)

        // Get reference to the text view for displaying result.
        val idTokenTextView = findViewById<TextView>(R.id.idToken)
        if (savedInstanceState == null) {
            // The payload is passed via intent. Verify it isn't empty and display it.
            val extra = intent.extras?.get(getString(R.string.payload)) as String
            if (extra.isEmpty()) {
                idTokenTextView.text = “Failed to obtain token”
                return
            }

            idTokenTextView.text = JSONObject(extra).toString(2).toString()
        } else {
            idTokenTextView.text = savedInstanceState.getSerializable(getString(R.string.payload)).toString()
        }
    }

    override fun onCreateOptionsMenu(menu: Menu?): Boolean {
        val inflater = menuInflater
        inflater.inflate(R.menu.menu_logout, menu)
        return true
    }

    override fun onOptionsItemSelected(item: MenuItem): Boolean {
        if (item.itemId == R.id.logout) {
            this.finish()
            return true
        }
        return super.onOptionsItemSelected(item)
    }
}
TokenActivity is a simple Activity that just takes the intent payload it receives and shows the resulting payload. If the token request was successful then the payload will be the ID token payload segment. If the token request failed then it will show an error. We also want to log out of the app so we add a logout menu button.
We need to add the logout menu button and the TextView to the activity layout. In res > layout, replace the contents of activity_token.xml with the following:
<?xml version="1.0" encoding="utf-8"?>
<androidx.constraintlayout.widget.ConstraintLayout xmlns:android="http://schemas.android.com/apk/res/android"
    xmlns:app="http://schemas.android.com/apk/res-auto"
    xmlns:tools="http://schemas.android.com/tools"
    android:layout_width="match_parent"
    android:layout_height="match_parent"
    tools:context=".TokenActivity">

    <TextView
        android:id="@+id/idToken"
        android:layout_width="wrap_content"
        android:layout_height="wrap_content"
        android:layout_marginStart="30dp"
        android:layout_marginTop="10dp"
        android:layout_marginBottom="10dp"
        app:layout_constraintBottom_toBottomOf="parent"
        app:layout_constraintEnd_toEndOf="parent"
        app:layout_constraintStart_toStartOf="parent"
        app:layout_constraintTop_toTopOf="parent" />

</androidx.constraintlayout.widget.ConstraintLayout>
Here we added a TextView with the ID referenced in TokenActivity. Addtionally, we added some styling to center the content.
To handle the menu logout button we need to create a new menu resource. In AndroidStudio right-click res directory and select New > Android Resource File. Name it menu_logout.xml and set the resource type to Menu. Add the following to the new menu layout:
<?xml version="1.0" encoding="utf-8"?>
<menu xmlns:android="http://schemas.android.com/apk/res/android"
    xmlns:app="http://schemas.android.com/apk/res-auto">
    <item
        android:id="@+id/logout"
        android:title="@string/logout"
        android:orderInCategory="100"
        app:showAsAction="always" />
</menu>
Running the application
-
Run the application by choosing
Runfrom the AndroidStudio menu and verify there are no errors. You should see the sign-in screen as shown.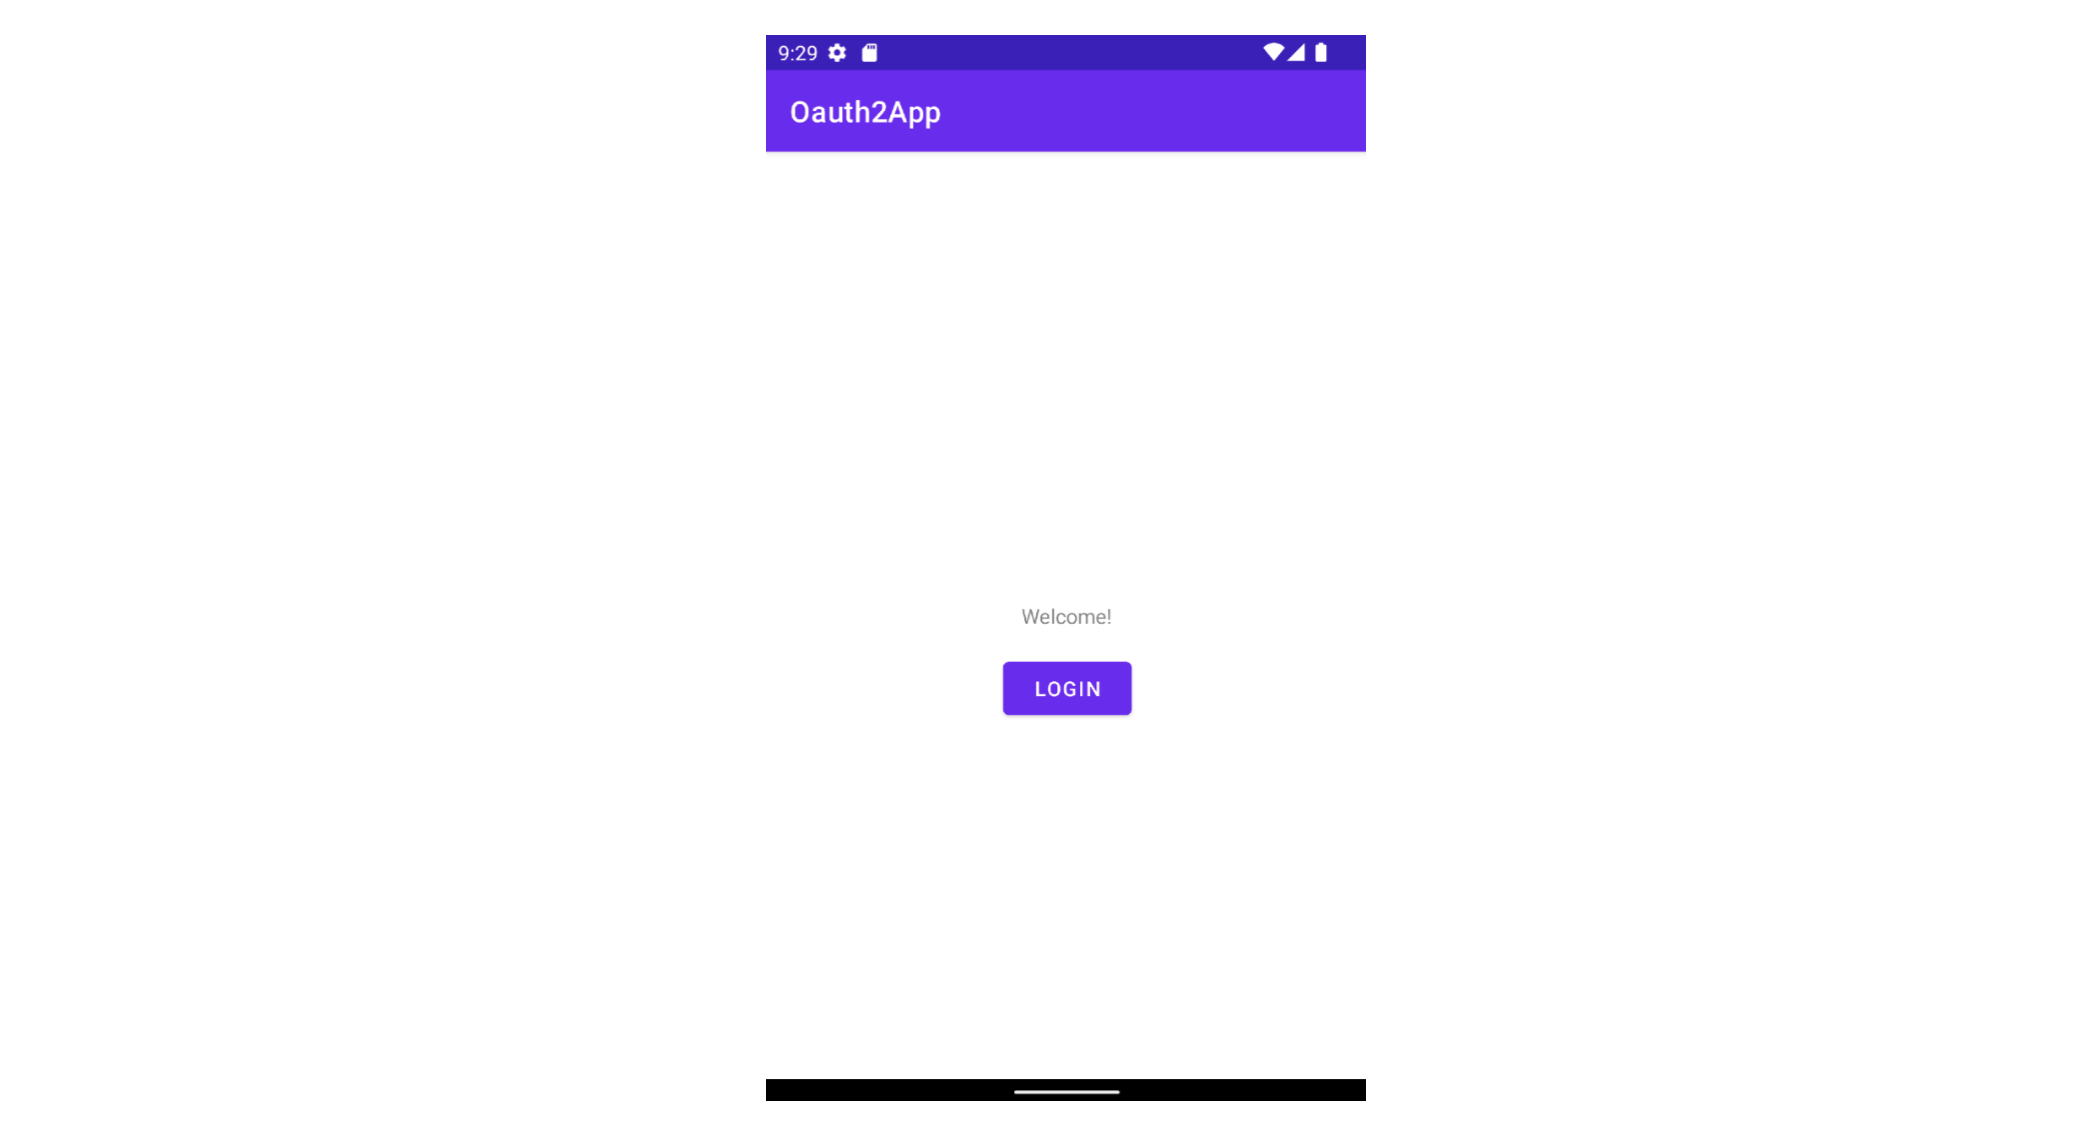
-
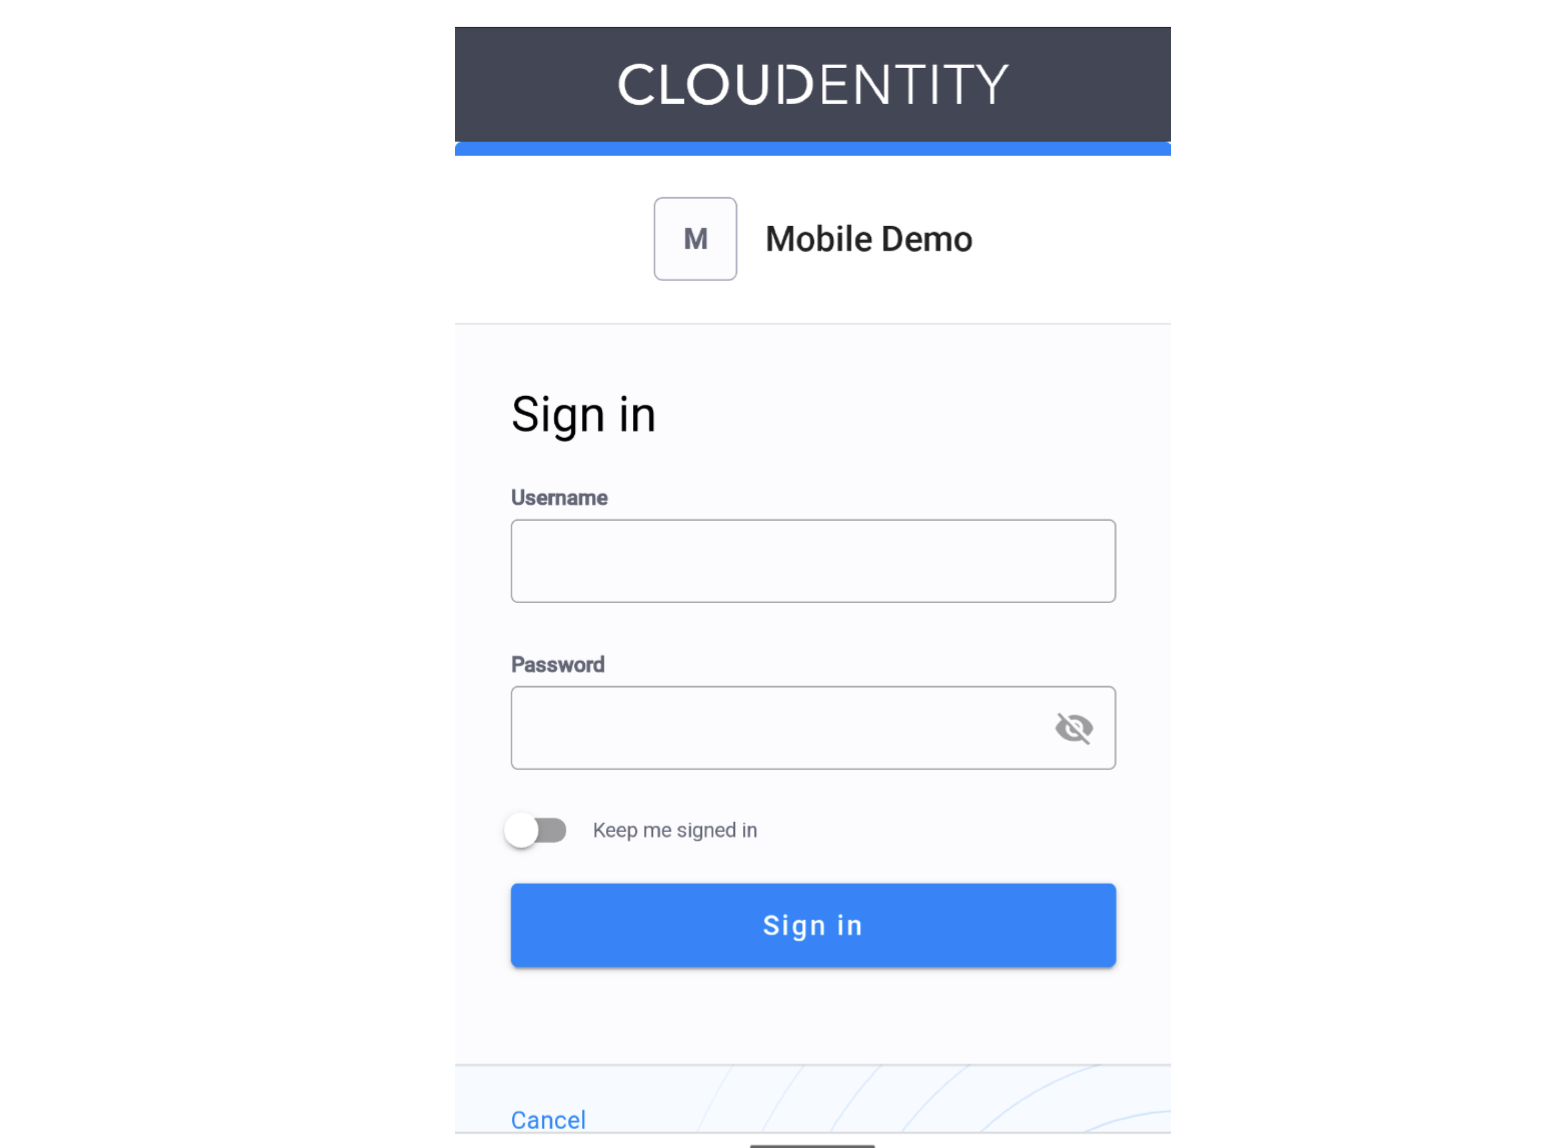
Log in to the application by tapping Login.
You should see no errors and be presented with the Cloudentity OAuth sign-in modal.
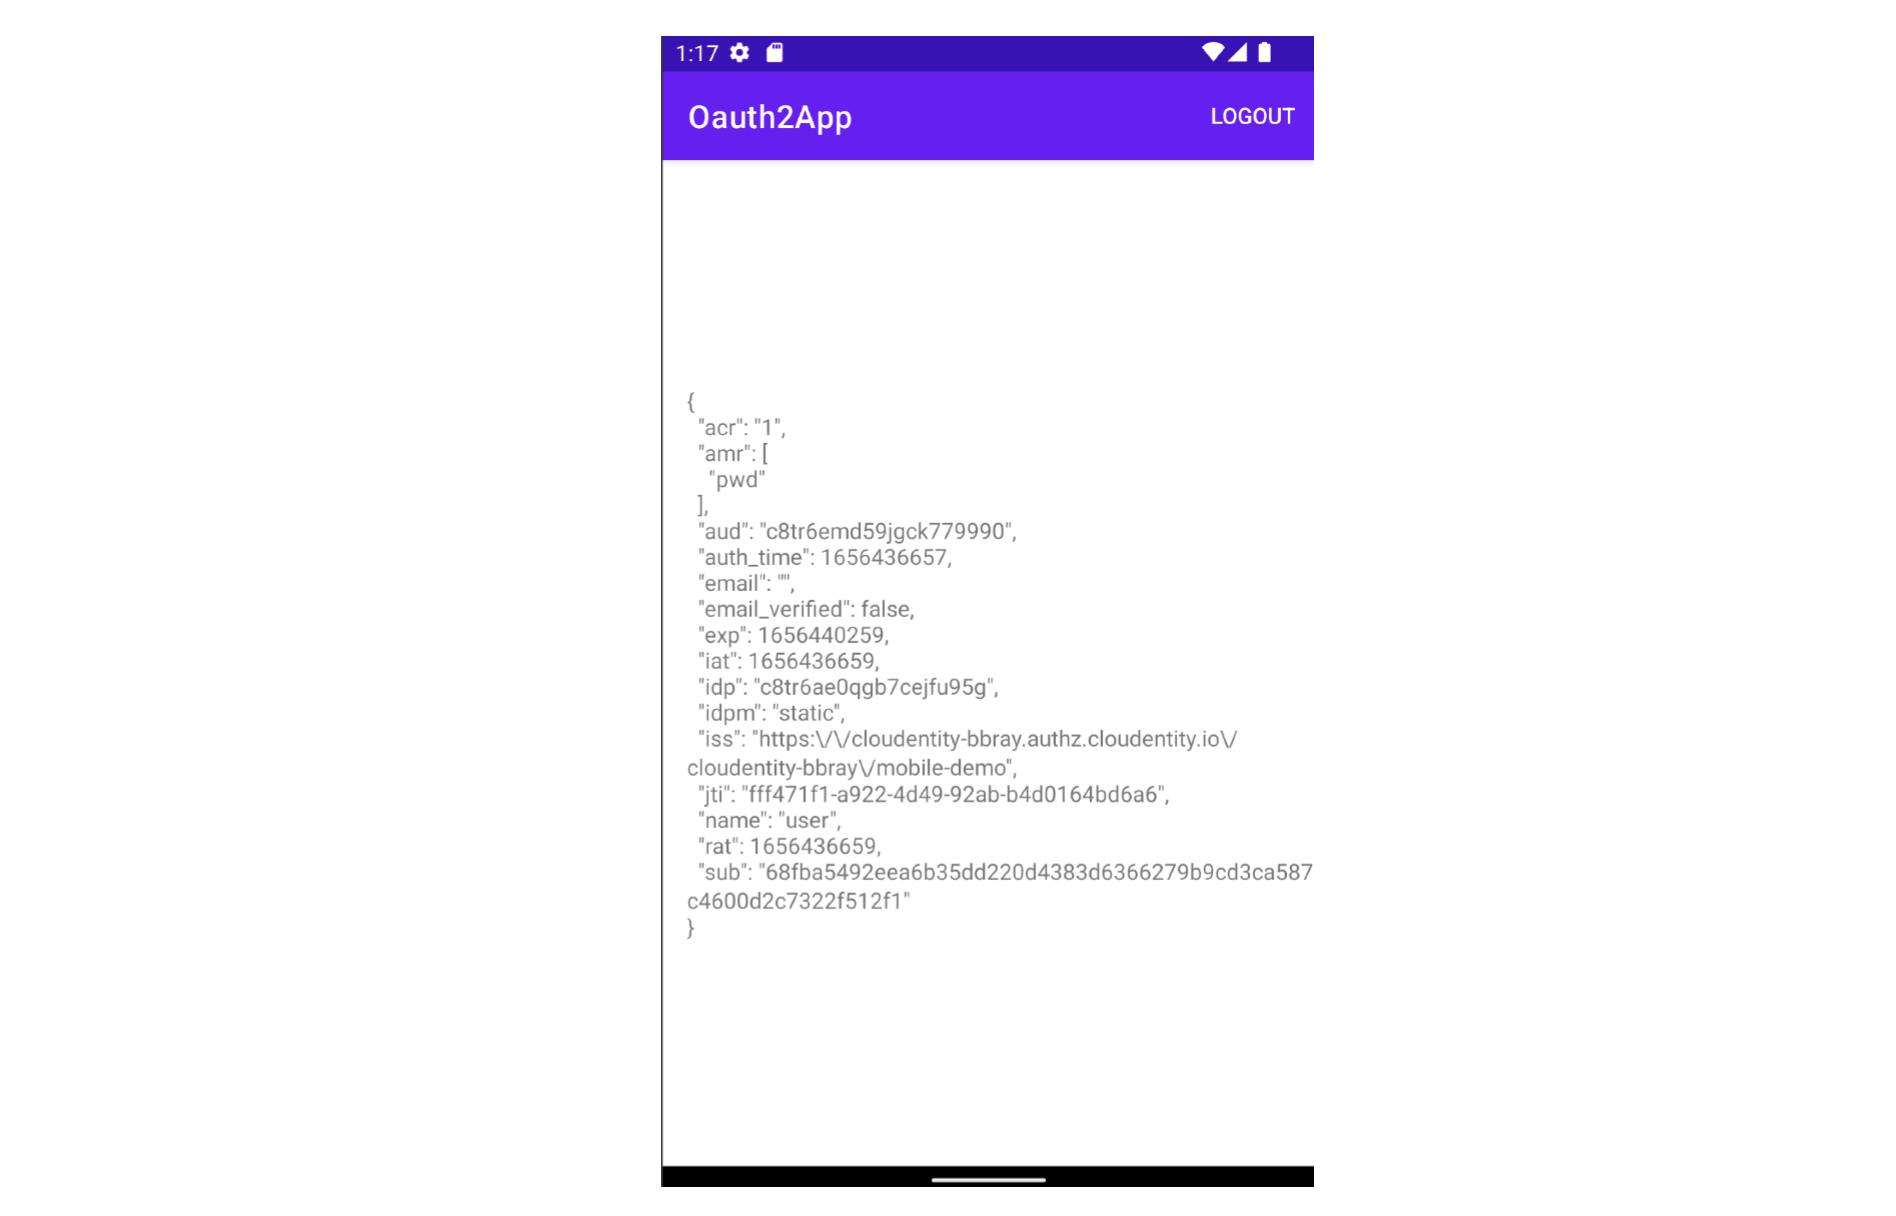
After signing in and granting consent you will be redirected to the application and the ID token payload segment should be visible. If you see an error review the configuration settings and try agan.
Breaking PKCE Exercise
Using PKCE we provided a code challenge and code challenge method to the /authorize endpoint. In PKCEUtil try changing the code_challenge to a random string. Alternatively, leave the code challenge as it is and change PKCEHelper.getCodeVerifier() to a random string. Verify that you cannot obtain the access token. This is the benefit of using PKCE. If a rogue application obtains your authorization code and does not have the code verifier used to generate the code challenge, then the authorization server will reject the request. Without using PKCE anyone in possession of the authorization code could use it to obtain the access token.
Summary
In this tutorial we created an Android application which obtains an access token and an ID token using Cloudentity platform. PKCE was used with the authorization code flow ensuring that only this application can obtain an access token using the authorization code returned from the authorization server. If another application used the same custom URL scheme and obtained the authorization code it would not be able to obtain an access token because it would not have the correct code verifier. Cloudentity platform conforms to the current OAuth 2.0 standards and facilitates creating secure mobile applications, protects user data, and enables developers to build applications quickly and easily with security in mind.