Overview
In this tutorial , we will be creating a Node.js application for displaying custom consents. After authenticating, the user will be redirected to a custom consent page where the user will be presented with the scopes that the OAuth client is requesting. The end user will have an option to customize the requested consents or reject them altogether. We will be using Cloudentity platform and its authorization service as an authorization server.
After a user is authenticated with the configured identity source by the OAuth server, the user is redirected to consent page where the user can accept or reject consents. The Cloudentity platform allows the client to set up a custom consent page. The Cloudentity platform allows you to create a custom consent application and integrate into the OAuth flow. A custom consent page may be required if the customizations capability provided by Cloudentity isn’t enough or there are other UX interactions or data points that need to be displayed in the consent page. In such scenarios custom consent application integration model can be utilized. One of the main usecase for a custom consent page is for Open Banking scenarios which need interaction with external APIs as well.
An overview of the flow can be seen below.
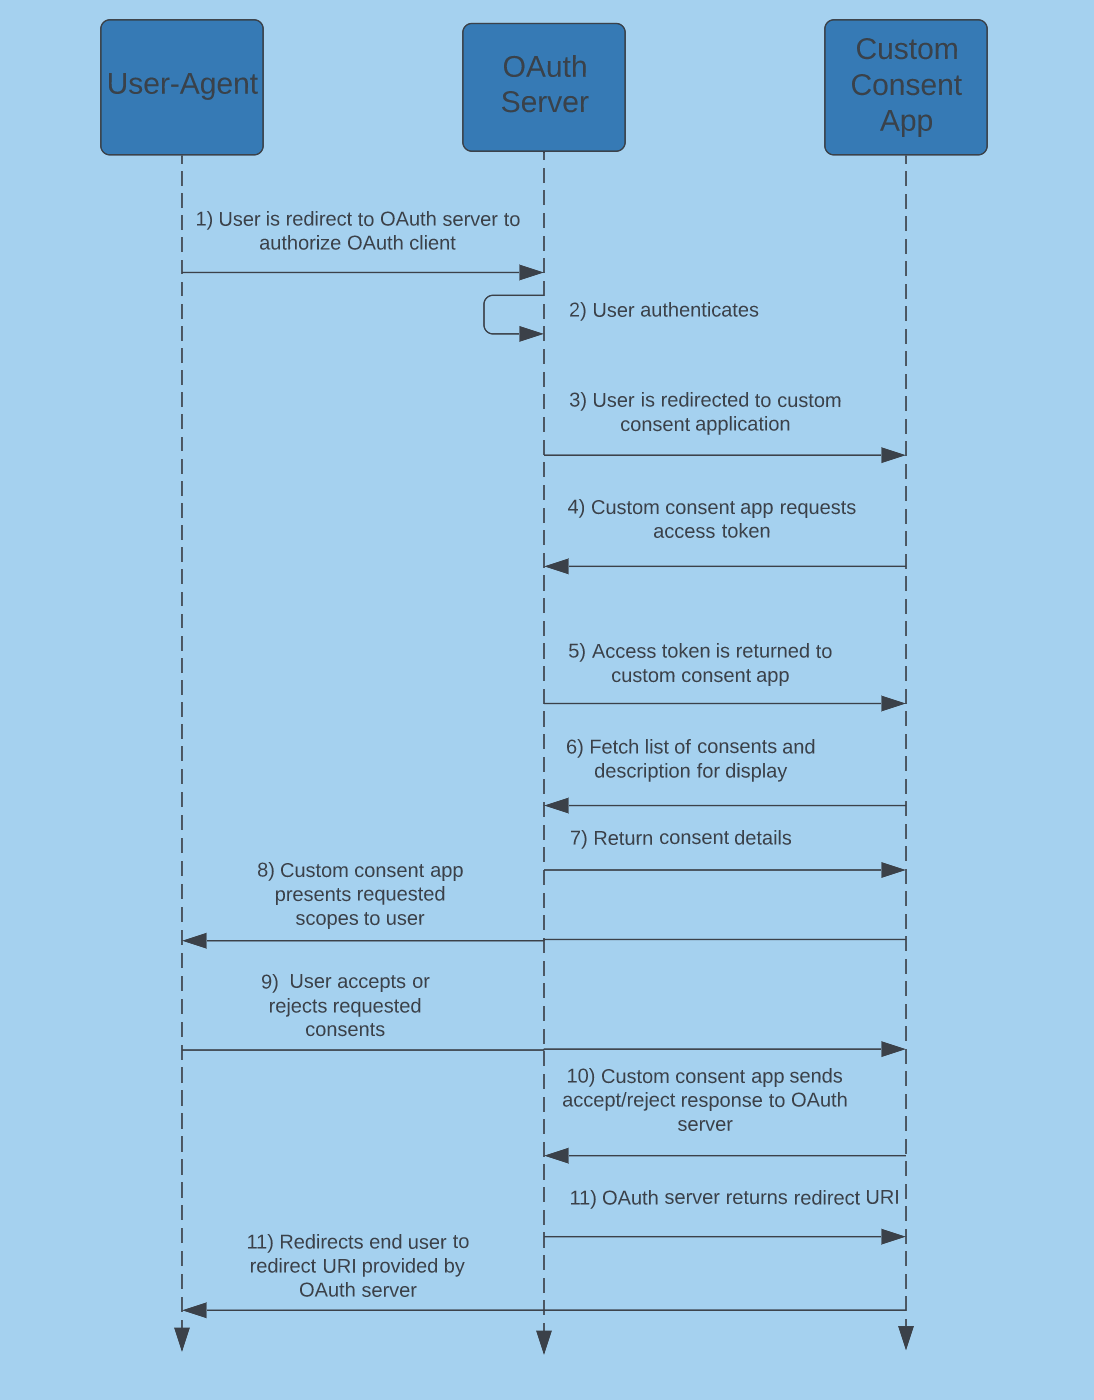
First, the user-agent is redirected to Cloudentity authorization server, where the user logs in and is authenticated. Once the user is authenticated, the Cloudentity authorization server redirects the user to the application hosting the custom consent page. The application calls the Cloudentity scope grant request API to retrieve details on the account access consents. The application displays the consents to the user and the user can accept all, reject all, or accept only some of the consents. Once a selection is made the application redirects the user back to the Cloudentity authorization server.
Prerequisites
- Cloudentity tenant
- Node.js - Recommended v16.x +
- ExpressJS - Recommended 4.16.1 +
Configure Cloudentity to Use Custom Consent Application
-
Add a new workspace for your tenant.
For the purpose of this article, create a Demo Environment and Enable Demo Application. Additionally, while creating the workspace or later, set up Sandbox IDP.
-
Within your workspace, navigate to OAuth » Authorization Server » Consent.
-
Select Open Banking Consent.
-
In the Consent URL field, add your callback URL.
In our app we add a callback of
http://localhost:4001/consent. The callback URL is the endpoint to which Cloudentity will redirect the user-agent after authenticating the user to show the requested consent list and get the users consent (or rejection) for the requested scopes.
Result
Cloudentity workspace is now configured to redirect the user to the custom consent page served by our Node.js application for OAuth flow(s) that requires user consent.
Build Node.js Application
The Node.js application we will build consists primarily of two JavaScript files and some templates
for rendering the HTML. app.js is just boilerplate for setting up our Express.js application and
specifying that we are using Handlebars.js for our view engine. There should be nothing unfamiliar
here but if you need a refresher check out the ExpressJS documentation.
Define Basic Route & Environment Variables
Inside the routes folder lets look at the index.js file. It contains our handlers and the
code for obtaining the consent request, getting an authorization token, and accepting or
denying the consent request.
First, we get our environment variables. The System workspace needs to obtain an access token so that it can fetch the scopes and related metadata. To do that, we will need the following:
-
TENANT_ID- the tenant ID which can be seen in Cloudentity platform under Platform. -
AUTHORIZATION_SERVER_URL- the issuer URL which can be found in the.well-knownendpoint. In the next section we will add these environment variables to our.envfile. -
CLIENT_ID- this is the client ID of your system workspace client application. -
CLIENT_SECRET- the client secret for your client application in the system workspace.
const tenant_id = process.env.TENANT_ID;
const issuer_url = process.env.AUTHORIZATION_SERVER_URL;
const client_id = process.env.CLIENT_ID;
const client_secret = process.env.CLIENT_SECRET;
Client Authentication
The Demo Application, by default, is set up for using the Client Secret Basic client authentication method. This is not required. You may change this to an alternative token endpoint authentication method. Please, update your Node.js application according to your change.
We will use the CLIENT_ID and CLIENT_SECRET to create the “Bearer” token credentials to access
Cloudentity APIs.
const auth_token = Buffer.from(`${client_id}:${client_secret}`, 'utf-8').toString('base64');
Token Purpose
When obtaining an access token using the Client Secret Basic method, this is not the access token that the OAuth client uses for accessing the users protected resources. Instead, this is for the custom consent application to use for obtaining an access token that is used for getting the available consents for displaying to the user.
Next, add a route for checking that our application is running and responding to requests.
router.get('/', function (req, res, next) {
  res.render('health');
});
Add the Consent Page Route
Let’s add a route to handle requests directed to the consent application at /consent since we
defined the consent app at http://localhost:4000/consent. This is the consent application URI
that Cloudentity platform redirect users to after they authenticate,
in a case when the consent flow is required. The process for handling the custom consent page
callback is found at Integrating the custom consent page.
Cloudentity provides login ID and login state parameters during the redirect to
consent application. If they are missing, an error is displayed and returned. Using the login ID
retrieved from the query parameter, we can retrieve more details about the requested scope using
the getScopeGrants function that we create below.
router.get('/consent', (req, res) => {
  const login_id = req.query.login_id;
  const state = req.query.login_state;
  if (state == null || login_id == null) {
    res.render('error', { msg: 'missing state and/or login id' });
    return;
  }

  appState.id = login_id
  appState.state = state

  getScopeGrants(res);
});
getScopeGrants fetches an access token from Cloudentity to call the APIs to get the
consent details. The scope grant request is then performed.
const getScopeGrants = async (res) => {
  // An access token is required for making a scope grant request.
  appState.access_token = await getAccessToken(res);
  if (appState.access_token == null) {
    return;
  }

  // Once we have an access token we make an API call for a scope grant request.
  getScopeGrantRequest(res);
}
We make a request to the token endpoint for our access token using the Token Endpoint API.
const getAccessToken = async (res) => {
  let CLOUDENTITY_TOKEN_FETCH_API = getTokenURL();

  try {
    const data = qs.stringify({ grant_type: 'client_credentials', scope: 'manage_scope_grants', state: appState.access_token });

    const options = {
      method: 'POST',
      url: CLOUDENTITY_TOKEN_FETCH_API,
      rejectUnauthorized: false,
      headers: {
        'Content-Type': 'application/x-www-form-urlencoded',
        Authorization: 'Basic ' + auth_token
      },
      data: data
    };

    const response = await axiosInstance(options);
    return response.data.access_token;
  } catch (error) {
    console.log(error);
    res.render('error', { msg: 'error getting access token: ' + error });
  }
}

function getTokenURL() {
  return origin + '/' + tenant_id + '/system/oauth2/token';
}
Once we obtain an access token we make the scope grant request using the Consent Request API.
const getScopeGrantRequest = async (res) => {
  let CLOUDENTITY_SCOPE_GRANT_FETCH_API = getScopeGrantURL();

  const options = {
    url: CLOUDENTITY_SCOPE_GRANT_FETCH_API,
    method: "GET",
    headers: {
      'Content-Type': 'application/x-www-form-urlencoded',
      'Authorization': 'Bearer ' + appState.access_token,
    }
  }

  try {
    const response = await axiosInstance(options);
    appState.redirectURI = response.data.request_query_params.redirect_uri[0];
    res.render('consent', { scopes: response.data.requested_scopes });
  } catch (error) {
    console.log(error);
    res.render('error', { msg: 'error getting scope grants: ' + error });
  }
}

function getScopeGrantURL() {
  return origin + '/api/system/' + tenant_id + '/scope-grants/' + appState.id + '?login_state=' + appState.state;
}
The response from the scope grant request includes the requested scopes. We then display the
requested scopes to the user. The HTML templates are stored in the views folder.
In the case of the application repository the template for showing the user that requested
scopes is located in views/consent.hbs. The user can then choose which, if any, scopes they
will allow or they can reject the request altogether. For each scope we display the
display_name of the scope and the description.
<!doctype html>
<html lang="en">

<head>
  <meta charset="utf-8">
  <meta name="viewport" content="width=device-width, initial-scale=1">

  <link href="https://cdn.jsdelivr.net/npm/bootstrap@5.1.3/dist/css/bootstrap.min.css" rel="stylesheet"
    integrity="sha384-1BmE4kWBq78iYhFldvKuhfTAU6auU8tT94WrHftjDbrCEXSU1oBoqyl2QvZ6jIW3" crossorigin="anonymous">

  <title>Custom Consent</title>
</head>

<body style="background-color: #f8f5f3;">
  <div class="d-flex flex-column min-vh-100 justify-content-center align-items-center mx-auto" style="width: 600px;">
    <div class="card">
      <div class="card-body">
        <h5 class="card-title">Scopes</h5>
        <form id="scopeForm" action="/accept" method="post">
          {{#each scopes}}
          <div class="form-check">
            <input type="checkbox" class="form-check-input" id="{{this.name}}" name="{{this.name}}" checked>
            <label class="form-check-label" for="{{this.name}}">{{this.display_name}} -
              {{this.description}}</label>
          </div>
          {{/each}}
          <div class="row">
            <div class="col">
              <button type="button" class="text-center btn btn-primary mt-3 float-end"
                onclick="accept()">Accept</button>
            </div>
            <div class="col">
              <button type="button" class="text-center btn btn-danger mt-3"
                onclick="reject()">Reject</button>
            </div>
          </div>
        </form>
      </div>
    </div>
  </div>

  <script>
    function accept() {
      document.getElementById('scopeForm').submit();
    }

    function reject() {
      window.location = '/reject';
    }
  </script>

  <script src="https://cdn.jsdelivr.net/npm/bootstrap@5.1.3/dist/js/bootstrap.bundle.min.js"
    integrity="sha384-ka7Sk0Gln4gmtz2MlQnikT1wXgYsOg+OMhuP+IlRH9sENBO0LRn5q+8nbTov4+1p"
    crossorigin="anonymous"></script>
</body>

</html>
If the user rejects the request, we need to notify the Cloudentity authorization platform using the Reject Login Request API.
router.get('/reject', function (req, res, next) {
  const data = JSON.stringify({ id: appState.id, login_state: appState.state });
  submitConsentAndRedirect(res, 'reject', data);
});
If the user accepts some or all of the scopes, we collect the scopes the user has accepted and notify the Cloudentity platform using the Accept Login Request API.
router.post('/accept', function (req, res, next) {
  let scopes = [];
  for (const val in req.body) {
    scopes.push(val);
  }
  const data = JSON.stringify({ granted_scopes: scopes, id: appState.id, login_state: appState.state });
  submitConsentAndRedirect(res, 'accept', data);
});
Finally, we notify the Cloudentity platform of the acceptance or rejection of the
requested scopes. The response from the Cloudentity platform includes a body with a
redirect_to field. We then redirect the user to the provided redirect URI which sends the user
agent back to the Cloudentity platform.
const submitConsentAndRedirect = async (res, consent, data) => {
  let CLOUDENTITY_CONSENT_API = getConsentURL(consent);

  const options = {
    url: CLOUDENTITY_CONSENT_API,
    method: "POST",
    headers: {
      'Content-Type': 'application/x-www-form-urlencoded',
      'Authorization': 'Bearer ' + appState.access_token,
    },
    data: data
  }

  try {
    let acceptRes = await axiosInstance(options)
    res.redirect(acceptRes.data.redirect_to);
  } catch (error) {
    console.log(error);
    res.render('error', { msg: 'failed to submit consent acceptance: ' + error });
  }
}

function getConsentURL(consent) {
  return origin + '/api/system/' + tenant_id + '/scope-grants/' + appState.id + '/' + consent;
}
Set Environment Variables in Node.js Application
When we enabled a custom consent page in our Cloudentity platform client, an application was created for us in the System workspace. This application should have grant type client credentials and Client Secret Basic as the Token Endpoint Authentication Method (if your system workspace has different settings then change them to the previous values).
Additionally, under the Scopes tab of your client application settings,
ensure that the manage_consents and manage_scope_grants scopes are selected.
From the OAuth tab of the system workspace application, copy the CLIENT ID and
CLIENT SECRET. Also, make note of your Tenant ID in the top right.
Then, in your client application in the new workspace that we created, on the left navigation menu
choose OAuth » Authorization Server and from the General tab copy the
Authorization Server URL (this is your issuer URL and can also be found in the .well-known
endpoint). Add these values to the environment variables in the .env file.
Running the Node.js Application
To run the application, enter the following command from the root of the project in the terminal
after you have added the required environment variables to .env.
npm start
Tip
After running the application, verify that there are no errors and check that the application is running by visiting
http://localhost:4001/. You should see that the application is running.Visiting
http://localhost:4001/directly will show an error since the application is expecting values to the passed in during the callback from Cloudentity. You should see a page with a card title showing Running.
Now, go back to the Cloudentity platform and select View all workspaces. Then, select the three dots in the upper right corner of the card for the client application that we created. Select Demo Application. This initiates the OAuth flow.
Sign in using the username and password that you chose when the workspace was created (when you added the Sandbox IDP). Once you sign in, you should be redirected to the custom consent screen. Once you accept the consent you should be redirected back to Cloudentity platform and your access and ID tokens should be visible.
Summary
This wraps up our tutorial for the Node.js application that provides a custom consent page to end users after the user has authenticated with the Identity Source. After going through the tutorial you have accomplished the following:
- Build a simple Node.js application to provide a custom consent page.
- Prepare Cloudentity for redirecting a user to a custom consent page.