Overview
Spring Boot makes it easy to create stand-alone, production-grade Spring based Applications that you can just run. In this tutorial, we will create and configure a Spring Boot based API application that uses Spring Security configuration to enforce API endpoint protection by accepting OAuth Bearer tokens only from a trusted OAuth/OIDC authorization server. This application expects the API callers to present a Bearer Token as defined in RFC6750 to access API resources. Any party in possession of a bearer token (a “bearer”) can use it to get access to the associated resources.
Cloudentity authorization platform have mulitple levels of governance policy checks to ensure OAuth access tokens are issued after only all policies are satisfied for the user and application access. Cloudentity authorization server level multitenancy inherently allows you to model multiple authorization servers. In this tutorial, we will create single authorization server within a Cloudentity tenant and the OAuth authorization server (workspace) can issue OAuth access tokens with associated scopes.
Any API access within this application using the Bearer token issued by Cloudentity is protected by verifying that Cloudentity is the actual issuer of the presented Bearer OAuth access token using Spring Security configurations.

Some of the main configurations showcased within this sample application are:
- Validate and accept only access tTokens issued by Cloudentity as the trusted OAuth Authorization Server
- Deny protected API resource access when accessed with:
- No access token
- Invalid access token
- Access token from a different OAuth authorization server other than the ones in trusted list
issclaim does not match trusted authorization server issuer URL- Insufficient/missing scopes in the access tokens
- Programatic scope check for API resources
Tip - Insight
Another approach to ensure proper authorization is to offload the authorization check to an upstream component like API Gateway and ensure the service cannot be accessed from any other component other the API Gateway trust domain. This integration model is similar to a sidecar implemenation in service meshes. This way the entire token validation can be offloaded. Cloudentity also provides an additional authorizer component that can be plug into modern API gateway ecosystems to validate, audit, and enforce access policy for API resource access by offloading that individual responsibility from the services themselves.
Reference repo

Check out the below github repo for complete source code of the reference application in this tutorial
Spring Boot Integration Samples
Prerequisites
- Cloudentity SaaS tenant
- Development
- JDK 1.8+
- Maven/Gradle
- IDE of your choice
Configurations
In OAuth terminology, this SpringBoot service plays the role of the Resource Server with its own API endpoints and for consumption of these services, the resource server need to define scopes that logically determine access to various APIs.
Let’s go ahead and register this service as a Resource Server application within Cloudentity OAuth authorization server that depicts an OAuth resource server. During service registration, you will see that you had to define the scopes and attach it to the service. Notice that you can attach OAuth scope governance policies to each scope that you define.
Scope Governance Policies and Their Benefits
One of the main highlights of Cloudentity authorization server are the scope governance policies. You can protect individual scopes with their own policies that can applied at either a client registration level or actual request flow to evaluate if the requesting user/application can actually get the scope back in access tokens.
Create & Configure Spring Boot Application
Create Application
In this tutorial, we will not go into the details of a Spring Boot application. You can use the above cloned repo to follow along with this tutorial or use this guide to create a vanilla Spring Boot application from ground up and, then, continue with below configurations.
It’s very important that proper Spring component dependencies are configured.
Spring OAuth Capabilities
Spring has recently moved most of the Spring Oauth capabilities into Spring Security. In case you are following some of the old tutorials in the internet you might run into outdated libs or references that still uses the old style of integration.
Choose your style for dependency management with either Maven/Gradle
- Using Maven
<parent>
    <groupId>org.springframework.boot</groupId>
    <artifactId>spring-boot-starter-parent</artifactId>
    <version>2.6.7</version>
  </parent>

  <properties>
    <java.version>1.8</java.version>
    <spring.security.version>5.6.3</spring.security.version>
    <spring.boot.autoconfigure.version>2.6.7</spring.boot.autoconfigure.version>
  </properties>

  <dependencies>
    <dependency>
      <groupId>org.springframework.boot</groupId>
      <artifactId>spring-boot-starter-web</artifactId>
      <version>${spring.boot.autoconfigure.version}</version>
    </dependency>

    <!-- Spring security dependencies -->
    <dependency>
      <groupId>org.springframework.security</groupId>
      <artifactId>spring-security-oauth2-resource-server</artifactId>
      <version>${spring.security.version}</version>
    </dependency>
    <dependency>
      <groupId>org.springframework.security</groupId>
      <artifactId>spring-security-core</artifactId>
      <version>${spring.security.version}</version>
    </dependency>
    <dependency>
      <groupId>org.springframework.security</groupId>
      <artifactId>spring-security-web</artifactId>
      <version>${spring.security.version}</version>
    </dependency>
    <dependency>
      <groupId>org.springframework.security</groupId>
      <artifactId>spring-security-config</artifactId>
      <version>${spring.security.version}</version>
    </dependency>
    <dependency>
      <groupId>org.springframework.security</groupId>
      <artifactId>spring-security-oauth2-jose</artifactId>
      <version>${spring.security.version}</version>
    </dependency>

  </dependencies>
- Using Gradle
dependencies {
    implementation 'org.springframework.boot:spring-boot-starter-web:2.6.7'
    implementation 'org.springframework.security:spring-security-oauth2-resource-server:5.6.3'
    implementation 'org.springframework.security:spring-security-core:5.6.3'
    implementation 'org.springframework.security:spring-security-web:5.6.3'
    implementation 'org.springframework.security:spring-security-config:5.6.3'
    implementation 'org.springframework.security:spring-security-oauth2-jose:5.6.3'
}
Configure application.yaml
application.yaml is one of the files that can be used to configure a Spring Boot
application. Let’s configure the application.yaml to define the trusted AAuth
authorization provider, in this case the Cloudentity authorization server.
In the below configuration, you can see that we are configuring the Spring Boot application to trust
a single issuer identified with issuer-uri.
spring:
  security:
    oauth2:
      resourceserver:
        jwt:
          issuer-uri: https://{tid}.authz.cloudentity.io/{tid}/{aid}

logging:
  level:
    root: DEBUG
The {tid} variable stands for your tenant identifier. The {aid} variable stands
for the identifiers of your authorization server (workspace).
Tip
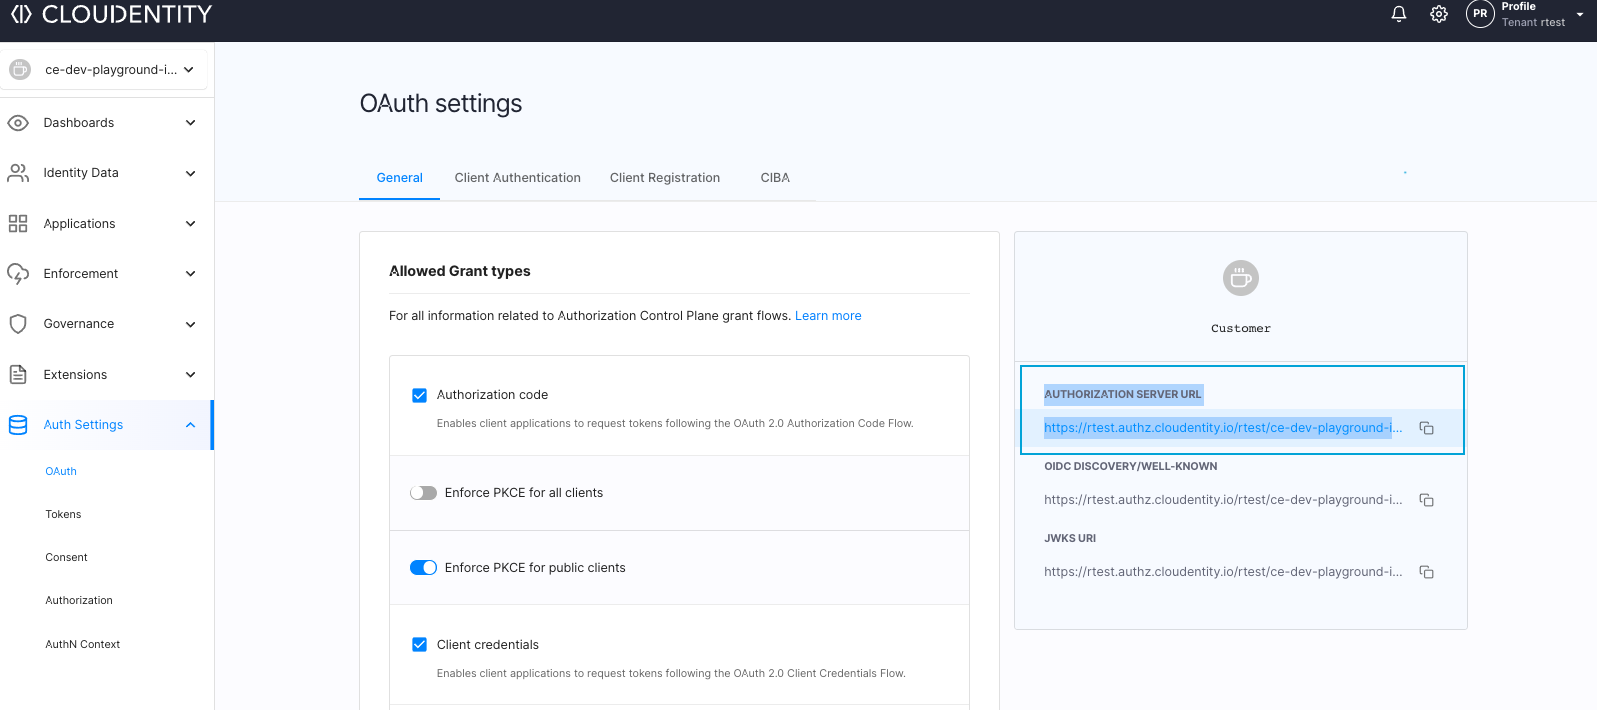
You can find the issuer uri within the Auth Settings » OAuth section in the Cloudentity platform under AUTHORIZATION SERVER URL label
iss within the presented access token is first matched to see if it matches one of the URL
defined within issuer-uri in the above configuration. If it does not match, Spring Security
rejects that access token. If it matches, then
it uses the iss to construct the .well_known endpoint of the OAuth provider to fetch the JWKS
URI. The JWKS URI is used to get the key used to verify the access token signature
of the trusted authorization server. Thus the integrity of the access token presented to
resource server is verified.
Sample Bearer access token
{
    "scp": [
        "address",
        "email",
        "introspect_tokens",
        "openid",
        "phone",
        "profile",
        "revoke_tokens"
    ],
    "st": "public",
    "sub": "c6rnpqgh5kra1jev5o0g",
    "amr": [],
    "iss": "https://rtest.authz.cloudentity.io/rtest/ce-dev-playground-integrations",
    "tid": "rtest",
    "aud": [
        "c6rnpqgh5kra1jev5o0g",
        "spiffe://rtest.authz.cloudentity.io/rtest/ce-dev-playground-integrations/c6f9qqurvhrgrkeifa2g",
        "spiffe://rtest.authz.cloudentity.io/rtest/ce-dev-playground-integrations/c6f9qqurvhrgrkeifa7g"
    ],
    "nbf": "2022-04-28T04:24:18Z",
    "idp": "",
    "exp": "2022-04-28T05:24:18Z",
    "aid": "ce-dev-playground-integrations",
    "iat": "2022-04-28T04:24:18Z",
    "jti": "60a329f2-d59c-47ed-be11-28e2e1f736f7"
}
Configure API Resource Access Protection
Now that we have configured the trusted OAuth provider within the Spring configuration,
let’s configure Spring web security to enforce API access traffic based on API paths.
In the below code snippet, we are going to enforce
protection for all paths except the resources on /actuator/** and OPTIONS Http method on any
path. This means any access to rest of the resources served by this application needs to have a
valid OAuth Bearer access token issued by Cloudentity authorization server.
import org.springframework.beans.factory.annotation.Value;
import org.springframework.http.HttpMethod;
import org.springframework.security.config.annotation.method.configuration.EnableGlobalMethodSecurity;
import org.springframework.security.config.annotation.web.builders.HttpSecurity;
import org.springframework.security.config.annotation.web.configuration.WebSecurityConfigurerAdapter;
import org.springframework.stereotype.Component;

@Component
@EnableGlobalMethodSecurity(securedEnabled = true, prePostEnabled = true)
public class ResourceServerAuthorizationConfig extends WebSecurityConfigurerAdapter {

  public void configure(HttpSecurity http) throws Exception {
    http.csrf().disable()
        .authorizeRequests()
        .antMatchers(HttpMethod.OPTIONS, "/**").permitAll()
        .antMatchers("/actuator/**").permitAll()
        .anyRequest().authenticated()
        .and()
        .oauth2ResourceServer()
        .jwt();
  }
}
Configure scope check
Let’s configure the scope check required for resource access. Scope check can be enforced
using the Preauthorize annotation with hasAuthority method and the scope of the resource.
Sample usage of the annotation is @PreAuthorize("hasAuthority('SCOPE_openid')") which indicates
that the openid scope is required in the Bearer token presented to access the specific API
resource on which this annotation is applied.
import java.util.HashMap;
import java.util.Map;
import org.springframework.security.access.prepost.PreAuthorize;
import org.springframework.security.core.Authentication;
import org.springframework.security.core.context.SecurityContextHolder;
import org.springframework.security.oauth2.jwt.Jwt;
import org.springframework.web.bind.annotation.*;

@RestController
@RequestMapping("api")
public class SampleController {

  @GetMapping("/jwt/info")
  public Map<String, Object> jwtInfoSample(){
    Authentication auth = SecurityContextHolder.getContext().getAuthentication();
    Jwt j = (Jwt)auth.getCredentials();
    j.getClaims();
    return j.getClaims();
  }

  @PreAuthorize("hasAuthority('SCOPE_openid')")
  @RequestMapping("/sample/protected/openidscope")
  public Map<String, String> sampleScopeProtected() {
    Map<String, String> m = new HashMap<>();
    m.put("hasScope", "true");
    return m;
  }

  @PreAuthorize("hasAuthority('SCOPE_nonexistent')")
  @RequestMapping("/sample/protected/nonexistentscope")
  public Map<String, String> sampleNonExistentScope() {
    Map<String, String> m = new HashMap<>();
    m.put("hasScope", "true");
    return m;
  }

}
What Gets Verified
Using minimal Spring Boot configuration, indicating the authorization server’s issuer uri, this application configuration defaults to verifying the following claims:
issexpnbf
Spring Security allows to further customize the validation checks for more attributes and for such scenarios, there are couple of advanced configuration options as described in this article
Build and Test
Now that we have configured the Spring Boot application with all required configurations to trust a given OAuth authorization server and to check for presence of authorized scopes within the presented Bearer access token, let’s proceed to build and test the application.
Build Application
For convenience, there is a Makefile in the GitHub repo and below steps assume that you have cloned the repository already to test these out.
- Build using Maven and Run
make build-run-maven
- Build using Gradle and Run
make build-run-gradle
Register OAuth Client application in Cloudentity
To test this application, we need to register an OAuth client within Cloudentity authorization server that has subscribed to scopes defined by the Resource server. Register an OAuth client application within the Cloudentity platform, so that we can fetch an access token from Cloudentity authorization server using the registed OAuth client.
Tip
Make sure you are subscribing to scopes required by this application during the application registration.
Request Access Token Using OAuth Client Application from Cloudentity
For the sake of simplicity, we will use the above registered client and OAuth client_credentials grant flow to get the access token.
The method of obtaining access token is irrelevant to this example and is used to demostrate only
a specific test scenario.
curl --request POST \
  --url 'https://YOUR_CLOUDENTITY_ISSUER_URI/oauth/token' \
  --header 'content-type: application/x-www-form-urlencoded' \
  --data grant_type=client_credentials \
  --data client_id=YOUR_CLIENT_ID \
  --data client_secret=YOUR_CLIENT_SECRET
Test API Endpoints Exposed by Spring Boot Application
- Test endpoint wihout access token
curl -v -X GET http://localhost:8080/api/jwt/info
Response:
HTTP/1.1 401
- Test endpoint with access Token from a non-trusted OAuth provider
curl -X GET \
  http://localhost:8080/api/jwt/info \
  -H 'Authorization: Bearer <PUT_YOUR_NON_TRUSTED_PROVIDER_ACCESS_TOKEN>'
Response:
HTTP/1.1 401
- Valid access token and get JWT information
Provide access token from the trusted provider.
curl -X GET \
  http://localhost:8080/api/jwt/info \
  -H 'Authorization: Bearer <PUT_YOUR_ACCESS_TOKEN>'
Response:
{
    "scp": [
        "address",
        "email",
        "introspect_tokens",
        "openid",
        "phone",
        "profile",
        "revoke_tokens"
    ],
    "st": "public",
    "sub": "c6rnpqgh5kra1jev5o0g",
    "amr": [],
    "iss": "https://rtest.authz.cloudentity.io/rtest/ce-dev-playground-integrations",
    "tid": "rtest",
    "aud": [
        "c6rnpqgh5kra1jev5o0g",
        "spiffe://rtest.authz.cloudentity.io/rtest/ce-dev-playground-integrations/c6f9qqurvhrgrkeifa2g",
        "spiffe://rtest.authz.cloudentity.io/rtest/ce-dev-playground-integrations/c6f9qqurvhrgrkeifa7g"
    ],
    "nbf": "2022-04-28T04:24:18Z",
    "idp": "",
    "exp": "2022-04-28T05:24:18Z",
    "aid": "ce-dev-playground-integrations",
    "iat": "2022-04-28T04:24:18Z",
    "jti": "60a329f2-d59c-47ed-be11-28e2e1f736f7"
}
- Valid access token with an existing scope
Provide access token from the trusted provider.
curl -X GET \
  http://localhost:8080/api/sample/protected/openidscope \
  -H 'Authorization: Bearer <PUT_YOUR_ACCESS_TOKEN>'
Response:
{
    "hasScope": "true"
}
- Valid accessToken with non existing scope
Provide accessToken from the trusted provider.
curl -v -X GET \
  http://localhost:8080/api/sample/protected/nonexistentscope \
  -H 'Authorization: Bearer <PUT_YOUR_ACCESS_TOKEN>'
Response:
HTTP/1.1 403
Summary
We have seen how Cloudentity can easily protect your Spring Boot API application. In addition to being an OAuth/OIDC provider, Cloudentity brings in advanced external identity provider integrations and scope governance checks to ensure your application can serve users any any source and authorize them with varying conditions using policies before access token is issued to access the target service.