Quickstart
Cloudentity offers an FDX reference application that you can use when creating your applications for a better understanding of how the flow works and how you can integrate with the Cloudentity platform. This reference quickstart project has a separate consent application that interacts with both Cloudentity and financial institution APIs to display the data and scopes that are going to be shared by the end consumer.
To have full control over your custom consent page and to be able to tailor it to match your needs you can implement your own consent page. It can be, later on, integrated and enabled within Cloudentity. What technology you use to implement custom consent pages is totally up to you, but to be FDX compliant, your custom consent application has to fulfill certain requirements.
FDX Consent Applications
Consumer consent is one of the pillars of Financial Data Exchange (FDX) that adopts the Five Core Principles of Data Sharing:
-
Control - consumers should be able to permission their data for services and applications.
-
Access - consumers should have access to their data and the ability to determine who has access to their data.
-
Transparency - consumers should be able to learn how, when, and for what purpose their data is used. Only the absolutely required data should be shared with the consuming service or application.
-
Traceability - All data transfers should be traceable. Consumers should be able to learn about all entities within the user-permissioned financial data ecosystem and that are involved in the data sharing flow.
-
Security - Financial data parties should follow industry best cybersecurity practices accross the whole organization for safety and privacy of consumers data.
Register for free
to get access to a Cloudentity tenant and experience the FDX journey with us!
Cloudentity was the first authorization platform to comply with FDX rules and, now, you can use a
dedicated workspace profile compliant with FDX requirements out of the box!
Integrate Custom Consent Application
For FDX, the integration pattern is similar to other Open Banking specifications such as UK Open Banking or Open Banking Brasil.
There are few differences that lay mostly in the APIs that Cloudentity provides for given specification. The general integration pattern requires financial institutions to build a service that displays the consent page to the end user and communicates with Cloudentity and bank under the hood to get/accept/reject consent and fetch accounts information.
The diagram below depicts the flow of Data Recipient getting access to user’s accounts.
In the diagram above steps 1-2 and 11-13 are added to showcase the entire flow from the fintech app perspective, but the actual steps related to the consent page integration are marked as 3-10 steps.
-
The flow starts by the Fintech app requesting a consent.
Fintech app calls Cloudentity Pushed Authorization Request (PAR) API and providing Rich Authorization Request object describing the consent, for example:
{ "authorization_details":[ { "type":"fdx_v1.0", "consentRequest":{ "durationType":"ONE_TIME", "lookbackPeriod":60, "resources":[ { "resourceType":"ACCOUNT", "dataClusters":[ "ACCOUNT_DETAILED", "TRANSACTIONS", "STATEMENTS" ] }, { "resourceType":"CUSTOMER", "dataClusters":[ "CUSTOMER_CONTACT" ] } ] } } ] }PAR and RAR
To learn more, see the following:
-
Rich Authorization Requests (RAR) specification
-
The user authenticates with their identity source.
-
Cloudentity redirects user to the consent page.
-
The consent page communicates with Cloudentity by calling FDX specific endpoints.
The consent page needs to get information about the requested consent. This is done using Get FDX Consent API.
-
The Cloudentity platform responds with the information about authenticated user, client, and requested consent, for example:
Objectstatus:"AwaitingAuthorisation"subject:"e91de26b66647927955f1ebb5482a2b557b222dd88b708a0dc836c77a13c3f8d" -
The custom consent page needs to get user accounts.
This interface is deployment specific and there is no standard built around it. It may happen that you will embed consent page functionality into your already existing bank application or you may want to write a separate service from scratch. In our mock application the consent page is making an HTTP call to the bank’s internal endpoint to fetch the list of customer accounts.
-
Data Provider returns the list of customer accounts.
-
At this point all the necessary data to display consent page is in place and it should be rendered. The consent page should follow UX Guidelines. In the current version, in the first step the consent page should display a list of permissions (scopes) that the Data Recipient is requesting and then the list of the accounts that the user wants to share.
-
Depending on the user’s choice, the consent page must notify Cloudentity if the user accepted or rejected the request using Cloudentity APIs:
-
If the user accepts the consent, the consent page should provide a list of resources that the user accepted with some unique identifiers. Although in the current version of FDX specification
scopesare not used, Cloudentity requires consent applications to provide a list of granted scopes. This list can be built based on therequested_scopesfrom Get FDX Consent API.
-
-
Regardless of the user’s choice, the Cloudentity platform returns a
redirect_toURL that the consent page should use to continue the flow. -
Finally, after the notification Cloudentity redirects the user to Fintech app callback with an authorization code which is then exchanged for access, ID, and, optionally, refresh token.
Consent Application Configuration
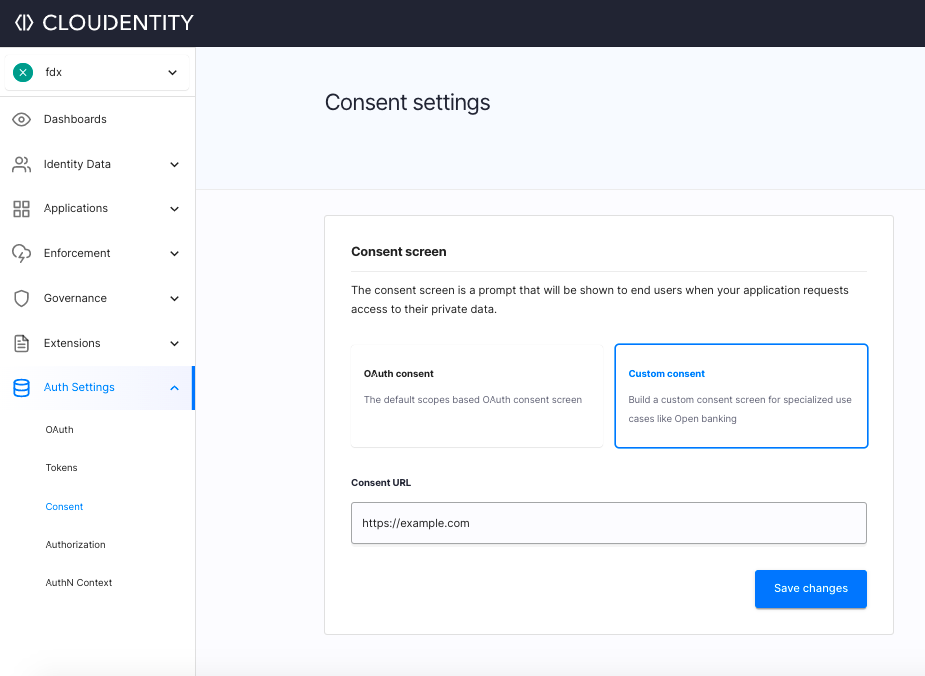
The consent page URL can be configured in workspace settings like any different client application:

The consent page must authorize to Cloudentity APIs using the OAuth client credentials flow.