Prerequisites
- Access to a Cloudentity tenant
Add Identity Pools in Tenant
-
Go to Tenant settings > Identity Pools.

-
Select Create New.
-
Configure identity pool basic settings
Field Description Name Name for this identity pool for the users to see Description Optional description to help identify this pool Tag color This color helps identify the identitiy pool in the admin portal Sign In / Sign Up Configure allowed sign in methods (verification code, password or passkey - with the webauthnfeature flag enabled) and set the preference for end users. Enable or disable user self-registration.Schema Settings Assign your custom user and metadata schema if needed. -
Select Create. Your pool is created but it doesn’t have any users yet.
-
Select your newly created pool to configure its settings and add users.
-
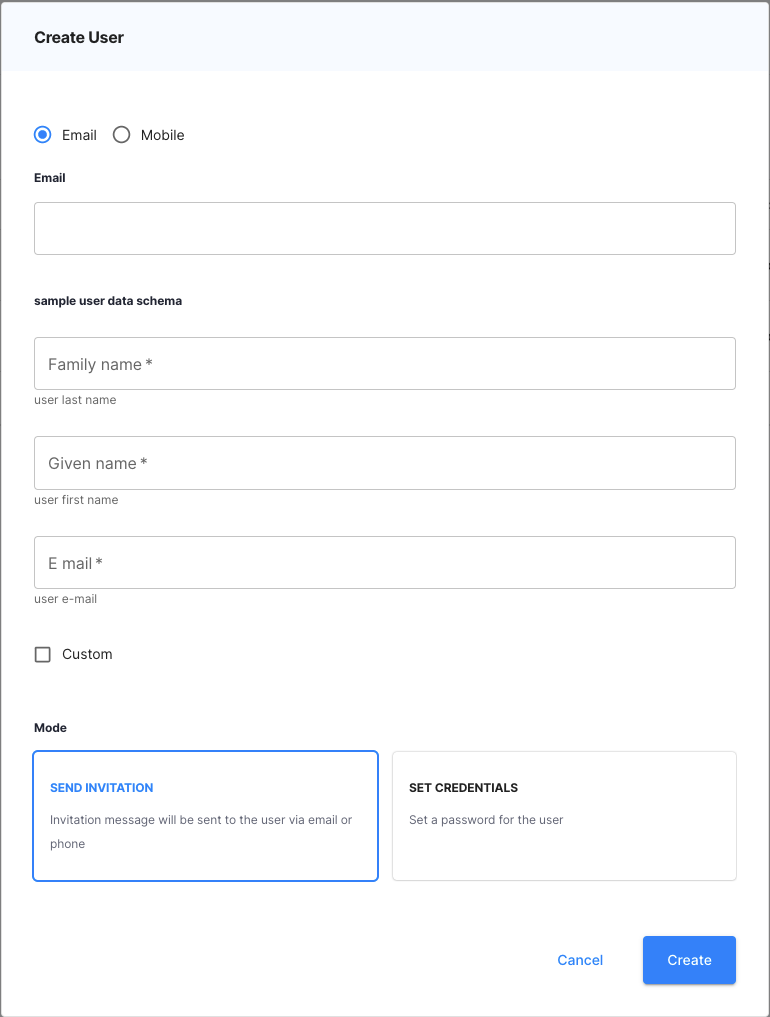
On the Users tab, you can add users as an administrator. Select Add User and fill in the form.
Field Description Email/Mobile User identifier used to log in User data User data as required by the schema assigned. Default schema requires user’s First Name, Last Name, and Full Name. Mode Mode of setting user credentials. Send invitation will send a link to the user, requiring the user to complete the registration. Set credentials allows you to set the password for the user. -
Go to the Settings tab. Fill in the form.
Field Description Name Name for this identity pool for the users to see Description Optional description to help identify this pool Tag color This color helps identify the identitiy pool in the admin portal Sign In / Sign Up Configure allowed sign in methods (verification code, password or passkey - behind the webauthnfeature flag) and set the preference for end users. Enable or disable user self-registration.Schema Settings Assign your custom user and metadata schema if needed. Note that schemas are read-only in this page. To set up a schema, see Configure Identity Schemas. Password Policy Set up password requirements for users in accordance with your organization’s policy. Verification Code Settings Set up Time To Live and length for one-time passwords sent to users for various use-cases. -
Go to Schemas to change the schema settings. You can preview the selected schema in the right-hand menu.
Field Description User schema Schema for the user data which both users and administrators can input Metadata schema Schema for the user metadata (read-only for users, can be edited by administrators) -
Go to Metadata to set up metadata for this identity pool (note that this is different than user metadata in Schemas which applies to a user).
-
When ready, click Save. You can now proceed to connecting your Identity Pool as an Identity Provider in a workspace. For details, see Creating Identity Pool IDP.
Configure Identity Schemas
-
Go to Tenant settings > Identity Pools > Schemas.
-
Select Create Schema and save your schema under a unique name.
-
Open your schema and go to the Schema tab. This is where you define the schema as a JSON object. Initially, the default schema is shown. Take note of the top-level objects:
Object Description properties An array of objects where each object represents a property to be entered by the user description Schema description for identification purposes. This description is displayed as a header on the user registration form. type Schema data type - there should be no need to change this as the schema will always be an object. required List of mandatory properties for user registration Modify the schema by adding more properties. Add mandatory properties to the
requiredlist. For example, to add ane-mailandcustomproperties, you can make the following modifications:{ "properties":{ "family_name":{ "description":"user last name", "type":"string", "minLength":1 }, "given_name":{ "description":"user first name", "type":"string", "minLength":1 }, "name":{ "description":"user full name", "type":"string", "minLength":1 }, "e-mail":{ "description":"user e-mail", "type":"string", "minLength":1 }, "custom":{ "description":"Custom", "type":"boolean", "minLength":1 } }, "description":"sample user data schema", "type":"object", "required":[ "family_name", "given_name", "e-mail", "custom" ] }As a result, the required user payload (both on administrator and user side) looks as follows:
-
Save your schema to apply your changes.
Set up Sign In Methods
-
Go to Tenant settings > Identity Pools > YOUR_IDP > Settings
-
Expand Sign In/Sign Up menu and set up your preferences.
Field Description Authentication Method Set up the preferred authentication method for users of this pool. Use the hamburger menu to set preference to either password, OTP or passwordless authentication or to delete a given method. Self-registration Select to enable user self-registration Admin Initiated Registration Enabled by default. This field controls whether or not the admin can register new users. Can only be set using the Identity APIs. -
Save Changes.
Set up Schema Settings
-
Go to Tenant settings > Identity Pools > YOUR_IDP > Settings
-
Expand the Schema Settings menu and set up password preferences in accordance with your organization’s policy.
-
Save Changes.
Set up Password Policy
Password strength is critically important if the users will log in this way.
-
Go to Tenant settings > Identity Pools > YOUR_IDP > Settings
-
Expand the Password Policy menu and set up password preferences in accordance with your organization’s policy.
-
Save Changes.
Set up Verification Code Settings
-
Go to Tenant settings > Identity Pools > YOUR_IDP > Settings
-
Expand Verification Code Settings menu and set up your preferences.
-
Save Changes.